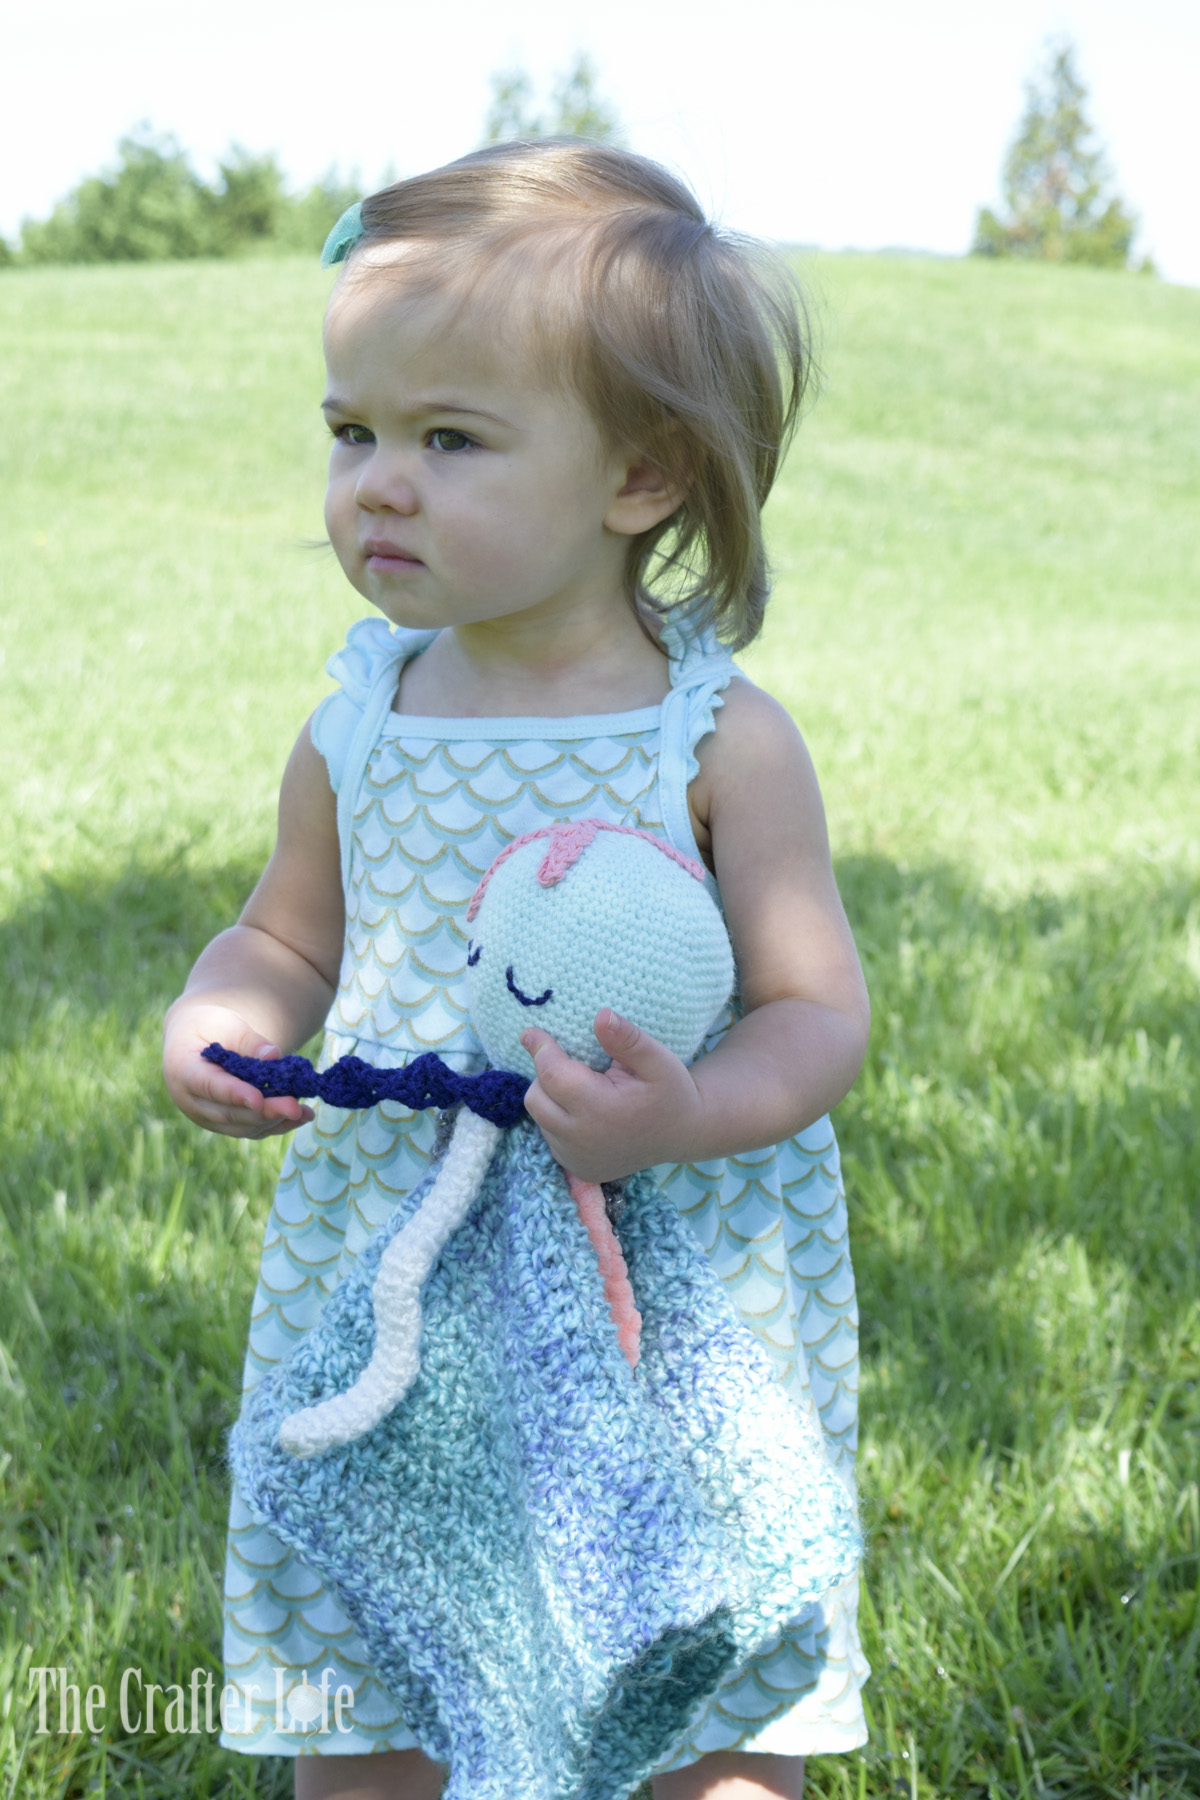
SLEEPY OCTO-PAL LOVEY BLANKET
Octo-Pal Lovey Blanket
I decided to make an octopus lovey as a baby shower present for a relative who is having an ocean-themed nursery. I wanted to make the legs different textures and colors to make it more engaging/stimulating for a baby so I used various types of yarns and patterns for the legs. I thought it would be cute to attach a starfish to the head of the octopus and make it appear as though he is asleep. I also decided to add a starfish in the corner of the blanket because I liked how the coral color contrasts with the blanket. My Sleepy Octo-Pal Lovey Blanket is a fun project to make for your favorite little one! See below for my pattern.

FINISHED MEASUREMENTS
The main blanket base is about 15 inches wide by 16 inches long. The octopus is about 4 inches tall, 14 inches across (from end of leg to end of opposite leg when fully extended), and about 12 inches around at the widest point of the head.
MATERIALS
– Size J/10/6.00 mm crochet hook or size needed to obtain gauge
– Size H/8/5.00 mm crochet hook or size needed to obtain gauge
– Bulky weight (5) yarn in Blue (I used Lion Brand Homespun in Waterfall.)
– Worsted weight (4) yarn in Aqua (I used Lion Brand Pound of Love in Pastel Green.)
– Worsted weight (4) yarn in Navy (I used Red Heart Super Saver in Soft Navy.)
– Worsted weight (4) yarn in Silver (I used Caron Simply Soft Party in Platinum.)
– Bulky weight (5) yarn in White (I used Lion Brand Homespun in Hepplewhite.)
– Jumbo weight (6) soft yarn in Coral (I used Loops & Threads Sweet Snuggles in Coral.)
– Worsted weight (4) cotton yarn in Coral (I used Lily Sugar’n Cream in Tea Rose.)
– Fiberfill (I used Loops & Threads Classic Fiber Fill)
– Stitch markers (for marking/counting stitches or rounds)
– Tapestry needle
– Scissors
– Measuring tape
Optional Items:
– Straight pins (if needed for place-holding/positioning eyes/starfish)
ABBREVIATIONS
– ch = chain
– chs = chains
– dc = double crochet
– hdc = half double crochet
– sc = single crochet
– sc2tog = single crochet 2 together (single crochet decrease)
– slst = slip stitch
– st = stitch
– sts = stitches
GAUGE
Blanket Base
3 dc = 1 inch; 2 rows = 1 inch
Head
6 sc = 1 inch; 6 rounds = 1 inch
PATTERN NOTES
- The blanket base is made first in rows of double crochet.
- The main body/head of the octopus is made next with continuous rounds of single crochet stitches. Do not join continuous rounds unless otherwise stated. Simply work the first stitch of each round in the first stitch of the previous round. Attach a stitch marker to mark rounds and move marker as you complete each round.
- Brackets [ ] indicate portions of the pattern to be repeated.
DIRECTIONS
Blanket Base
* Use your 6.00 mm hook and waterfall color bulky weight yarn to complete the blanket.
*The blanket is made in rows of double crochet. The turning ch-2 does not count as a stitch.
Row 1: Ch 50, dc in 3rd ch from hook and in each stitch across. (48 dc)
Rows 2-29: Ch 2, turn, dc in each st across. (48 dc)
*At the end of Row 29, fasten off and weave in loose ends.)
***The main base of the blanket is now complete. Follow the directions below to begin the head of the octopus.
Octopus Head/Body
*Use your 5.00 mm hook and aqua worsted weight yarn to make the main body of the octopus.
*The octopus head is worked in continuous rounds. Work first stitch of round in first stitch of previous round. Use a stitch marker if needed.
*Make sure to pull the magic ring closed and weave in/secure end at closure at the beginning. This is because it will be harder to do later once the octopus gets larger.
Round 1: With aqua yarn, make a magic ring, ch 1, work 6 sc in ring, pull ring closed. (6 sc)
Round 2: 2 sc in each st around. (12 sc)
Round 3: Repeat [sc in next st, 2 sc in next st] around. (18 sc)
Round 4: Repeat [sc in next 2 sts, 2 sc in next st] around. (24 sc)
Round 5: Repeat [sc in next 3 sts, 2 sc in next st] around. (30 sc)
Round 6: Repeat [sc in next 4 sts, 2 sc in next st] around. (36 sc)
Round 7: Sc in next 2 sts, 2 sc in next st, repeat [sc in next 5 sts, 2 sc in next st] 5 times, sc in next 3 sts. (42 sc)
Round 8: Repeat [sc in next 6 sts, 2 sc in next st] around. (48 sc)
Round 9: Repeat [sc in next 7 sts, 2 sc in next st] around. (54 sc)
Round 10: Sc in next 3 sts, 2 sc in next st, repeat [sc in next 8 sts, 2 sc in next st] 5 times, sc in next 5 sts. (60 sc)
Round 11: Repeat [sc in next 9 sts, 2 sc in next st] around. (66 sc)
Round 12: Repeat [sc in next 10 sts, 2 sc in next st] around. (72 sc)
Rounds 13-16: Sc in each st around. (72 sc)
Round 17: Repeat [sc in next 10 sts, sc2tog] around. (66 sts)
Rounds 18-19: Sc in each st around. (66 sc)
Round 20: Repeat [sc in next 9 sts, sc2tog] around. (60 sts)
Round 21: Sc in each st around. (60 sc)
Round 22: Sc in next 3 sts, sc2tog, repeat [sc in next 8 sts, sc2tog] 5 times, sc in next 5 sts. (54 sts)
Rounds 23-24: Sc in each st around. (54 sc)
Round 25: Repeat [sc in next 7 sts, sc2tog] around. (48 sts)
Round 26: Repeat [sc in next 6 sts, sc2tog] around. (42 sts)
Round 27: Sc in each st around. (42 sc)
Round 28: Sc in next 2 sts, sc2tog, repeat [sc in next 5 sts, sc2tog] 5 times, sc in next 3 sts. (36 sts)
Round 29: Repeat [sc in next 4 sts, sc2tog] around. (30 sts)
Round 30: Repeat [sc in next 3 sts, sc2tog] around. (24 sts)
*After completing last st of Round 30, slst in back loop only of first st of round and fasten off, weaving in loose ends.
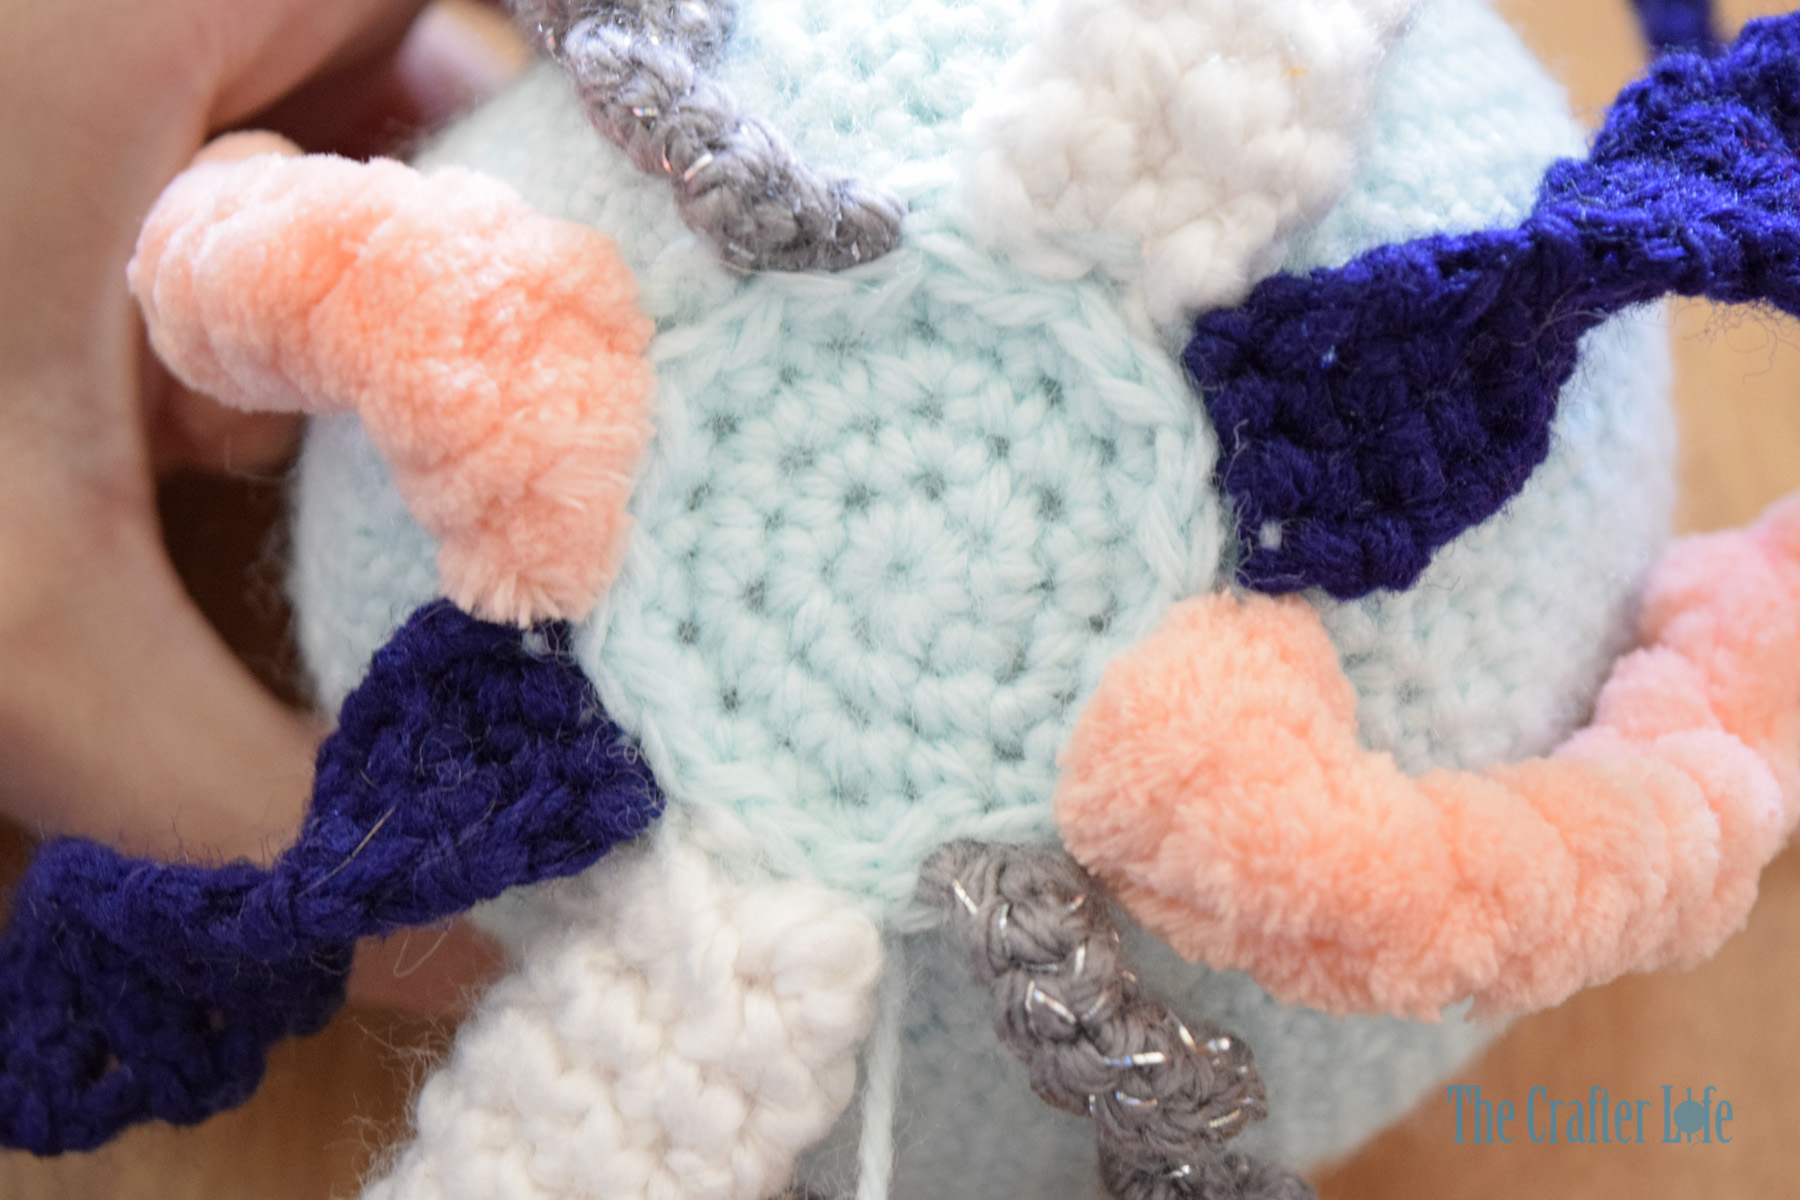
*The main head/body of the octopus is now complete. Follow the directions below to make the legs.
First (Silver) Leg
*Use your 5.00 mm hook and silver worsted weight yarn to make the first leg.
*The first (silver) leg should form a spiral as you work your single crochet stitches across the starting chain.
*Attach your yarn to the back loop only of the first stitch of Round 30 of the octopus head (the same stitch in which you worked your slst before fastening off) to begin the leg.
Row 1: Attach silver yarn to back loop only of the first stitch of Round 30 of the octopus head, ch 50, sc in 3rd ch from hook, work 2 sc in each remaining ch across, slst in back loop only of next 2 sts of Round 30, fasten off and weave in loose ends on the inside of the octopus head.
*The first leg of the octopus is now complete. Follow the directions below to make the second leg.
Second (White) Leg
*Use your 6.00 mm hook and white bulky weight yarn to make the second leg.
*The second (white) leg is made in continuous rounds of single crochet stitches. Use a stitch marker if needed. The top of the leg is sewn together before attaching it to the octopus head.
*Make sure to pull the magic ring closed and weave in/secure end at closure at the beginning. This is because it will be harder to do later once the octopus gets larger.
Round 1: With white yarn, make a magic ring, ch 1, work 6 sc in ring, pull ring closed. (6 sc)
Rounds 2-27: Sc in each st around. (6 sc)
*After completing last st of Round 27, slst in first st of round and fasten off, leaving a long tail for sewing open end closed and attaching it to the head.
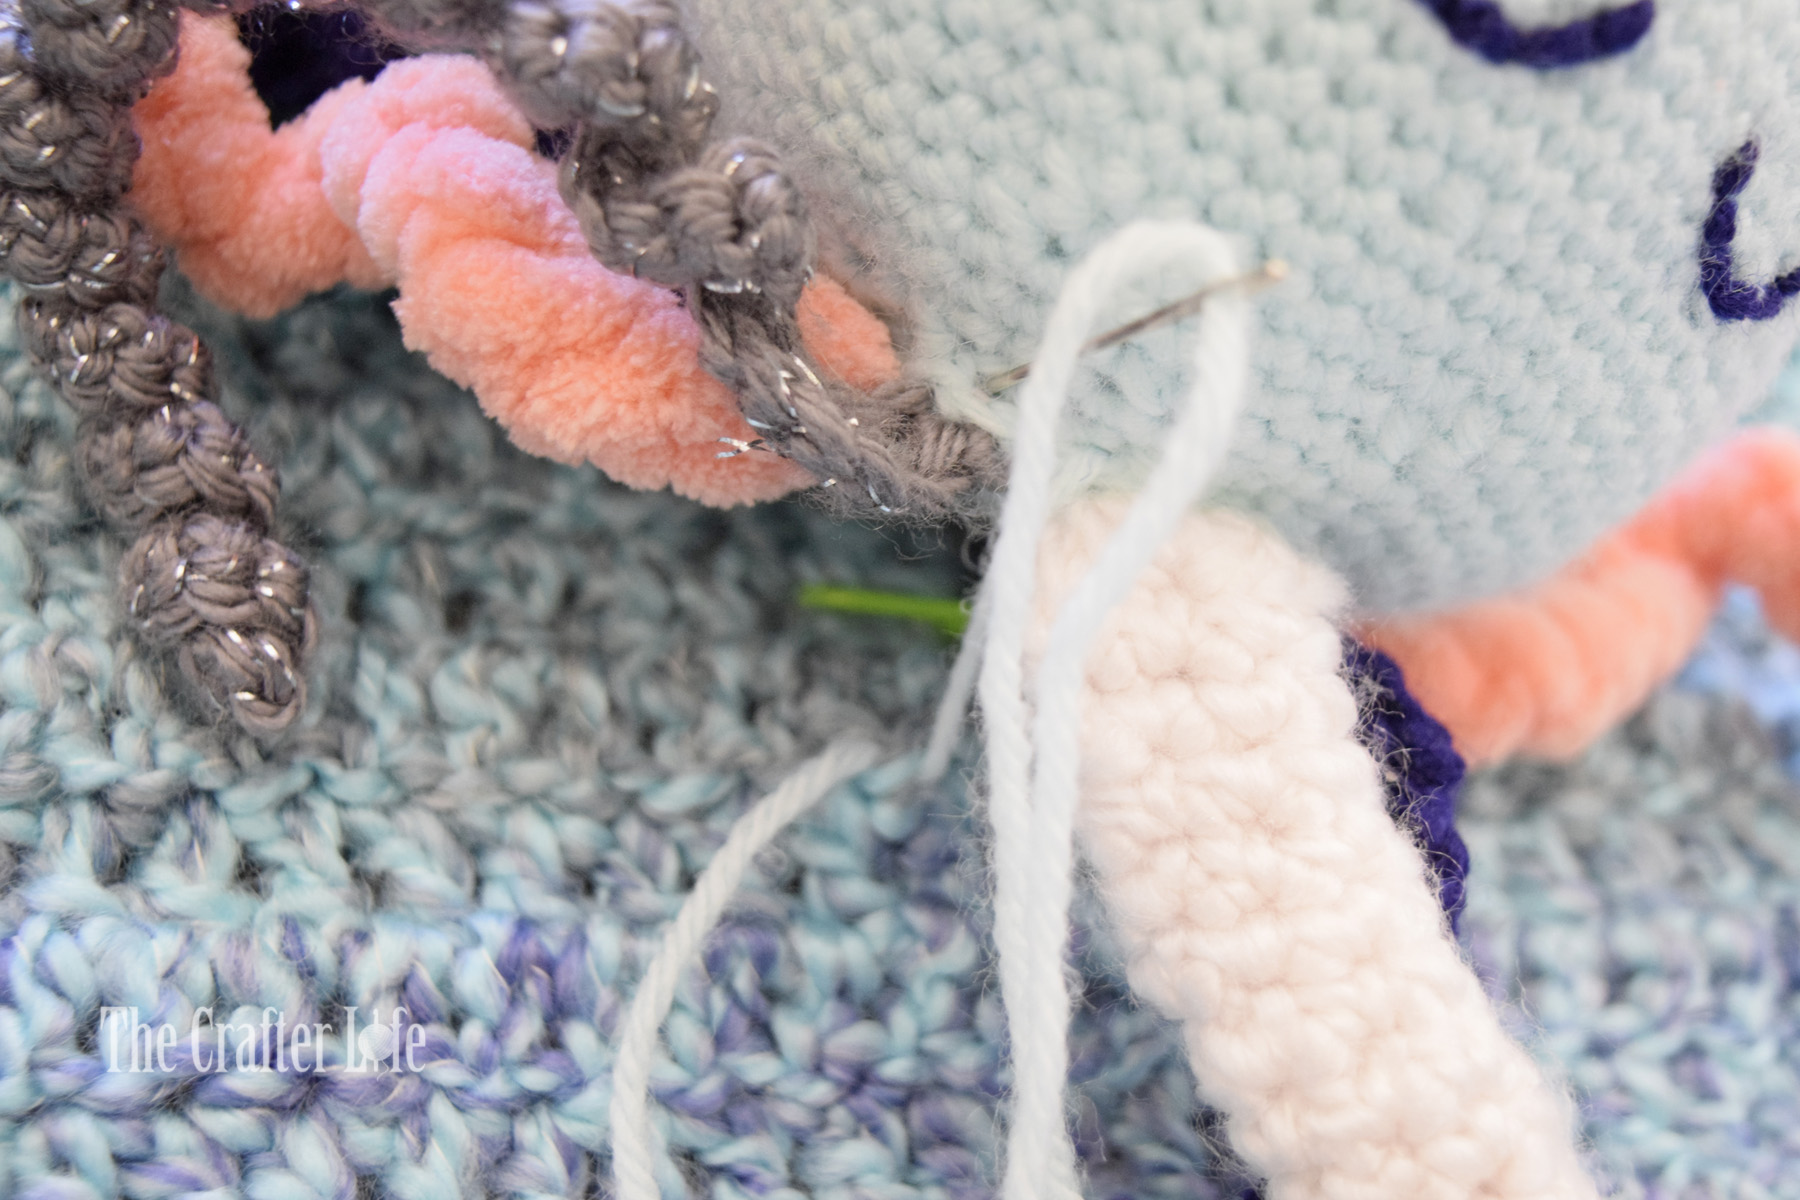
*Before attaching the second (white) leg next to the first (silver leg) on the octopus head, you will first need to close the open end of the leg. Use a tapestry needle and the long tail you left at the end of Round 27 to sew the open end of the leg closed. Pinch the open end of the leg together so you have three pairs of stitches from Round 27 that touch and sew each pair together so it closes the open end. Once you have sewn the last pair of stitches together, line them up with the next 3 stitches from Round 30 of the octopus head (the 4th, 5th, and 6th stitches of Round 30) and sew each stitch from the top of the leg to the back loop only of the corresponding stitch from Round 30 of the head. Once the leg is securely attached to the back loops of the three stitches over from the first (silver) leg, weave in and secure the loose ends on the inside of the octopus head.
*The second leg of the octopus is now complete. Follow the directions below to make the third leg.
Third (Navy) Leg
*Use your 5.00 mm hook and navy worsted weight yarn to make the third leg.
*The third (navy) leg is made in rows of single crochet (except for the last row which is made up of hdc and dc stitches).
*Attach your yarn to the back loop only of the 7th stitch of Round 30 of the octopus head (this should be the next stitch over from the second leg) to begin the third leg.
Row 1: Attach navy yarn to back loop only of the 7th stitch of Round 30 of the octopus head, ch 1, sc in back loop only of the same st (7th st of Round 30), sc in back loop only of the next 2 sts of Round 30 of the head (8th and 9th sts of Round 30). (3 sc)
Rows 2-30: Ch 1, turn sc in each st across. (3 sc)
Row 31: Ch 1, turn hdc in first st, 2 dc in next st, hdc in last st, fasten off and weave in loose ends. (2 hdc, 2 dc; 4 total sts)
*The third leg of the octopus is now complete. Follow the directions below to make the fourth leg.
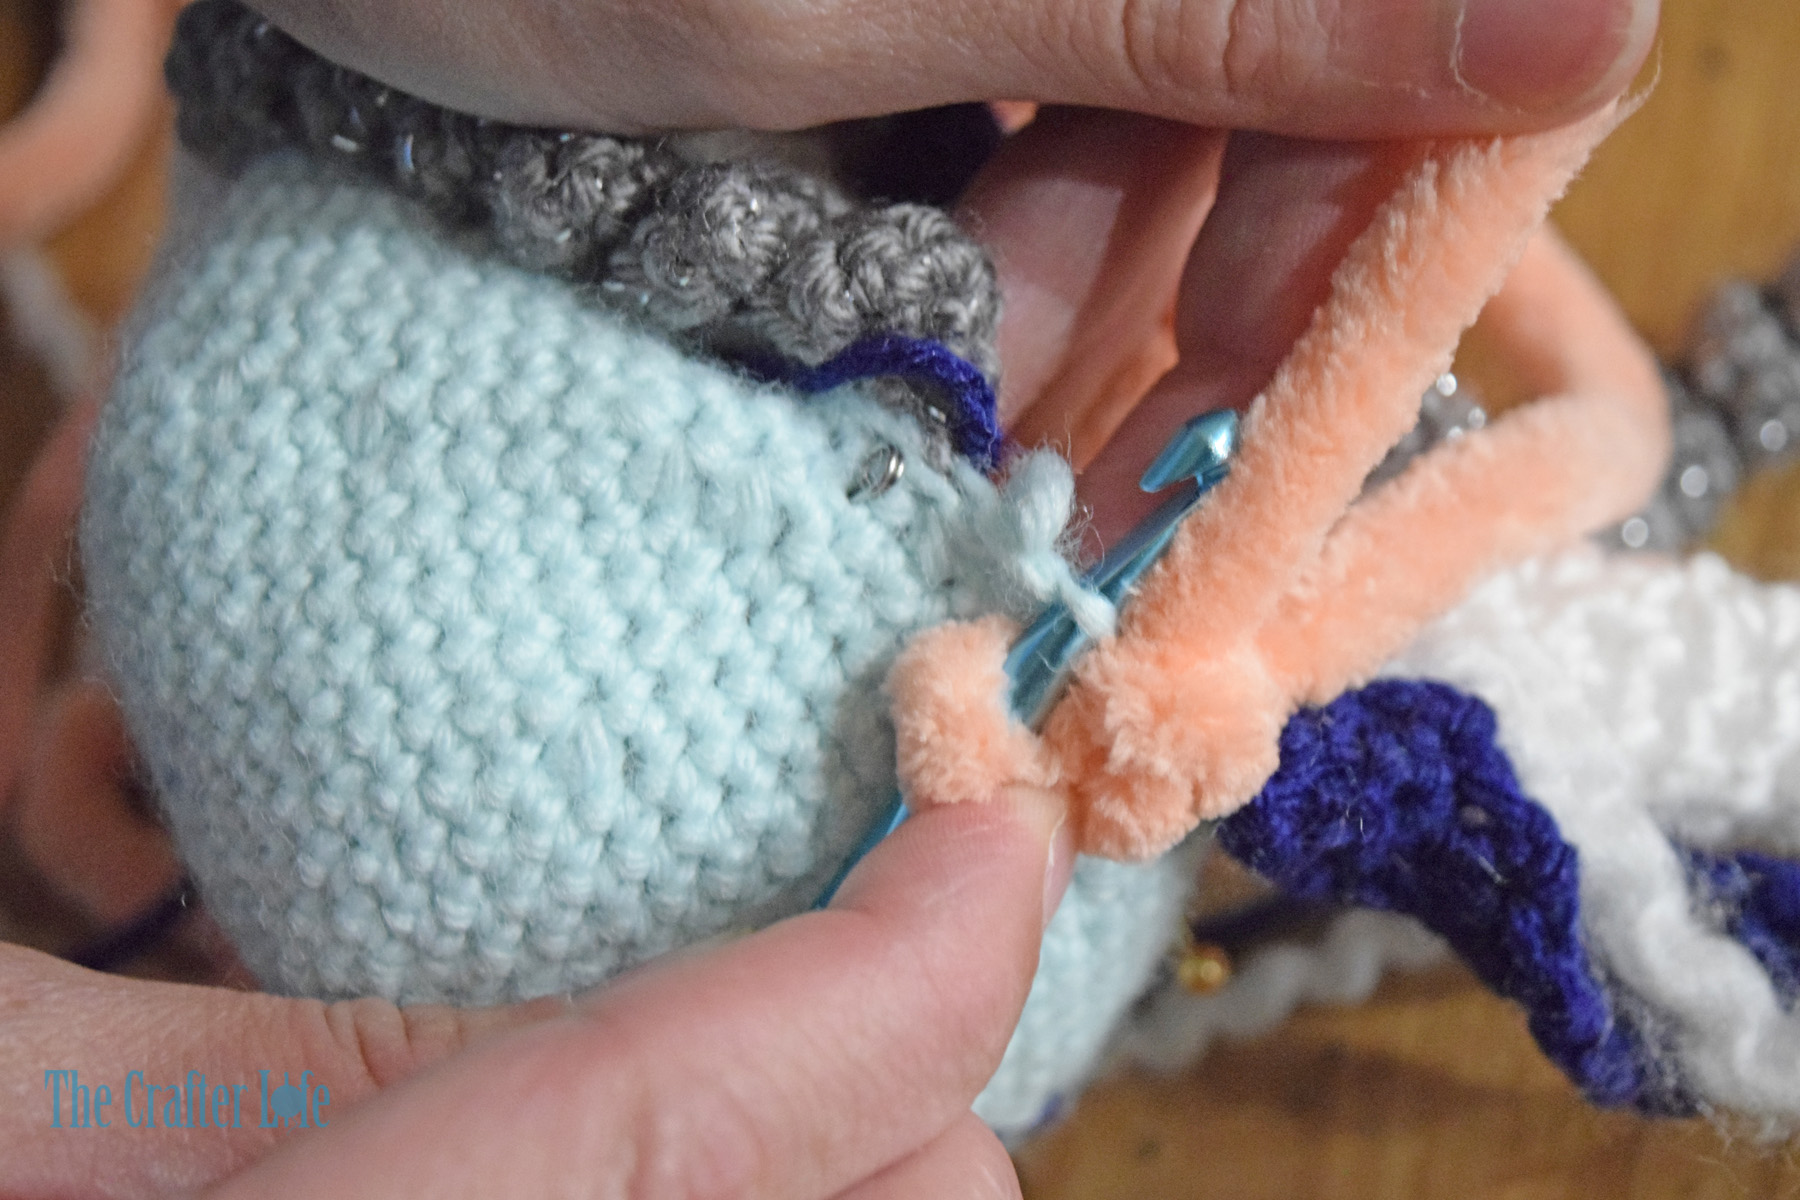
Fourth (Coral) Leg
*Use your 5.00 mm hook and coral jumbo weight yarn to make the fourth leg.
*The fourth (coral) leg is made up of one long chain.
*Attach your yarn to the back loop only of the 10th stitch of Round 30 of the octopus head (this should be the next stitch over from the third leg) to begin the fourth leg.
Row 1: Attach coral yarn to back loop only of the 10th stitch of Round 30 of the octopus head, ch 1, slst in back loop only of the next st of Round 30 of the head (11th st of Round 30), slst in back loop only of the next st of Round 30 of the head (12th st of Round 30), ch 20, fasten off and weave in loose ends.
* Weave in the tail at the end of the chain down through the chain and cut it close to chain so you can’t see the end of the tail.
*The fourth leg of the octopus is now complete. Follow the directions below to make the fifth-eighth legs.
Remaining Legs
Fifth (Silver) Leg: Attach your silver yarn to the 13th stitch of Round 30 of the head and follow the same directions/pattern as for the first (silver) leg. The fifth leg will be attached to the 13th, 14th, and 15th stitches of Round 30 of the head.
Sixth (White) Leg: Attach your white yarn to the 16th stitch of Round 30 of the head and follow the same directions/pattern as for the second (white) leg. The sixth leg will be attached to the 16th, 17th, and 18th stitches of Round 30 of the head.
Seventh (Navy) Leg: Attach your navy yarn to the 19th stitch of Round 30 of the head and follow the same directions/pattern as for the third (navy) leg. The seventh leg will be attached to the 19th, 20th, and 21st stitches of Round 30 of the head.
Eighth (Coral) Leg: Attach your coral yarn to the 22nd stitch of Round 30 of the head and follow the same directions/pattern as for the fourth (coral) leg. The eighth leg will be attached to the 22nd, 23rd, and 24th stitches of Round 30 of the head.
*Once you have completed the remaining four legs and have woven in all loose ends, follow the directions below to stitch on the eyes of the octopus.
Eyes
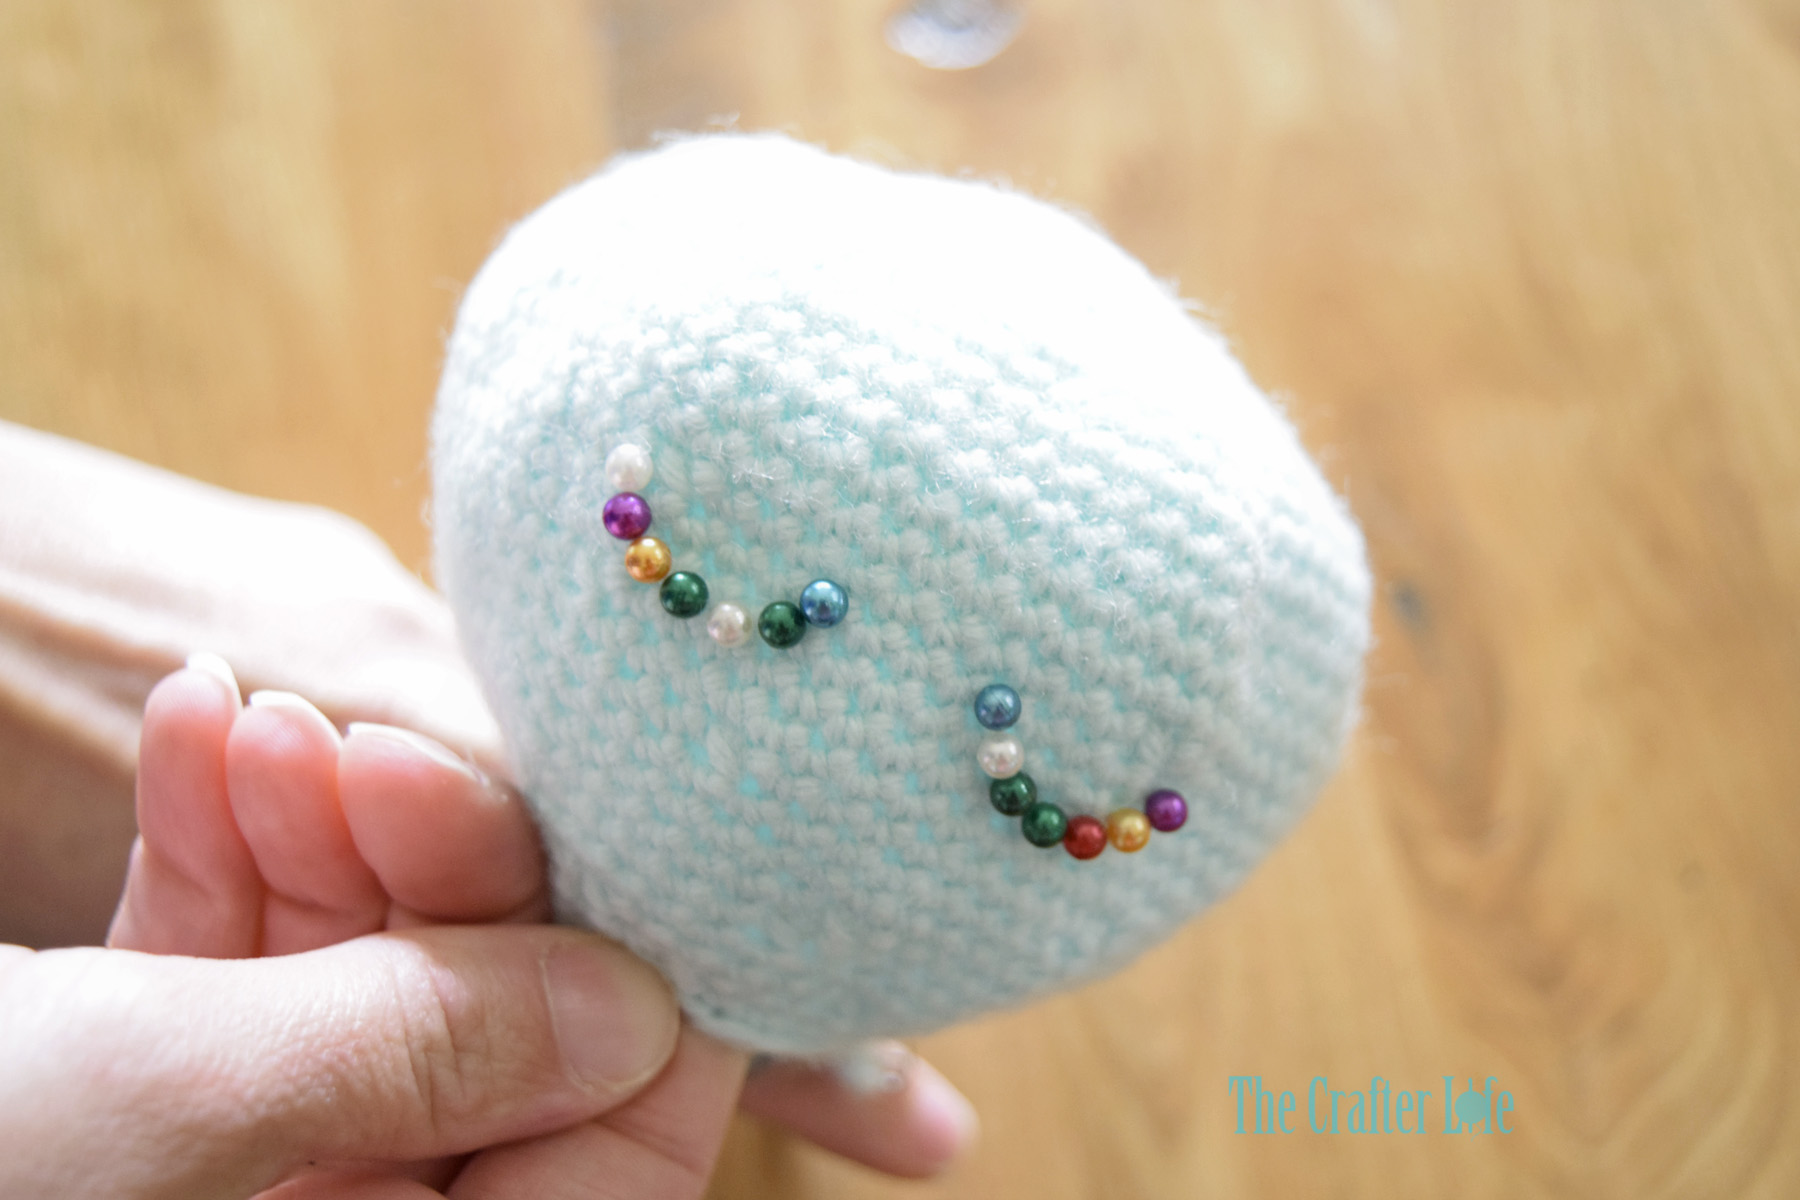
- Decide where you want to place your eyes on the octopus head. I placed mine on top of Rounds 18, 19, and 20 of the head and so that the sixth (white) leg is centered between them. The inside corners of my eyes are 4 stitches apart. Each eye is about 4 stitches wide (from corner to corner). You may want to use straight pins as explained in the Optional Step below to help you position them and aid you in stitching them on the head. The eyes should form a wide U shape in order to get them to appear like the octopus is sleeping.
OPTIONAL STEP: Use straight pins to mark/outline the eyes to help you find a position you like and help to make them symmetrical with each other. If you place your straight pins side-by-side, they show you exactly where to place your stitches. I used 7 straight pins per eye. Just be careful not to poke yourself when sewing the eyes on with the straight pins in place.
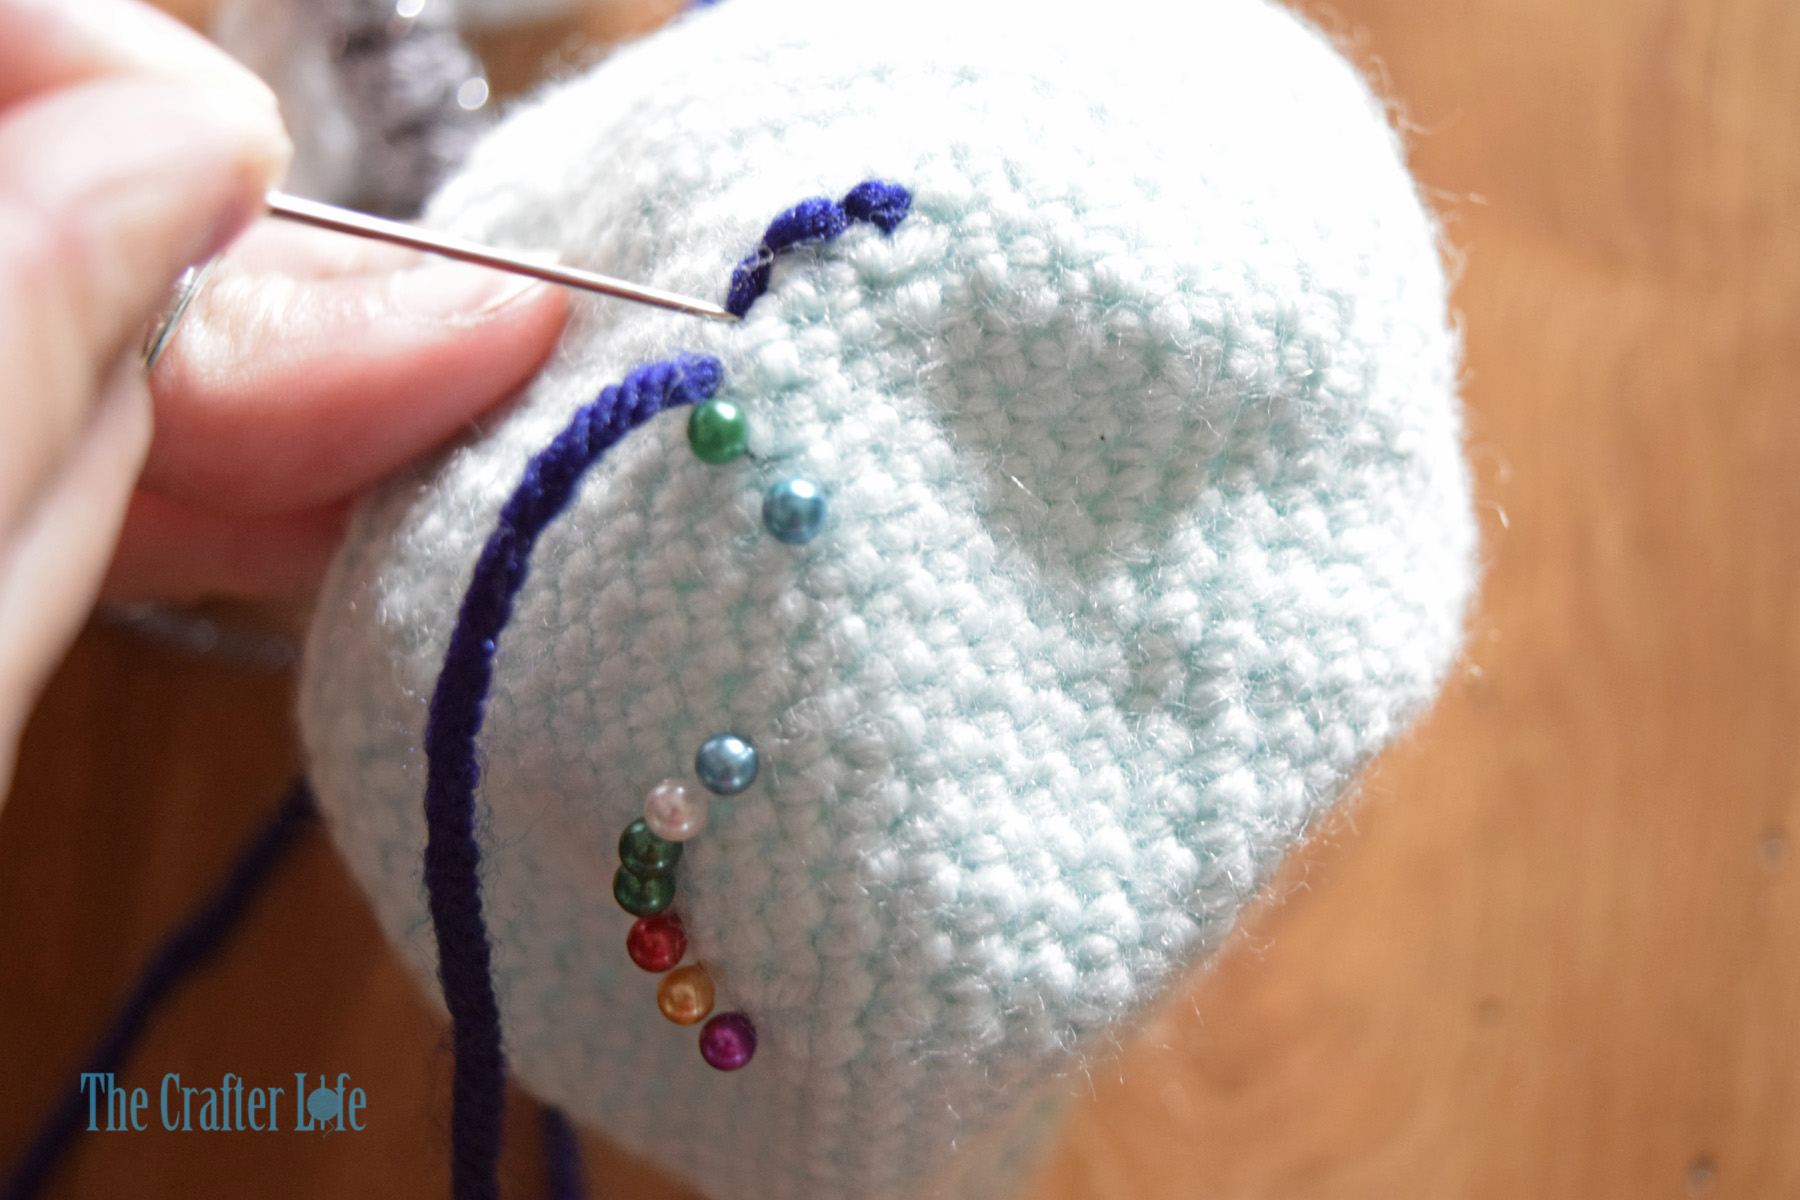
- Use your tapestry needle and a strand of navy yarn to stitch on the first eye. The corner of my eye where I first pulled my needle and thread up through from the inside of the head is right between Rounds 18 and 19 of the head. You should have about six stitches per eye. If you used straight pins to outline the eyes, it makes it really easy because each pin marks exactly where to pull your needle through for the stitches. Simply take each pin out as you go (it’s almost like connect the dots). If you had 7 straight pins marking the eye, you should end up with 6 total stitches that make up the eye. When you are finished stitching on the eye, don’t secure your yarn until you stitch on the second eye and are happy with how they look.
- Use your tapestry needle and another strand of navy yarn to stitch on the second eye in the same fashion as the first eye. The top corners of my second eye are also between Rounds 18 and 19 of the head so that it is positioned at the same height as my first eye. Try to make the eye as close to exactly the same as the first eye as possible. Straight pins make this much easier if you aren’t good at “eye-balling” where the stitches should go.
- Once you have both eyes stitched onto the head and you are satisfied with their shapes/positions, secure your navy yarn ends on the inside of the head. Since you used two separate strands of navy yarn for each eye, you should have two loose tails on the inside of the head. I first tied the two tails together in a knot for each eye since it can’t be seen on the inside of the head. Then you can also weave in the ends left from the knot to make it extra secure.
*Once you have finished stitching on the eyes and securing the yarn on the inside of the head, follow the directions below to make the starfish that will go on top the head.
Starfish
*Use your 5.00 mm hook and coral worsted weight cotton yarn to make the starfish.
*The starfish is worked in continuous rounds. Work first stitch of round in first stitch of previous round. Use a stitch marker if needed.
Round 1: With coral yarn, make a magic ring, ch 1, work 5 sc in ring, pull ring closed. (5 sc)
Round 2: 2 sc in each st around. (10 sc)
*Round 3 creates the 5 arms of the starfish.
Round 3: Slst in next st, repeat [ch 9, slst in 2nd ch from hook, slst in next ch, sc in next 3 chs, hdc in next 3 chs, slst in next 2 sts of Round 2] 5 times, fasten off, leaving a long tail for sewing the starfish onto the head.
*When finishing Round 3, your last slst should be in the first st from Round 2 (the same stitch you worked your first slst at the beginning of Round 3).
*The starfish is now complete. Follow the directions below for attaching it to the head.
Starfish Attachment
- Position your starfish on top the octopus head however you wish. You may want to use straight pins to hold it in place for you.
TIP: Stuff the head before pinning/positioning the starfish to make sure it will look right once the project is finished. Then take the stuffing out of the head before sewing it on in the next step.
- Once you are satisfied with the positioning of the starfish, use your tapestry needle and the long tail left on the starfish to begin sewing the starfish along its perimeter onto the top of the head.
- Once you have finished sewing the starfish to the head, check to make sure you like the placement. You may even want to stuff the head again to check. Take the stuffing back out and if you are happy with the placement of the starfish, secure your yarn on the inside of the head. Remember, you won’t see the inside of the head so you don’t have to be neat when you knot/secure/weave in your yarn.
*Now that the starfish is attached to the head, follow the directions below to stuff and attach the octopus to the blanket.
HEAD ASSEMBLY
- Stuff the octopus head with fiberfill until it is pretty firm and holds the shape you prefer.
- Follow the pattern below to make the circle piece that you will attach to the bottom of the head to close it. Then go to Step 3 for directions on how to attach the circle to the bottom.
Bottom Circle
*Use your 5.00 mm hook and aqua worsted weight yarn to make the bottom circle of the octopus.
*The bottom circle is worked in continuous rounds. Work first stitch of round in first stitch of previous round. Use a stitch marker if needed.

Round 1: With aqua yarn, make a magic ring, ch 1, work 6 sc in ring, pull ring closed. (6 sc)
Round 2: 2 sc in each st around. (12 sc)
Round 3: Repeat [sc in next st, 2 sc in next st] around. (18 sc)
Round 4: Repeat [sc in next 2 sts, 2 sc in next st] around, fasten off, leaving a really long tail for sewing onto the bottom of the octopus. (24 sc)
- Use your tapestry needle and the long tail you left on the bottom circle to attach the circle to the bottom of the octopus head to close it so it holds the stuffing. Match each stitch up from Round 4 of the circle to each stitch from Round 30 of the octopus head. Then run your needle through each pair of stitches in order to sew the circle to the bottom of the octopus head. Once you have gone completely around and finished sewing on the bottom circle, keep your tapestry needle threaded with your long tail of the yarn so you can use it to stitch the entire head to the middle of the blanket.

- Find the center of the blanket. This will be the 24th and 25th stitches of Row 15 of the Blanket Base. You can attach a stitch marker to those stitches to help you identify the center of the blanket when you begin to sew on the octopus.
- Lay the blanket out flat and place the octopus on top in the center (on top the stitch maker if you used one), facing the direction you prefer. I faced my octopus in the direction of Row 29 of the blanket. Keeping the blanket flat so the octopus stays in the right position, use your tapestry needle and the same long tail you used to stitch the bottom circle on the head to attach the octopus to the center of the blanket. Take your needle down through the closest stitch from Round 30 of the head and then through a loop on the top layer of the blanket (try not to go through entirely to the bottom of the blanket so you don’t see your stitches on the back), and then back up through the next stitch from Round 30 of the head. Repeat this process until you have gone completely around and sewn every stitch from Round 30 of the head to the top center of the blanket. Make sure to remove the stitch marker (if you used one) before stitching the whole way around so it doesn’t get stuck between the blanket and octopus. When you are satisfied with the position of the octopus and have ensured it is firmly attached to the blanket, secure your yarn on the inside of the octopus head. Do this by taking your needle inside the head by going through one stitch over from where it came out and then bringing it back out at a different place on the head, being careful not to pull so tight that the head pulls inward/loses shape. Continue this a few times until you feel the yarn is secure inside the head and then cut the yarn as close to the head as possible. Push any remaining tail on the outside of the head to the inside so it isn’t visible.
*Once you have finished attaching the octopus to the top of the blanket and have secured your yarn, the octo-pal lovey is finished unless you choose to add the starfish embellishment to the blanket. See below for instructions on the optional embellishment if you wish to make it.
OPTIONAL STARFISH EMBELLISHMENT
Starfish Embellishment
*Use your 5.00 mm hook and coral worsted weight cotton yarn to make the starfish embellishment.
*The starfish embellishment is worked in continuous rounds. Work first stitch of round in first stitch of previous round. Use a stitch marker if needed.
Round 1: With coral yarn, make a magic ring, ch 1, work 5 sc in ring, pull ring closed. (5 sc)
*Round 2 creates the 5 arms of the starfish.
Round 2: Repeat [Slst in next st, ch 5, sc in 2nd ch from hook, sc in next ch, hdc in next 2 chs, slst in same st of Round 1] 5 times, fasten off, leaving a long tail for sewing the starfish onto the blanket.
*The starfish is now complete. Follow the directions below for attaching it to the blanket.
Starfish Embellishment Attachment
- Decide where you want your starfish to be placed on your blanket. You may want to use straight pins to hold it in place for you.
- Use your tapestry needle and the long tail left on the starfish to begin sewing the starfish along its perimeter onto the top of the blanket. Just like you did for the octopus head, don’t go all the way through the blanket with your needle/yarn (only go through a loop of the blanket on the top layer) so you don’t see the coral yarn on the other side of the blanket.
- Once you have finished sewing the starfish to the blanket, check to make sure you like the placement. Secure your yarn on the underside of the starfish.


***Your Sleepy Octo-Pal Lovey Blanket is now finished and ready snuggle or use as a cute nursery decoration! You can try to fold the white legs in a zig-zag form to give it a fun shape if using as a decoration.
This pattern is property of TheCrafterLife.com
You may not sell my patterns or claim them as your own. You may make items to sell (i.e. on Etsy) from my patterns but I ask that you link back to my site (TheCrafterLife.com) and provide credit for the pattern. You are welcome to share my patterns on social media as long as you link back directly to my site by providing the link. No copying and pasting of any patterns will be allowed under any circumstances