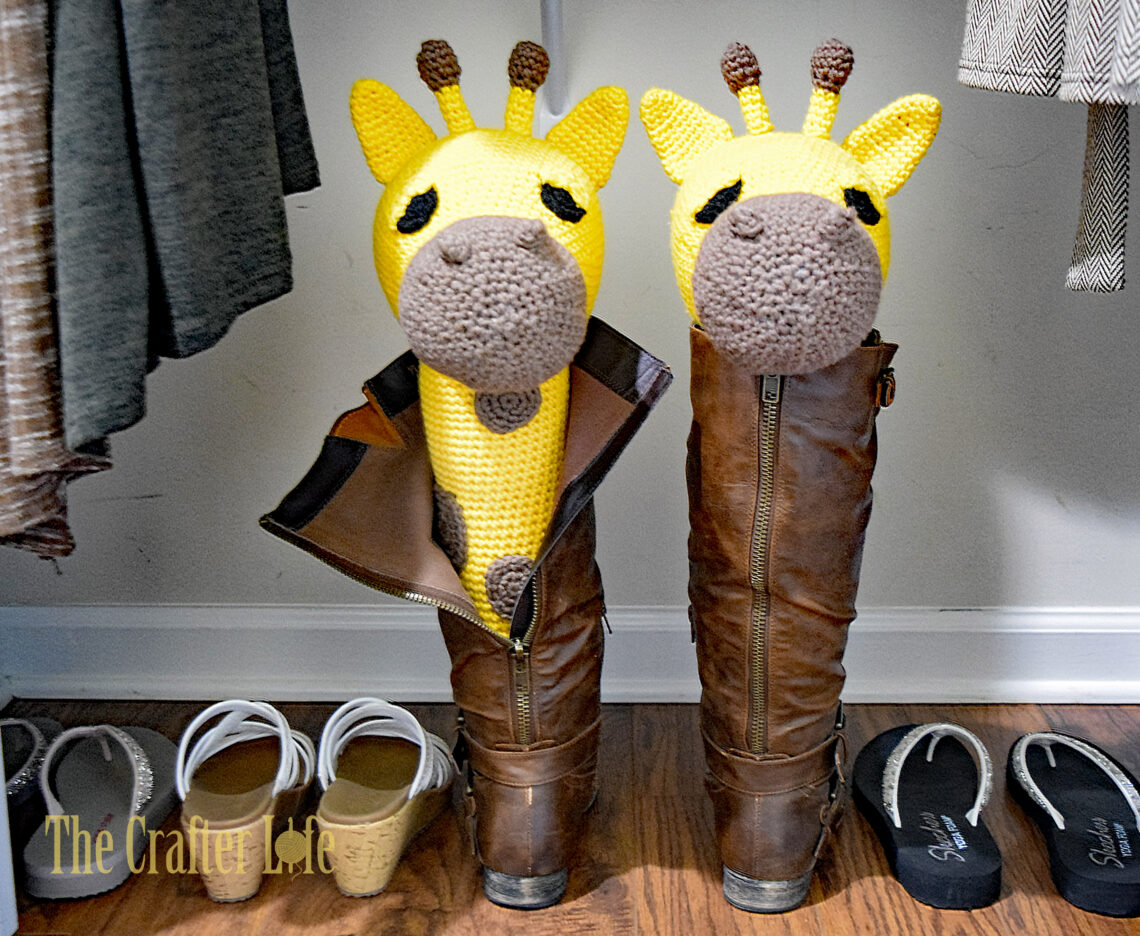
Giraffe Boot Shapers
Keep your boots upright and fun to look at when you aren’t wearing them with my Giraffe Boot Shapers! My boots always end up looking worn after months of storage in spring and summer since they slump over in my closet the entire time. Not anymore! I had this idea for giraffe boot shapers years ago and finally got around to making them! I love how the giraffes peek out the top of the boots as a cute accessory to a practical item. If you are interested in making a pair of my giraffe boot shapers, see below for my pattern.

FINISHED MEASUREMENTS
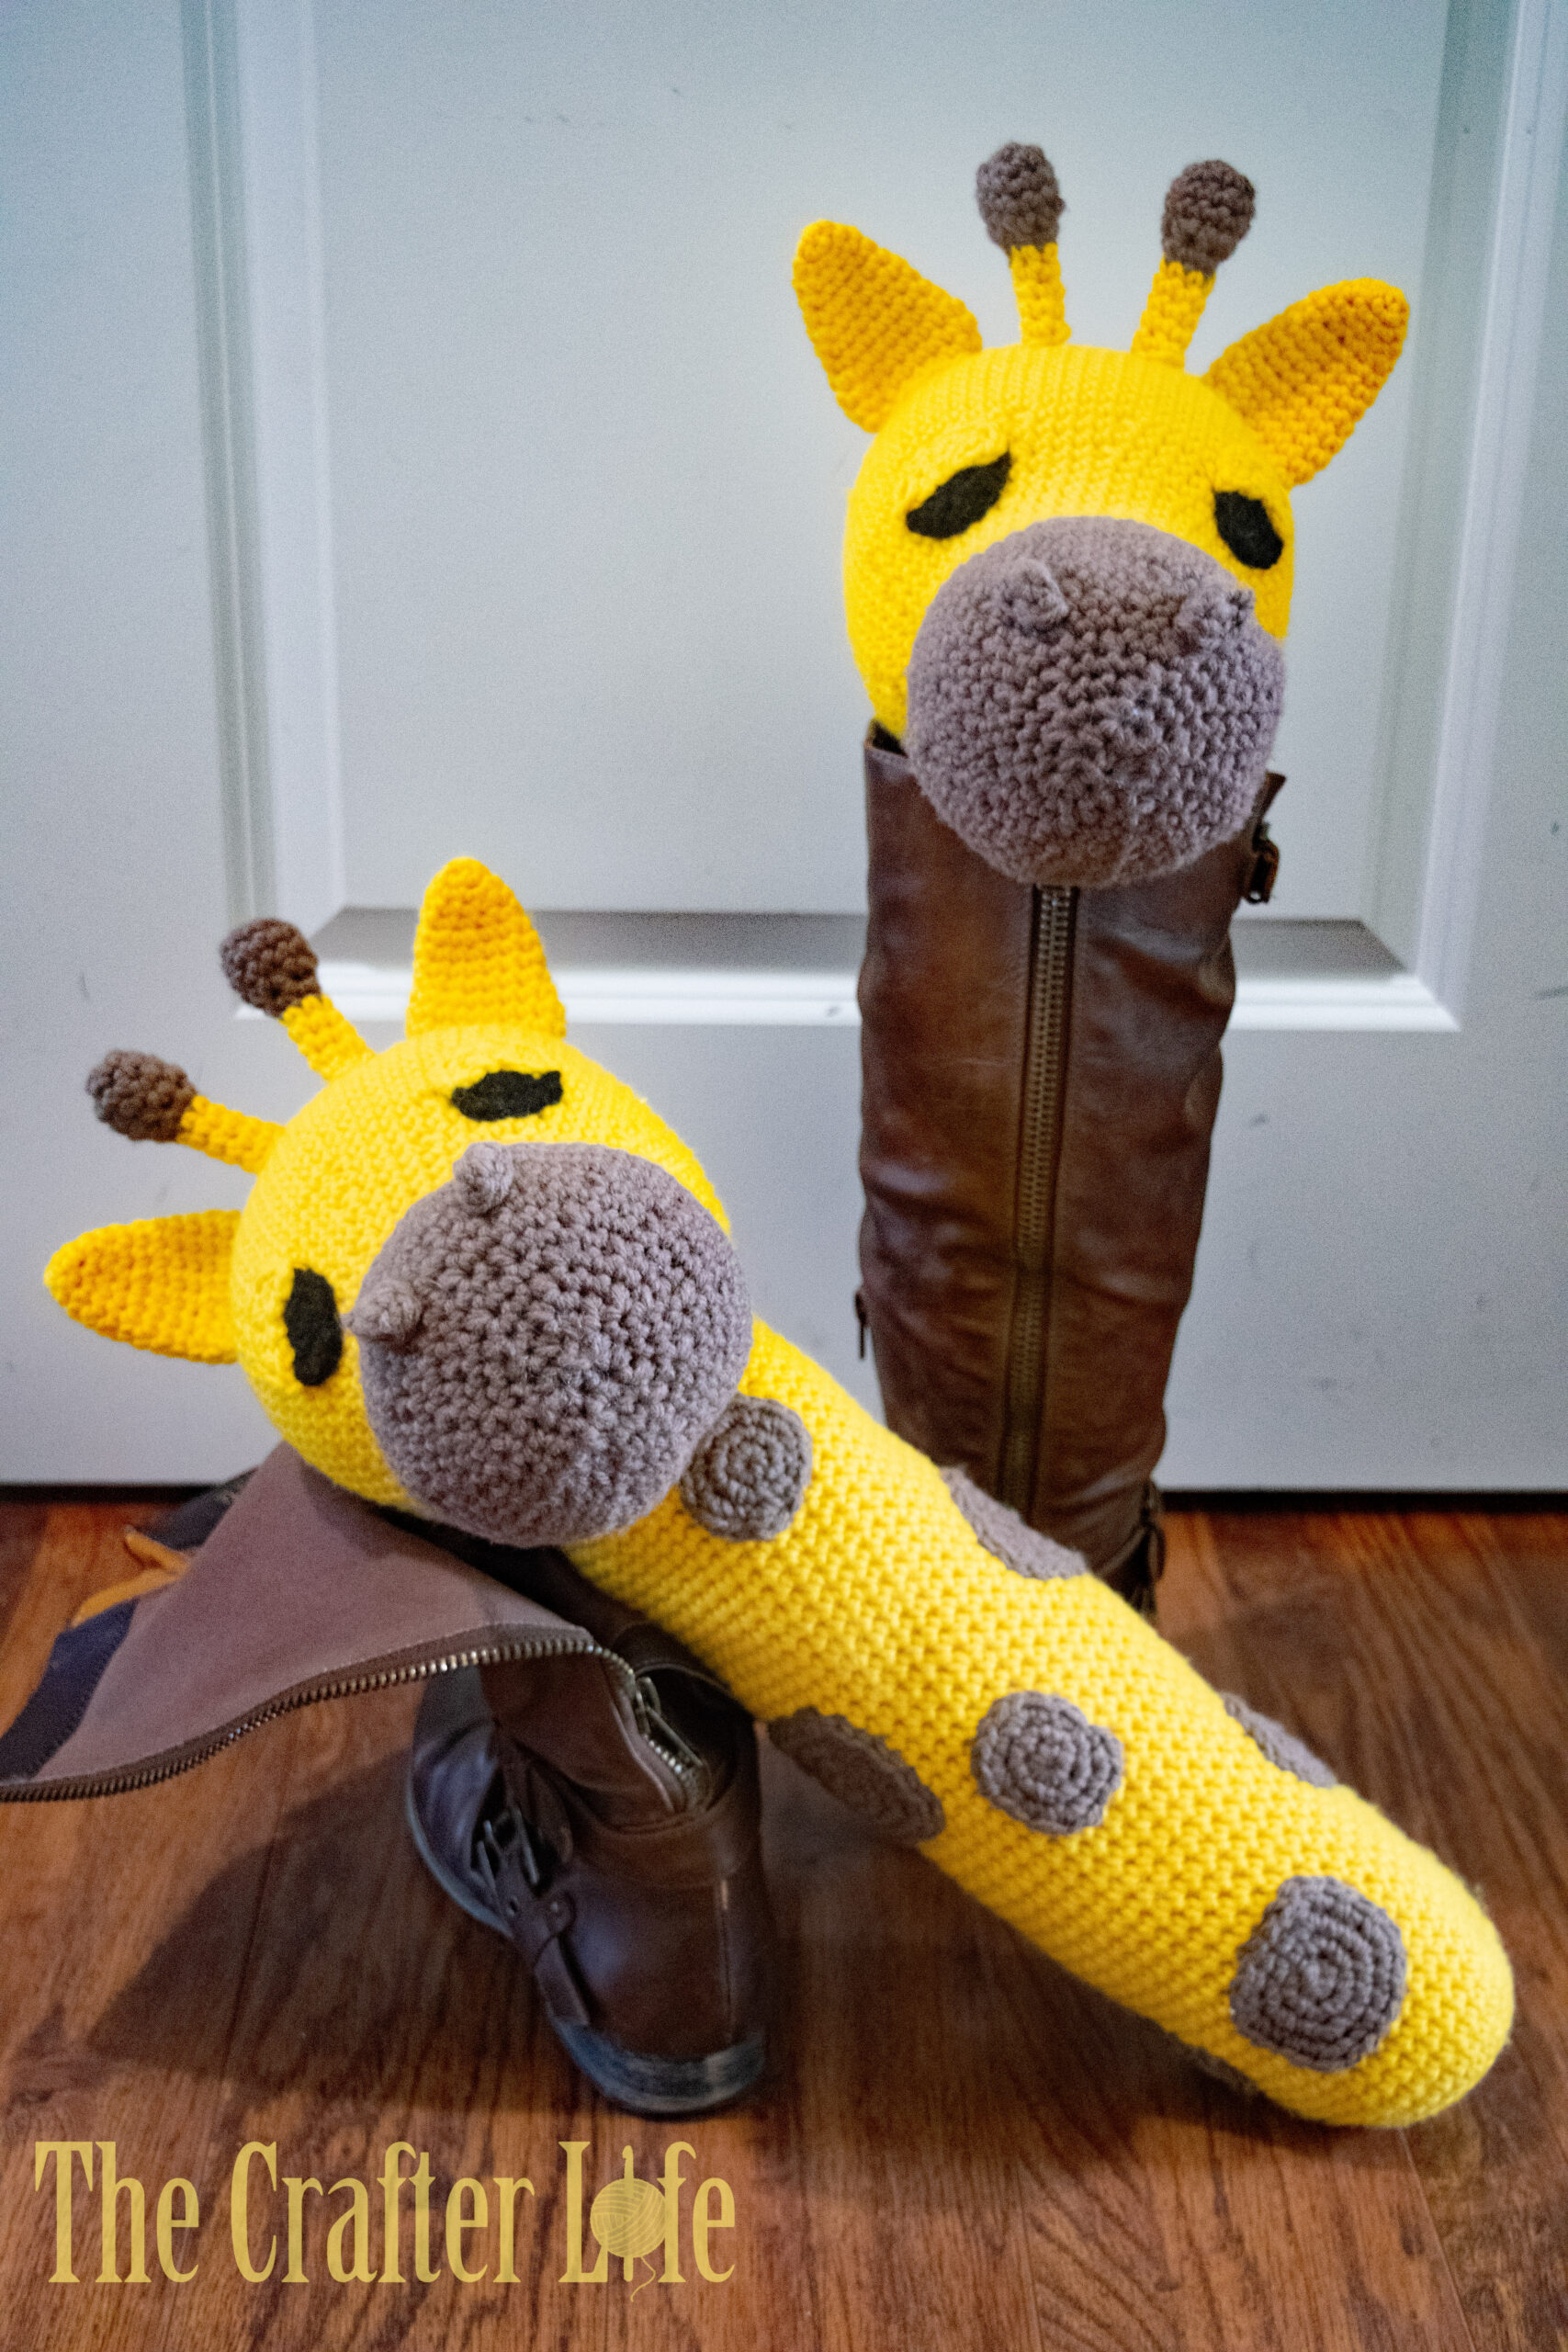
The finished giraffe boot shaper is approximately 20 inches tall (from the bottom of the neck to the top of the horns on the head). The height can be easily adjusted by adding or deleting rounds from the neck to make it taller or shorter, respectively. The neck is about 12 inches around when stuffed.
The head (when stuffed) is about 8½ inches long and about 8 inches tall from bottom to top of horns.
The neck is about 11½ inches tall with a diameter of about 3⅞ inches.
MATERIALS
– Size 5.50 mm crochet hook or size needed to obtain gauge
– Size 6.50 mm crochet hook or size needed to obtain gauge (for neck)
– Worsted weight (4) yarn in Yellow – you will need 2 regular size skeins or a jumbo size skein if making 2 boot shapers (I used a Jumbo skein of Red Heart Super Saver in Saffron.)
– Worsted weight (4) yarn in Brown (I used Red Heart Super Saver in Cafe Latte.)
– Worsted weight (4) yarn in Black (I used Red Heart Super Saver in Black.)
– Fiberfill (I used Loops & Threads Classic Fiber Fill)
– Stitch markers (for marking/counting stitches or rounds)
– Tapestry needle
– Scissors
– Measuring tape
Optional Items:
– Straight pins (if needed for holding parts in place while sewing them onto the head)
ABBREVIATIONS
– ch = chain
– chs = chains
– sc = single crochet
– sc2tog = single crochet 2 together (single crochet decrease)
– slst = slip stitch
– st = stitch
– sts = stitches
GAUGE
Head (5.5 mm hook): 9 rounds = 2 inches; 9 sc = 2 inches
Neck (6.5 mm hook) 4 rounds = 1 inch; 4 sc = 1 inch
PATTERN NOTES
- The head, neck, and all other pieces of the giraffe boot shaper are worked in continuous rounds of single crochet stitches. Do not join continuous rounds unless otherwise stated. Simply work the first stitch of each round in the first stitch of the previous round. Attach a stitch marker to mark rounds and move marker as you complete each round.
- This pattern is for one boot shaper. You will need to repeat the entire pattern to make a second boot shaper for a pair of boots.
- You can add or delete rounds when making the neck to adjust the height according to your boot length.
- Brackets [ ] indicate portions of the pattern to be repeated.
I offer a PDF version of this pattern on my CrafterLifePatterns web store.
DIRECTIONS
Eye of Giraffe (Make 2)
*Use a 5.50 mm hook and black worsted weight yarn to make the eye.
Round 1: With black yarn, make a magic ring, ch 1, work 6 sc in magic ring, pull ring closed. (6 sc)
Round 2: 2 sc in each st around. (12 sc)
Round 3: Repeat [sc in next st, 2 sc in next st] around, slst in first st of round, fasten off, leaving long tail for sewing onto head. (18 sc)
Eyelid of Giraffe (Make 2)
*Use a 5.50 mm hook and yellow worsted weight yarn to make the eyelid.
*The eyelid is not made in continuous rounds. Turn work when beginning Round 2.
Round 1: With yellow yarn, make a magic ring, ch 1, work 6 sc in magic ring. (6 sc)
Round 2: Ch 1, turn, sc in first st, 2 sc in next 4 sts, sc in last st, fasten off, leaving long tail for sewing onto eye and head. (10 sc)
Eye Assembly
Position the eyelid on top of the eye where you plan to sew it. Use a tapestry needle and the long yellow tail you left on the eyelid to sew the eyelid to the eye along the straight bottom line/edge of the eyelid. You can go entirely through both layers (eyelid and eye) since you will not see the bottom of the eye once it is sewn onto the head. Once you sew the eyelid to the eye the whole way across the straight bottom line/edge of the eyelid, leave the yellow tail loose so you can use it again when sewing the eyelid to the head. You should also still have the long black tail you left on the eye to use later for sewing onto the head.
Ear of Giraffe (Make 2)
*Use a 5.50 mm hook and yellow worsted weight yarn to make the ear.
*Make sure to pull the magic ring closed and weave in/secure end at closure at the beginning.
Round 1: With yellow yarn, make a magic ring, ch 1, work 6 sc in magic ring, pull ring closed. (6 sc)
Round 2: Sc in each st around. (6 sc)
Round 3: Repeat [2 sc in next 2 sts, sc in next st] around. (10 sc)
Rounds 4-5: Sc in each st around. (10 sc)
Round 6: Repeat [sc in next st, 2 sc in next 2 sts, sc in next 2 sts] around. (14 sc)
Rounds 7-9: Sc in each st around. (14 sc)
Round 10: Repeat [sc in next 2 sts, 2 sc in next 2 sts, sc in next 3 sts] around. (18 sc)
Rounds 11-12: Sc in each st around. (18 sc)
Round 13: Repeat [sc in next 2 sts, sc2tog, sc2tog, sc in next 3 sts] around, slst in first st of round, fasten off, leaving long tail for sewing onto head. (18 sc)
Horn of Giraffe (Make 2)
*Use a 5.50 mm hook and brown worsted weight yarn to begin the horn. You will switch to yellow yarn for Rounds 7-11.
*When changing color from brown to yellow, join yellow while completing the last sc (single crochet) of brown (by pulling through yellow when you have two loops of brown on the hook to complete the final sc).
*Make sure to pull the magic ring closed and weave in/secure end at closure at the beginning. This is because it will be harder to do later.
Round 1: With brown yarn, make a magic ring, ch 1, work 6 sc in magic ring, pull ring closed. (6 sc)
Round 2: 2 sc in each st around. (12 sc)
Rounds 3-4: Sc in each st around. (12 sc)
Round 5: Repeat [sc2tog] around. (6 sc)
Round 6: Sc in each st around, changing color to yellow when completing the last sc (pull through yellow yarn when you have two loops of brown on your hook when working the last sc). (6 sc)
*You should now have yellow yarn on your hook to begin Round 7.
Rounds 7-10: Sc in each st around. (6 sc)
HINT: If you find it difficult to weave in the brown and yellow loose ends left from the color change, you can simply knot them together, cut them pretty short, and leave them loose since they will be on the inside of the horn.
Round 11: Sc in each st around, slst in first st of round, fasten off, leaving long tail for sewing onto head. (6 sc)
Nostril of Giraffe (Make 2)
*Use a 5.50 mm hook and brown worsted weight yarn to begin the nostril.
Round 1: With brown yarn, make a magic ring, ch 1, work 6 sc in magic ring, pull ring closed. (6 sc)
Round 2: Sc in each st around, slst in first st of round, fasten off and leave a long tail for sewing onto the head. (12 sc)
Head of Giraffe
*Use a 5.50 mm hook and yellow worsted weight yarn to begin the head. You will switch to brown yarn for Rounds 37-51.
*Make sure to pull the magic ring closed and weave in/secure end at closure at the beginning. This is because it will be harder to do later.
*You will need to sew the head parts onto the head prior to stuffing/closing the head. I did not sew any of the head parts onto the head until I completed Round 48. However, you may wish to sew the eyes, ears, and horns on a little earlier.
Round 1: With yellow yarn, make a magic ring, ch 1, work 6 sc in magic ring, pull ring closed. (6 sc)
Round 2: 2 sc in each st around. (12 sc)
Round 3: Repeat [sc in next st, 2 sc in next st] around. (18 sc)
Round 4: Repeat [sc in next 2 sts, 2 sc in next st] around. (24 sc)
Round 5: Repeat [sc in next 3 sts, 2 sc in next st] around. (30 sc)
HINT: If you haven’t done so yet, make sure to weave in the beginning tail from the magic ring. It will be difficult to do so later as it gets bigger.
Round 6: Sc in first st, 2 sc in next st, repeat [sc in next 4 sts, 2 sc in next st] 5 times, sc in last 3 sts. (36 sc)
Round 7: Repeat [sc in next 5 sts, 2 sc in next st] around. (42 sc)
Round 8: Sc in next 2 sts, 2 sc in next st, repeat [sc in next 6 sts, 2 sc in next st] 5 times, sc in last 4 sts. (48 sc)
Round 9: Repeat [sc in next 7 sts, 2 sc in next st] around. (54 sc)
Round 10: Sc in next 3 sts, 2 sc in next st, repeat [sc in next 8 sts, 2 sc in next st] 5 times, sc in last 5 sts. (60 sc)
Round 11: Repeat [sc in next 9 sts, 2 sc in next st] around. (66 sc)
Round 12: Sc in next 4 sts, 2 sc in next st, repeat [sc in next 10 sts, 2 sc in next st] 5 times, sc in last 6 sts. (72 sc)
Rounds 13-24: Sc in each st around. (72 sc)
Round 25: Sc in next 4 sts, sc2tog, repeat [sc in next 10 sts, sc2tog] 5 times, sc in last 6 sts. (66 sc)
Round 26: Repeat [sc in next 9 sts, sc2tog] around. (60 sc)
Round 27: Sc in next 3 sts, sc2tog, repeat [sc in next 8 sts, sc2tog] 5 times, sc in last 5 sts. (54 sc)
Round 28: Repeat [sc in next 7 sts, sc2tog] around. (48 sc)
Round 29: Sc in each st around. (48 sc)
Round 30: Sc in next 2 sts, sc2tog, repeat [sc in next 6 sts, sc2tog] 5 times, sc in last 4 sts. (42 sc)
Rounds 31-35: Sc in each st around. (42 sc)
Round 36: Sc in next 2 sts, 2 sc in next st, repeat [sc in next 6 sts, 2 sc in next st] 5 times, sc in last 4 sts, slst in first st of round, fasten off, weave in loose ends. (48 sc)
***Change yarn color to brown to complete Rounds 37-51. Attach brown yarn to 1st stitch of Round 36 (the same stitch in which you worked the final slip stitch of Round 36). Make sure to skip the slip stitch when working your stitches around.
Round 37: Attach brown yarn to first st of Round 36, ch 1, sc in same stitch (first st of Round 36) and in each st around. (48 sc)
***Make sure to work first st of Round 38 in first stitch of Round 37 and not the slip stitch from Round 36 (skip the slip stitch from Round 36 when beginning Round 38).
Round 38: Repeat [sc in next 7 sts, 2 sc in next st] around. (54 sc)
Round 39: Sc in next 3 sts, 2 sc in next st, repeat [sc in next 8 sts, 2 sc in next st] 5 times, sc in last 5 sts. (60 sc)
Rounds 40-42: Sc in each st around. (60 sc)
* You may wish to stop here to sew on the eyes, ears, and horns before the piece becomes longer and more narrow. Also, if you want to have spots on your head, now would be a good time to make those (pattern found under Neck section) and sew them to the head. You can also wait until after Round 48 if you wish to sew on the nostrils with everything else at the same time. See below Round 51 for Head Assembly directions on where to sew them onto the head.
Round 43: Sc in next 3 sts, sc2tog, repeat [sc in next 8 sts, sc2tog] 5 times, sc in last 5 sts. (54 sc)
Round 44: Repeat [sc in next 7 sts, sc2tog] around. (48 sc)
Round 45: Sc in next 2 sts, sc2tog, repeat [sc in next 6 sts, sc2tog] 5 times, sc in last 4 sts. (42 sc)
Round 46: Repeat [sc in next 5 sts, sc2tog] around. (36 sc)
Round 47: Sc in first st, sc2tog, repeat [sc in next 4 sts, sc2tog] 5 times, sc in last 3 sts. (30 sc)
Round 48: Repeat [sc in next 3 sts, sc2tog] around. (24 sc)
*Stop here to sew on the nostrils (and other head parts, if you haven’t already). See below Round 51 for Head Assembly sewing directions. Once you are finished sewing on all the parts and securing all loose ends on the inside of the head, use fiberfill to stuff the inside of the head to your preference. Then continue on to Round 49 to complete/close the rest of the head.
Round 49: Repeat [sc in next 2 sts, sc2tog] around. (18 sc)
Round 50: Repeat [sc in next st, sc2tog] around. (12 sc)
Round 51: Repeat [sc2tog] around, slst in first st of round, fasten off, leaving a long tail for closing the opening. (6 sc)
Closing The Head
*Make sure the head is fully stuffed prior to closing the opening.
Use your tapestry needle and the long tail you left at the end of Round 51 to weave the tail through the front loops of each consecutive stitch from Round 51, making sure to take the needle in the direction from the inside of the opening to the the outside. Once you have woven the thread through the front loop of each stitch, pull the thread (but not extremely tight) so that the opening of the head closes. Next, take your needle and thread through the middle hole of the closed opening and bring it out somewhere else on the brown section of the head. Pull the thread so that the top bulge at the closed opening disappears. Then take the needle and thread back inside the head one stitch from where you came out and bring it back out at a different place on the brown section of the head. Continue this a few times until you feel the yarn is secure inside the head and then cut the yarn as close to the head as possible and push any remaining tail on the outside of the head to the inside so it isn’t visible.
Head Assembly
- Use a tapestry needle and the long black and yellow tails you left on the eyes to sew them to the front of the head where you prefer. Use the black tail to sew the black part of the eye to the head along the perimeter of the black section of the eye. Use the yellow tail to sew the yellow part of the eye (eyelid) to the head along the perimeter of the yellow section of the eye. Make sure to keep the yellow yarn on the outside of the black section when you sew the perimeter of the eyelid to the head. You may want to use straight pins to position the eyes on the head and hold them in place while you sew them. *I placed my eyes overlapping Rounds 23 to 29 with about 10 stitches between the bottom of the eyelids (the bottom of my eyelids were at about Round 27, so the eyes are about 10 stitches apart from each other at Round 27). I also made sure that the spot where the color change was made from yellow to brown on the head was at the bottom of the head. Once you finish sewing on the eyes, make sure to secure your yarn on the inside of the head.
- Use a tapestry needle and the long tails you left on the last round of the ear pieces to sew the ears (along their last rounds) to the top of the head on each side behind the eyes. You may want to use straight pins to position the ears on the head and hold them in place while you sew them. I placed the ears on top of Round 12 of the head and about 12 stitches apart from each other. When you are satisfied with the placement of the ears, make sure to secure your yarn on the inside of the head.
- Use a tapestry needle and the long tails you left on both horns to sew them (along their last rounds) to the top of the head, slightly in front of and centered between the ears. You may want to use straight pins to position the horns on the head and hold them in place while you sew them. I placed the horns on top of Round 14 about 3 stitches apart from each other. Secure the yarn on the inside of the head once they are attached where you like them. ***If you stopped after Round 42 of the head of the giraffe, now go back to the pattern and complete Rounds 43 through 48. Once you have completed Round 48, go to Step 4 below to sew on the nostrils.
- Use a tapestry needle and the long tails you left on both nostrils to sew them (along their last rounds) to the front of the head, centered with the eyes, ears, and horns. You may want to use straight pins to position the nostrils on the head and hold them in place while you sew them. I placed the nostrils over Rounds 44 and 45 with about 6 stitches in between them. Secure the yarn on the inside of the head once you have finished attaching them and you are satisfied with their placements.
- Once you have sewn all head pieces onto the head and secured all loose yarn ends on the inside of the head, stuff the head with fiberfill and return to the head pattern above to complete the remaining rounds.
*You may wish to add spots to the back of the head (I did not). If so, see below for the spot patterns. Make as many spots as you want on the head and sew them to the head before stuffing it and finishing the rounds.
Neck of Giraffe
*Use a 6.50 mm hook and yellow worsted weight yarn to complete the neck.
*Make sure to pull the magic ring closed and weave in/secure end at closure at the beginning. This is because it will be harder to do later.
*Work as many rounds as needed to customize the height for your boot. The top of the neck should be level with the top of the boot when it is inserted fully into the boot. Delete rounds if you need it shorter and add rounds if you need it taller to make it the same height as the leg of your boot.
Round 1: With yellow yarn, make a magic ring, ch 1, work 8 sc in magic ring, pull ring closed. (8 sc)
Round 2: 2 sc in each st around. (16 sc)
Round 3: Repeat [sc in next st, 2 sc in next st] around. (24 sc)
Round 4: Repeat [sc in next 2 sts, 2 sc in next st] around. (32 sc)
Round 5: Repeat [sc in next 3 sts, 2 sc in next st] around. (40 sc)
Round 6: Sc in each st around. (40 sc)
Rounds 7-53*: Repeat Round 6. (40 sc)
*You may need to make your neck longer or shorter depending on the length of your boot. Therefore, you may need more or less than 53 rounds. Simply stop repeating Round 6 once you have your desired length. You may need to stop working a few times to check your neck height until you get it the correct height for your boot.
*At the end of Round 53 (or your final round), slst to the first st of the round and fasten off, leaving a really long tail for sewing the neck onto the head.
*If you are choosing to add spots to the neck, follow the directions below to make them next. Skip the next set of directions for the spots if you do not wish to have them on the boot shaper.
OPTIONAL SPOTS
*The spots on the neck of the giraffe are completely optional since you won’t really see them inside of a boot. You may also choose to add some to the head if you wish. There are two sizes of spots (small and large). The patterns for each are below.
Small Spot (Make as many as you want – boot shaper shown has 5)
*Use a 5.50 mm hook and brown worsted weight yarn to make the small spots.
*You will need to sew the spots onto the neck prior to stuffing it.
Round 1: With brown yarn, make a magic ring, ch 1, work 6 sc in magic ring, pull ring closed. (6 sc)
Round 2: 2 sc in each st around. (12 sc)
Round 3: Repeat [sc in next 3 sts, 3 sc in next st, sc in next st, 3 sc in next st] around, slst in first st of round, fasten off, leaving long tail for sewing onto neck. (20 sc)
Large Spot (Make as many as you want – boot shaper shown has 5)
*Use a 5.50 mm hook and brown worsted weight yarn to make the large spots.
*You will need to sew the spots onto the neck prior to stuffing it.
Round 1: With brown yarn, make a magic ring, ch 1, work 6 sc in magic ring, pull ring closed. (6 sc)
Round 2: 2 sc in each st around. (12 sc)
Round 3: Repeat [sc in next 3 sts, 3 sc in next st, sc in next st, 3 sc in next st] around. (20 sc)
Round 4: Repeat [sc in next 4 sts, 3 sc in next st, sc in next 3 sts, 3 sc in next st, sc in next st] around, slst in first st of round, fasten off, leaving long tail for sewing onto neck. (28 sc)
*Once you have all your spots complete, use a tapestry needle and the long tails you left on the spots to sew them to the outside of the neck in your desired arrangement. You may want to pin them all in place with straight pins before sewing to make sure you like the their arrangement and the spacing between them. Secure your yarn ends on the inside of the neck when you are finished.
BOOT SHAPER ASSEMBLY
- Stuff the neck with fiberfill until it is firm so it can support the boot. You may need to place it in the boot to ensure you have stuffed it well enough to hold up the boot leg.
- Use the long tail you left on the last round of the neck to sew/attach the neck to the bottom of the head. Attach the neck by sewing the stitches from the last round of the neck to the bottom of the head. Make sure the head sits straight on the neck as you sew. Secure your yarn on the inside of the piece when finished sewing in the same manner you secured the yarn after closing the head.
*Once you have finished attaching the neck to the head and have secured your yarn, the giraffe boot shaper is ready to be placed inside your boot for support. Make a second boot shaper for the matching boot. Enjoy the cute giraffes peeking out the top of your boots when you aren’t wearing them!
This pattern is property of TheCrafterLife.com
You may not sell my patterns or claim them as your own. You may make items to sell (i.e. on Etsy) from my patterns but I ask that you link back to my site (TheCrafterLife.com) and provide credit for the pattern. You are welcome to share my patterns on social media as long as you link back directly to my site by providing the link. No copying and pasting of any patterns will be allowed under any circumstances