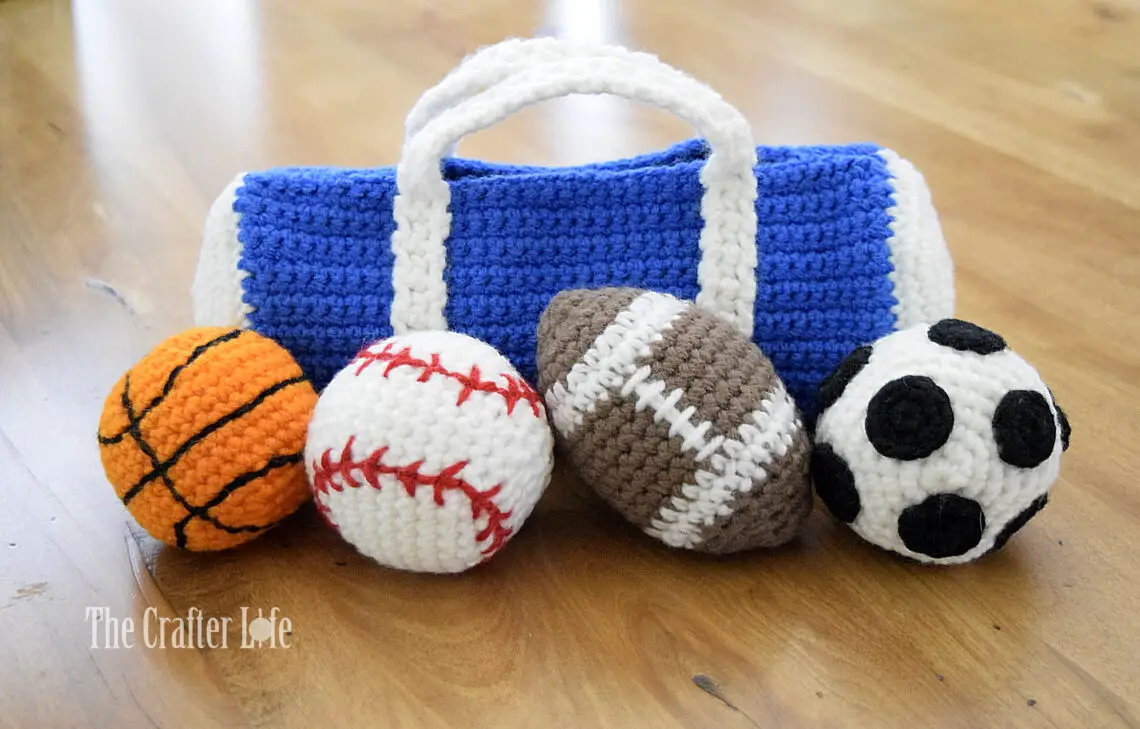
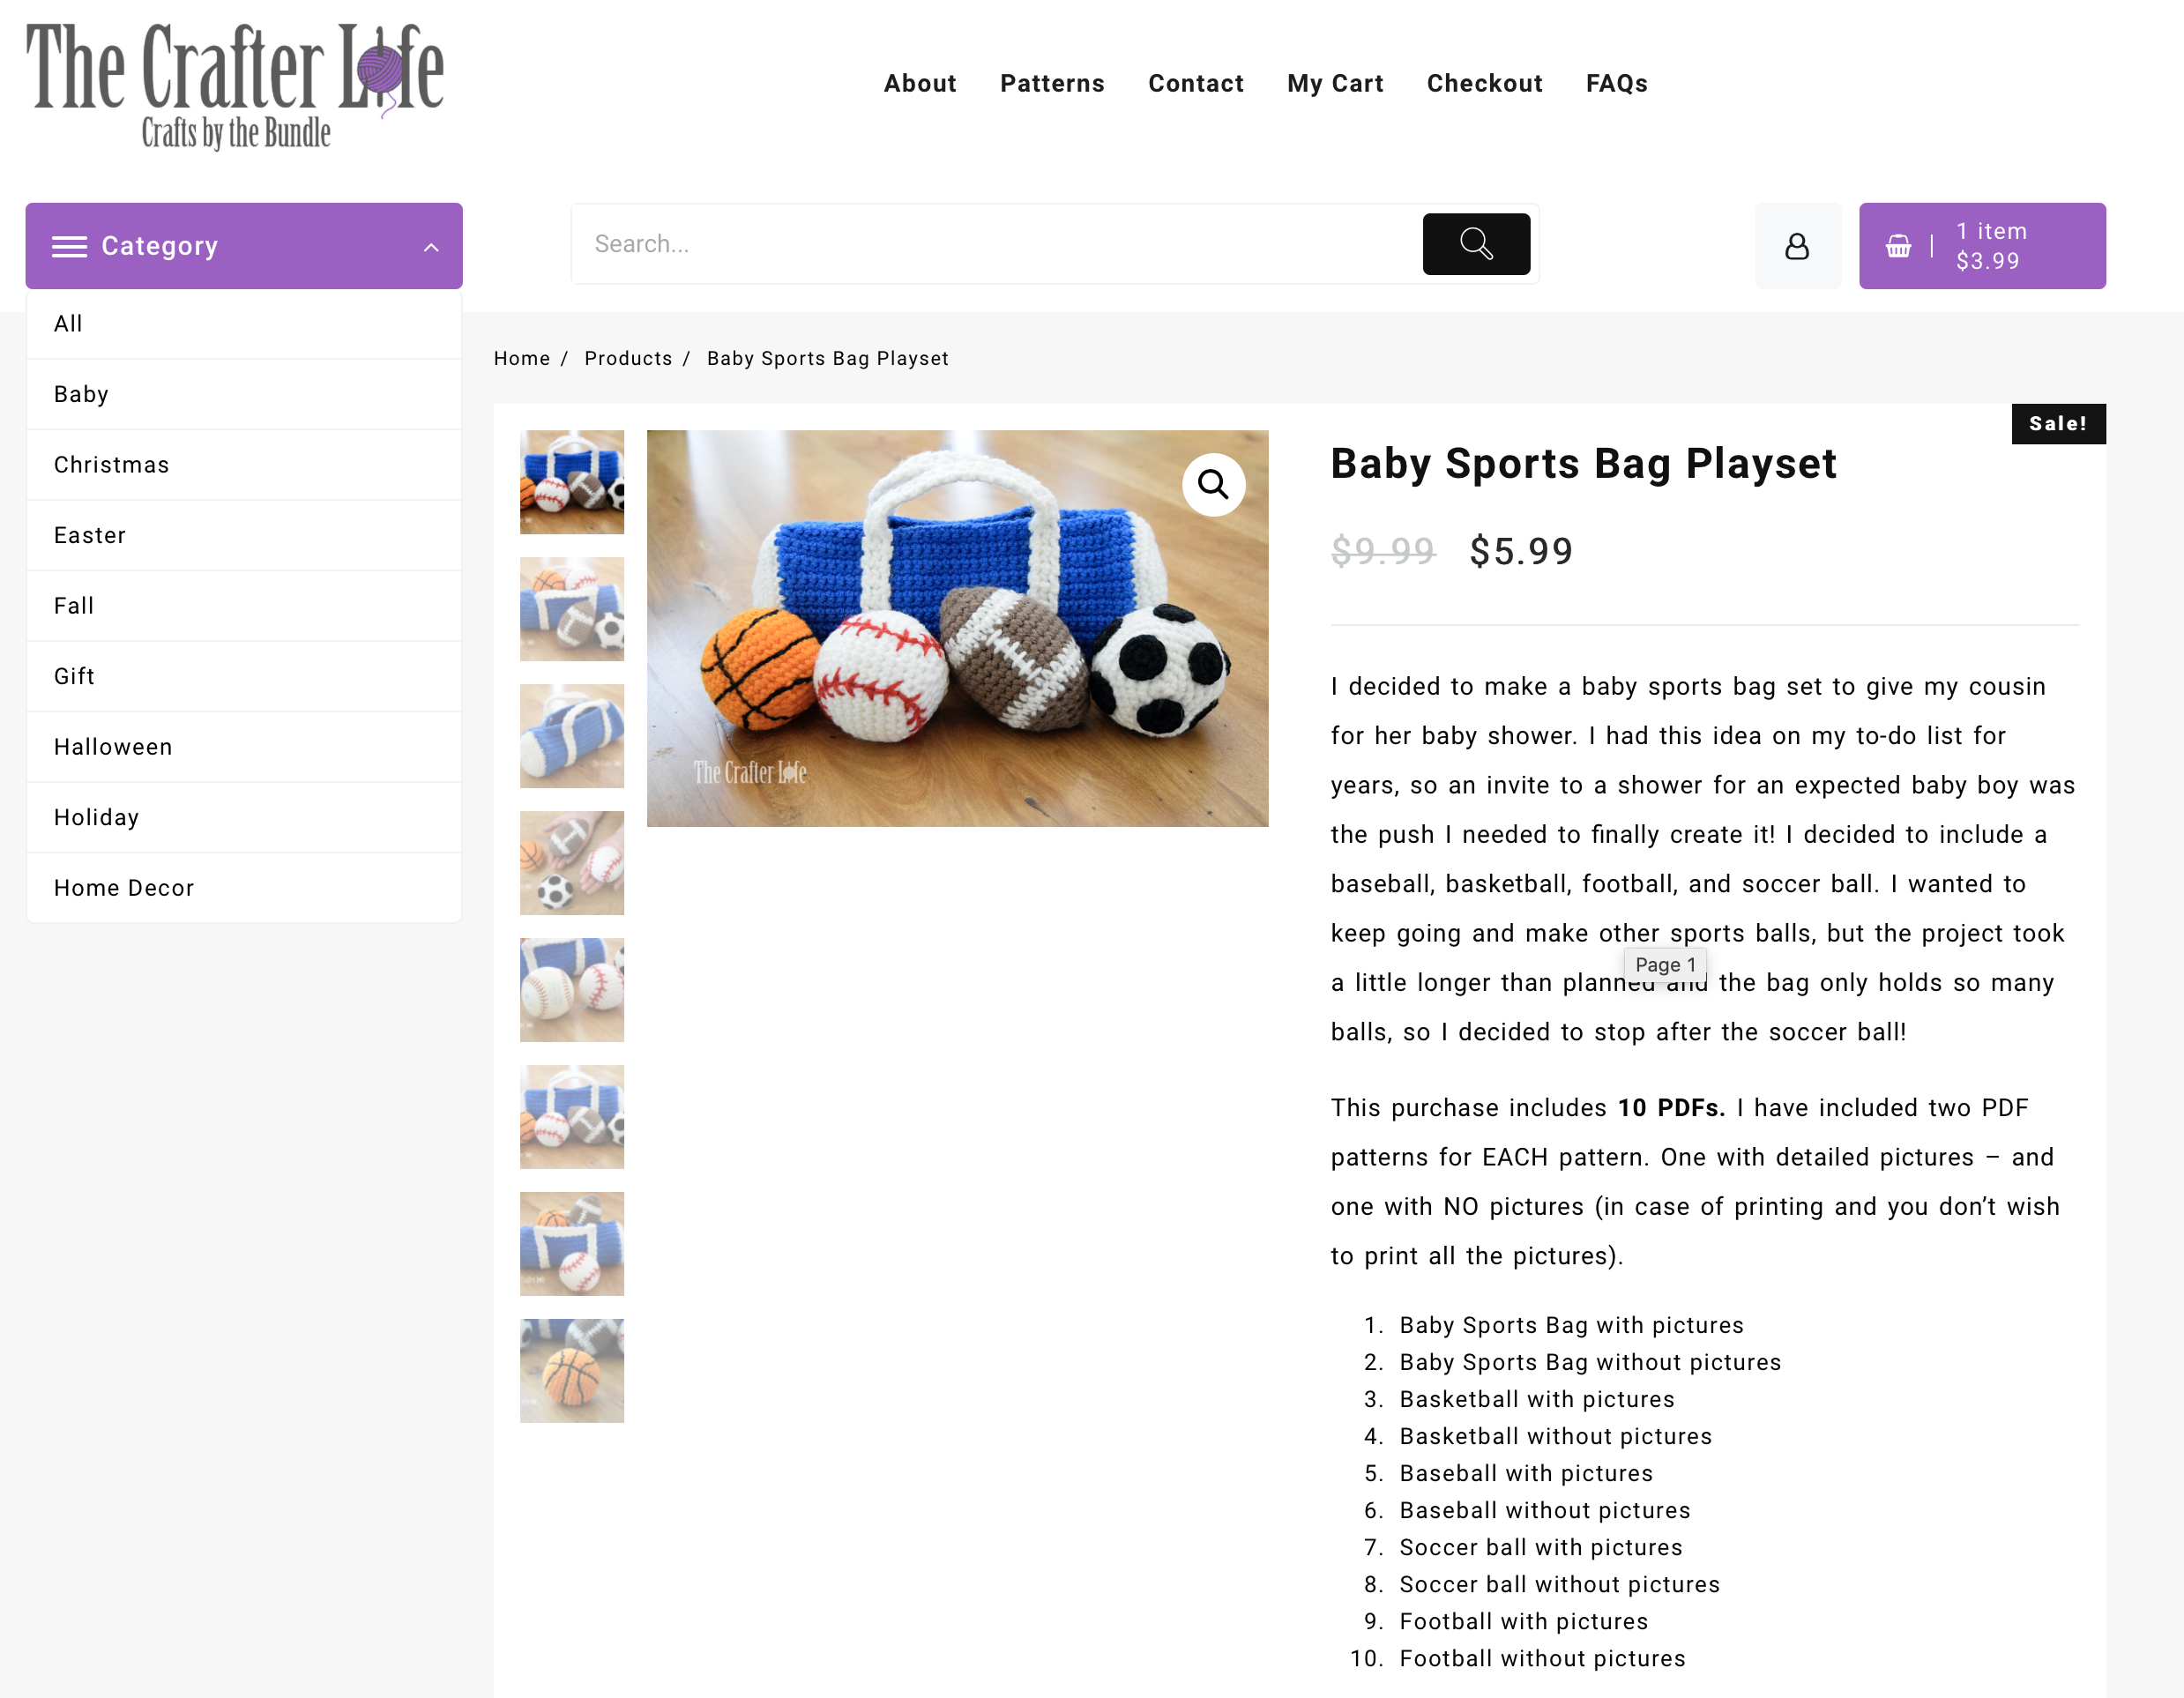
Baby Sports Bag Playset
I decided to make a baby sports bag set to give my cousin for her baby shower. I had this idea on my to-do list for years, so an invite to a shower for an expected baby boy was the push I needed to finally create it! I decided to include a baseball, basketball, football, and soccer ball. I wanted to keep going and make other sports balls, but the project took a little longer than planned and the bag only holds so many balls, so I decided to stop after the soccer ball! I made the bag in blue and white, but it would be fun to make in different team/school colors.
The Baby Sports Bag Playset is part of my premium collection of patterns and can be found on TheCrafterLifePatterns.com. This set INCLUDES 5 PATTERNS – A TOTAL OF 10 PDFs! I have included two PDF versions of EACH pattern (Sports Bag, Baseball, Basketball, Football, Soccer ball). For each item in the set, one of its PDF versions includes detailed pictures and one contains NO pictures (to make printing easier).
I have provided a FREE version of my basketball pattern below. Your purchase of the premium Sports Bag Playset collection will also include a basketball pattern with helpful pictures in addition to the printable PDF without pictures, along with the rest of the patterns for the entire Sports Bag Playset!
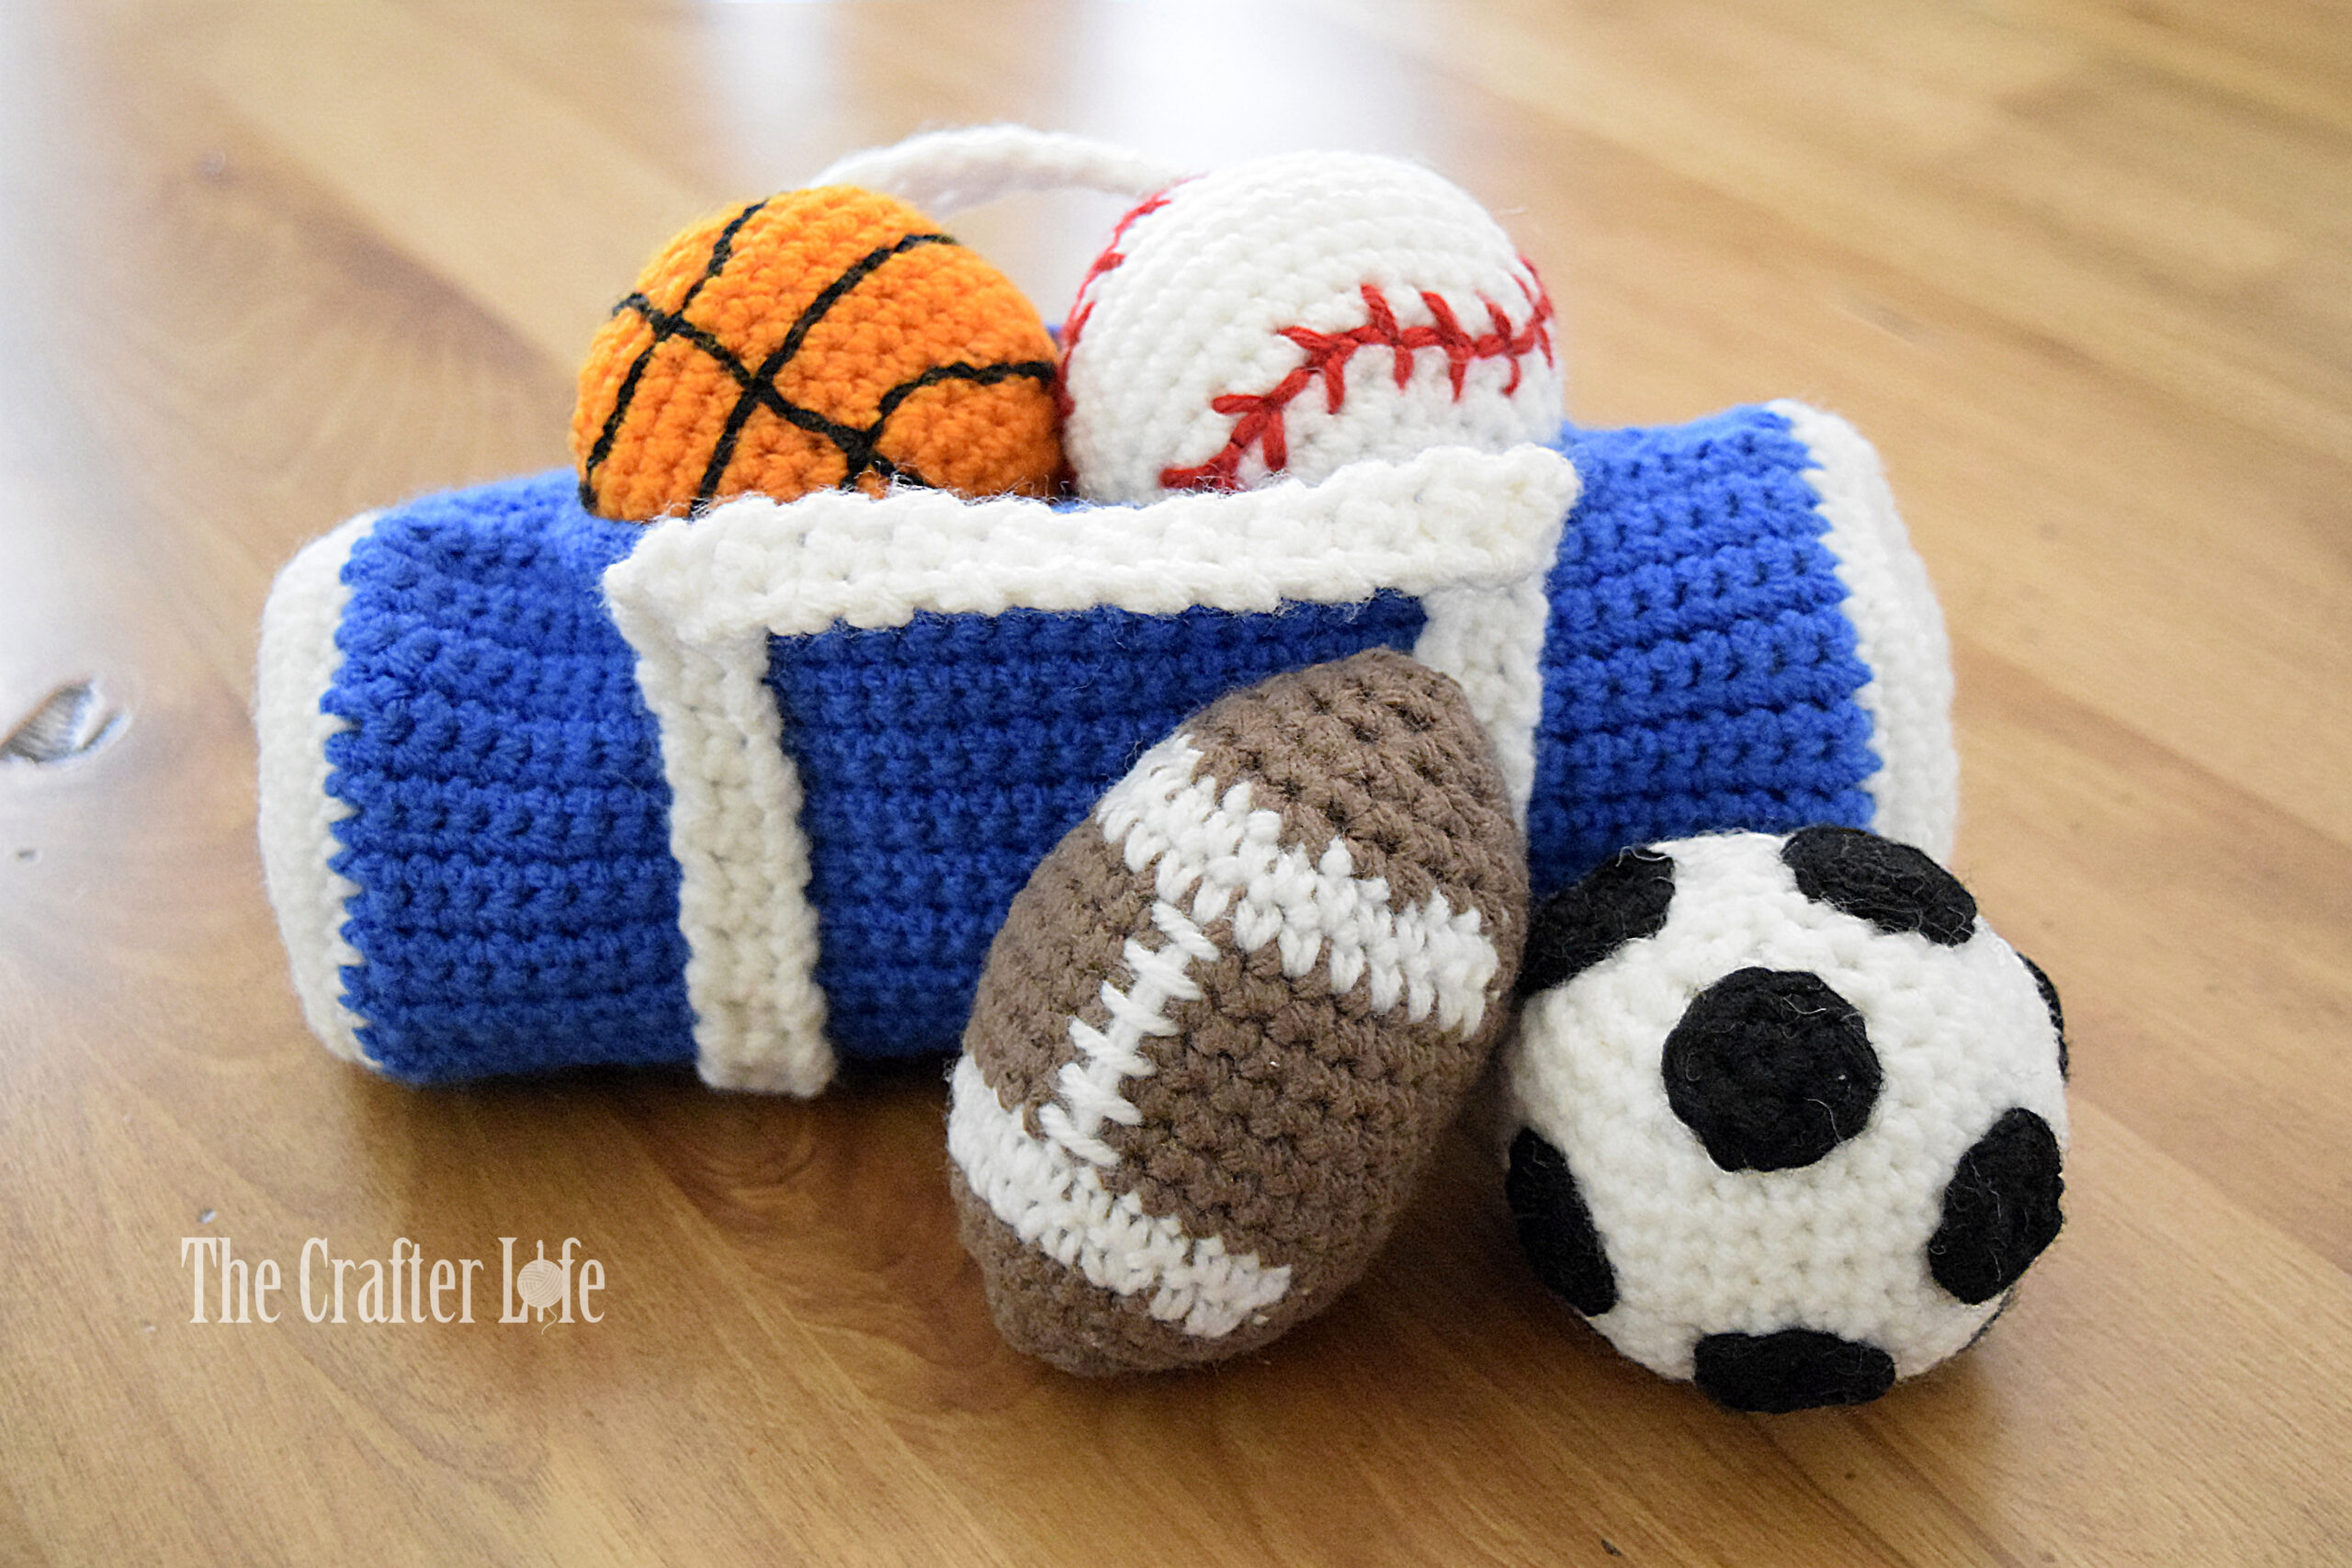
Sports Bag Playset- Mini Basketball
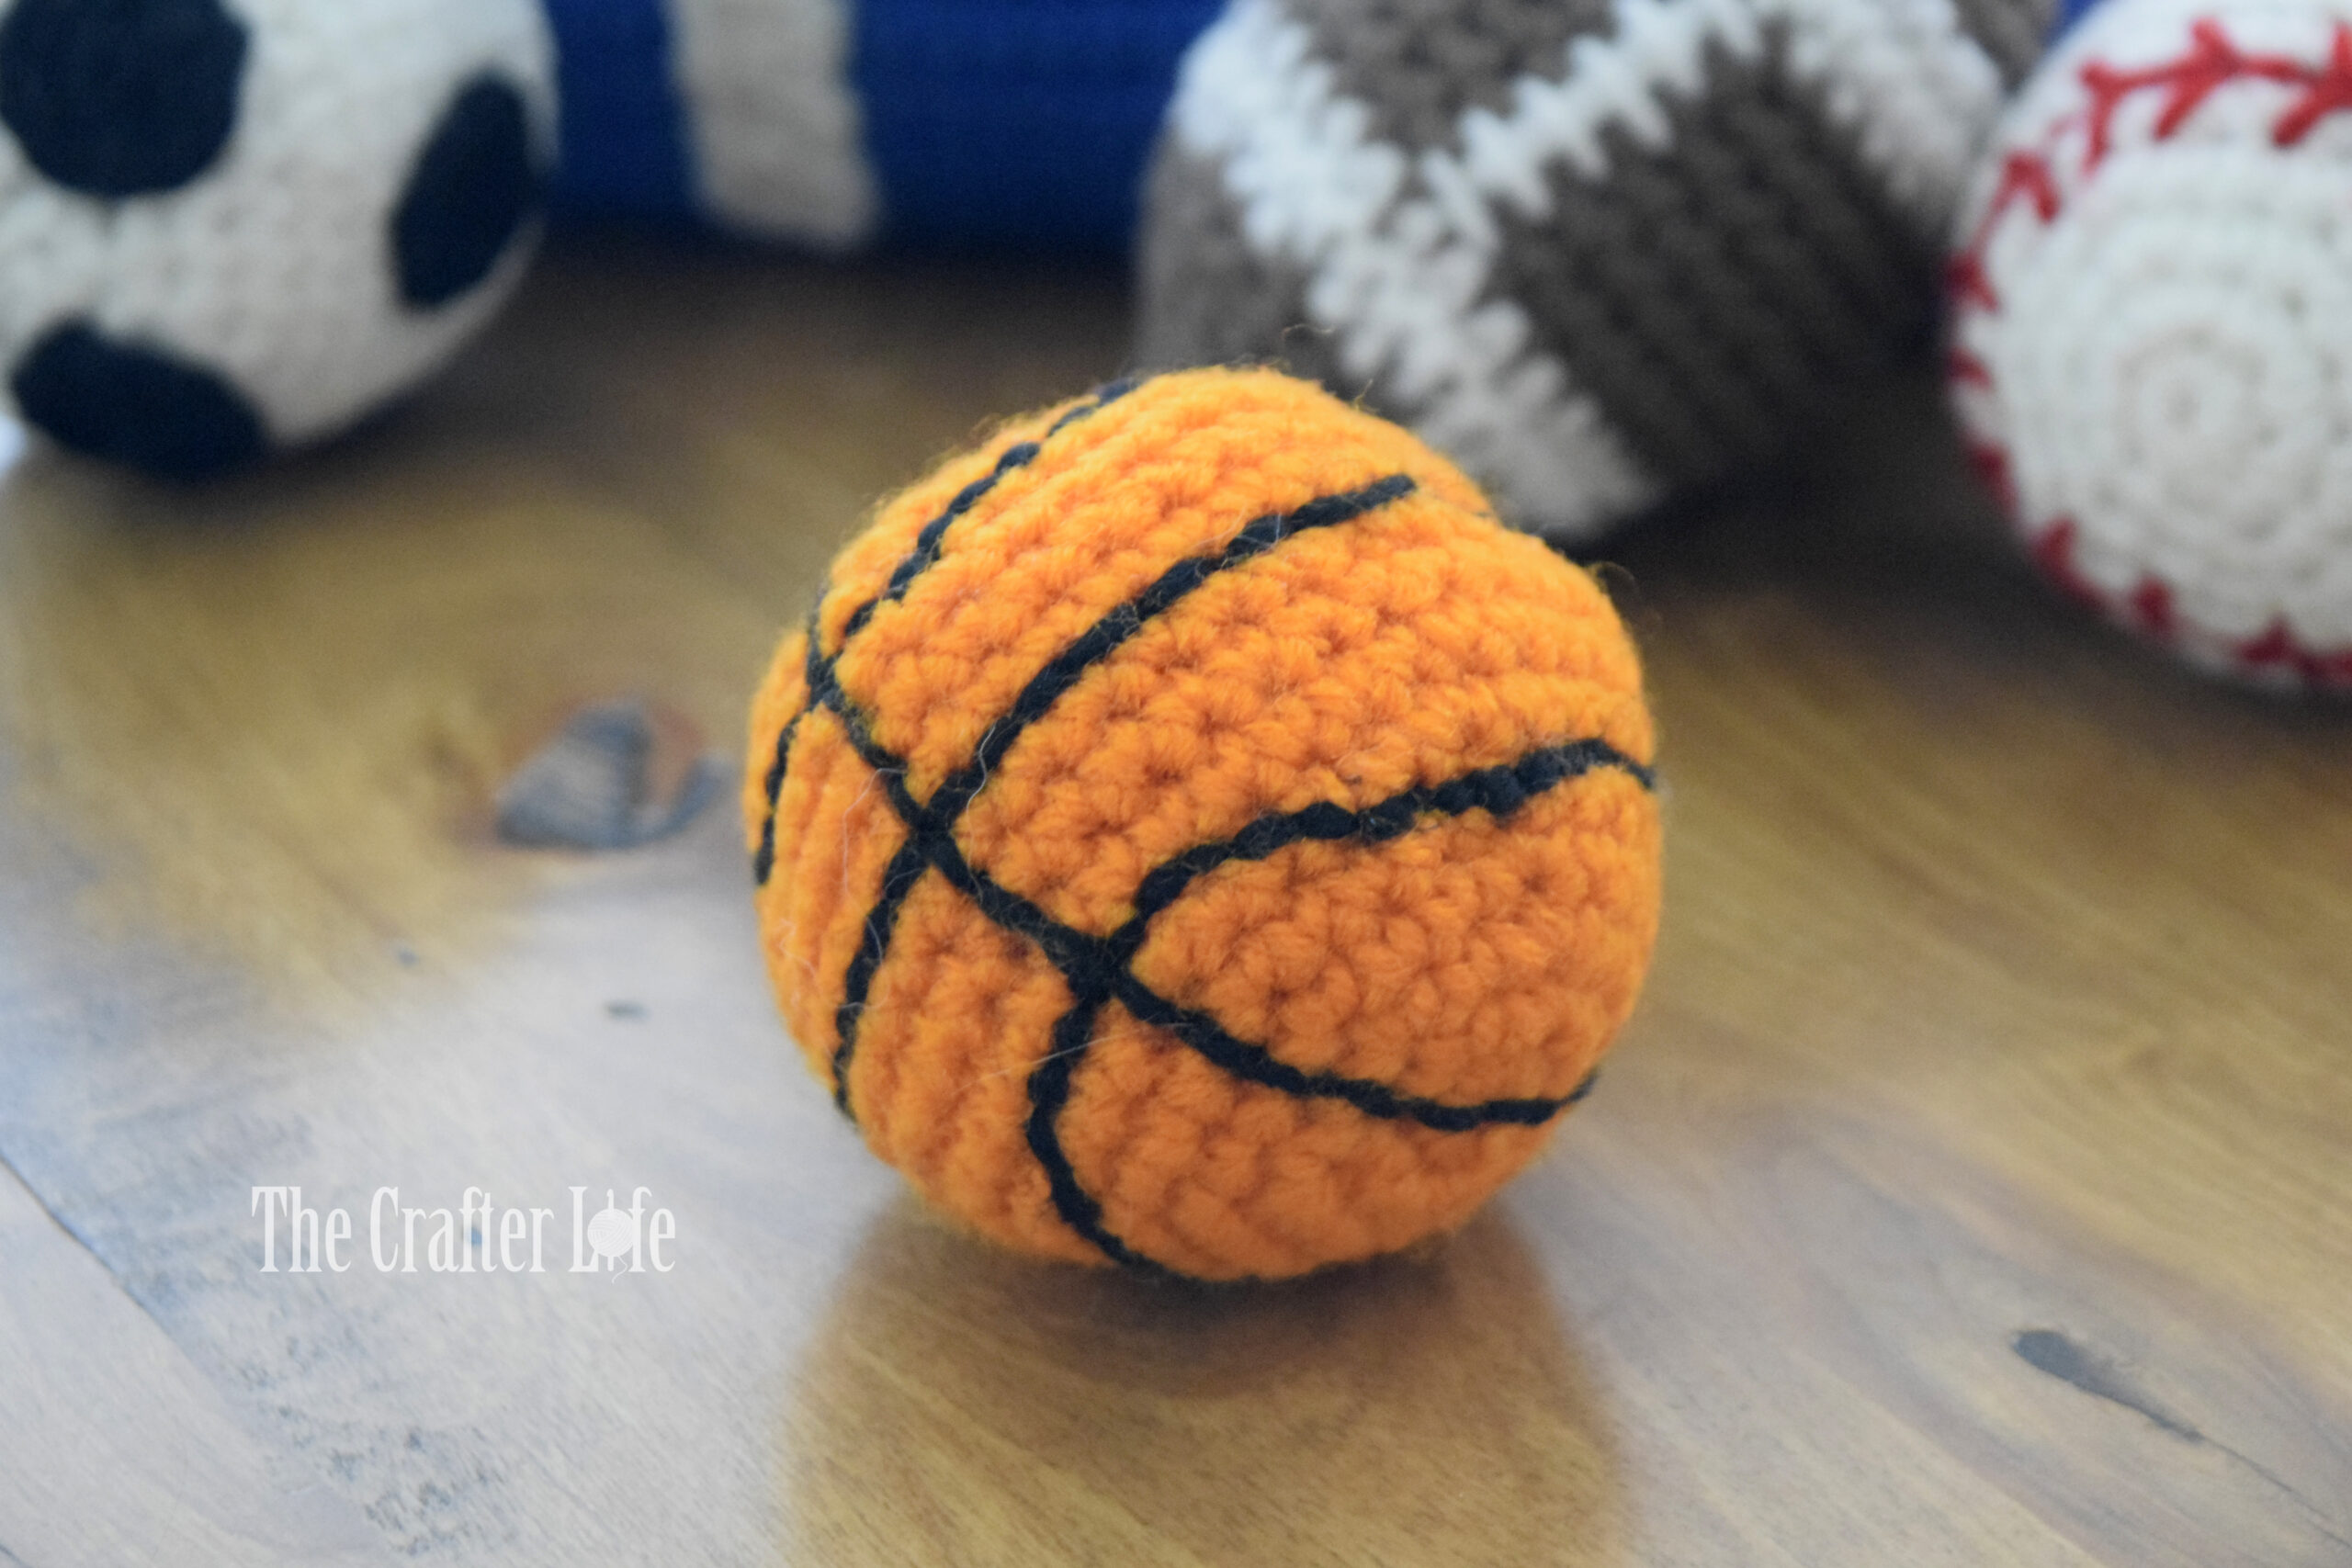
This project is a slam dunk! I made a mini basketball to go along with my Baby Sports Bag Playset. Of course, it could be used alone as a fun toy or decoration. It could also be used as a part of so many other crochet projects! It’s a perfect sized plush for little hands to hold. Have fun by making several basketballs in your favorite team colors! It is a fairly quick project to make so it might be a fun gift idea for several people!
FINISHED MEASUREMENTS
The basketball is about 8 inches around (circumference) and 2 ½ inches wide/across at its widest (diameter).
MATERIALS
– Size 5.00 mm crochet hook or size needed to obtain gauge
– Worsted weight (4) acrylic yarn in Orange (I used Red Heart Super Saver yarn in Pumpkin.)
– Worsted weight (4) acrylic yarn in Black (I used Red Heart Super Saver yarn in Black.)
– Fiberfill
– Scissors
– Tapestry needle for weaving in ends and sewing on lines
– Straight pins (to help when sewing on ball lines)
– Stitch markers
– Measuring tape
ABBREVIATIONS
– ch = chain
– chs = chains
– sc = single crochet
– sc2tog = single crochet 2 together (single crochet decrease)
– slst = slip stitch
– st = stitch
– sts = stitches
GAUGE
5 sc = 1 inch
5 rounds of sc = 1 inch
PATTERN NOTES
- The basketball is made with continuous rounds of single crochet stitches. Do not join continuous rounds unless otherwise stated. Simply work the first stitch of each round in the first stitch of the previous round. Attach a stitch marker to mark rounds and move marker as you complete each round.
- Brackets [ ] indicate portions of the pattern to be repeated.
DIRECTIONS
Basketball
*Use your 5.00 mm hook and orange worsted weight yarn.
* The basketball is worked in continuous rounds. Work first stitch of round in first stitch of previous round. Use a stitch marker if needed.
*Make sure to pull the magic ring closed and weave in/secure end at closure at the beginning. Weave in other loose ends as your work. This is because it will be harder to do later once the basketball gets larger.
Round 1: Make a magic ring, ch 1, work 6 sc in the ring, pull ring closed. (6 sc)
Round 2: Work 2 sc in each st around. (12 sc)
Round 3: Repeat [sc in next st, 2 sc in next st] around. (18 sc)
Round 4: Repeat [sc in next 2 sts, 2 sc in next st] around. (24 sc)
Round 5: Repeat [sc in next 3 sts, 2 sc in next st] around. (30 sc)
Round 6: Repeat [sc in next 4 sts, 2 sc in next st] around. (36 sc)
Rounds 7-12: Sc in each st around. (36 sc)
Round 13: Repeat [sc in next 4 sts, sc2tog] around. (30 sc)
Round 14: Repeat [sc in next 3 sts, sc2tog] around. (24 sc)
Round 15: Repeat [sc in next 2 sts, sc2tog] around. (18 sc)
***Before moving to Round 16, make sure your loose ends are secured inside the ball and use fiberfill to stuff the ball to your desired amount of fullness. It will be more difficult to stuff once the opening gets smaller. You can always add a tiny amount more of stuffing once you complete the final round.***
Round 16: Repeat [sc in next st, sc2tog] around. (12 sc)
*Make sure to have all your fiberfill stuffing in the ball at this point. It will be difficult to stuff after the next round since the opening will be so small.
Round 17: Repeat [sc2tog] around, fasten off, leaving long tail for closing top opening. (6 sc)
Close the opening
Use your tapestry needle and the long tail you left at the end of Round 17 to weave the tail through the front loops of each consecutive stitch from Round 17, making sure to take the needle in the direction from the inside of the opening to the the outside. Once you have woven the thread through the front loop of each stitch, pull the thread (but not extremely tight) so that the top opening of the basketball closes. Next, take your needle and thread through the middle of the closed opening and bring it out somewhere else on the body of the ball. Pull the thread so that the top bulge at the closed opening disappears. Then take the needle and thread back inside the ball one stitch from where you came out and bring it back out at a different place on the ball. Continue this a few times until you feel the yarn is secure and then cut the yarn as close to the ball as possible and push any remaining tail on the outside of the ball to the inside so it isn’t visible.
Sewing Lines on Basketball
***Make the lines using your black yarn and tapestry needle. Use straight pins and insert them into the ball to outline the lines and mark where your stitches should be placed. I started with the two lines that run straight around the ball (one horizontal like the equator and one vertical like the prime meridian, or like a “cross”). I pinned and sewed them on separately from one another. Then, I did the two circular lines on each side last. I also did each of those separately. You may need to look at a basketball to determine where to place the pins for each line section. Once you are satisfied with the positioning of the pins/the basketball lines, use your tapestry needle and an extra long strand of black yarn to backstitch the the lines on the ball, following the outline of the pins. Remove the pins as you go along. Try to make each stitch equal in length. Once you have all the lines stitched on the ball and you are satisfied with how they look, secure your yarn ends on the inside of the basketball when finished. See below for more detailed instructions.***
- Place straight pins straight around the center of the ball (Round 9 should be about the center so you could place your pins on top of Round 9). Try to make the straight pins equally spaced apart so when you go to make your stitches, they will be the same length if you use the same holes in the ball as the straight pins. Once you are satisfied with the positioning of the pins, cut a long strand of black yarn and thread it through your tapestry needle. Sew/backstitch the line onto the basketball, removing the pins as you stitch. Do this by first removing a pin, inserting your needle down through the hole the pin was in and then back up through the hole in which the next pin is (removing the next pin as you draw your needle up through its hole). Make sure to draw up a long portion of your black yarn since you will use it to stitch around the entire length of the ball. Next bring your needle back down through the original hole to form one backstitch. Then, bring your needle back up through the hole of the next pin (removing the pin as you do so). Once you have drawn up your entire length of that portion of the yarn, take your needle back down through the same hole as you brought it up through to begin your first stitch (the same hole in which the second pin you removed was). You should now have two stitches made. Continue backstitching along the path made by the pins until you reach back around the ball where you began. If you have a really long strand of black yarn to work with still, before your do your last stitch, stop and start pinning the next line on your ball. Then you can complete the last stitch and take your yarn through the ball and back up through a pin on the next line to begin that line with the same strand of yarn. If you need to use a new strand of yarn for the next line, you can finish your stitches for the first line and secure your yarn on the inside of the ball.
- Place straight pins straight around the center of the ball so that it crosses your first line going the opposite direction (if you hold the ball so your first line runs horizontally around Round 9, this next line should run vertically around the center). This line should run through the center of the magic circle and the center of Round 17. Try to make the straight pins equally spaced apart so when you go to make your stitches, they will be the same length if you use the same holes in the ball as the straight pins. Once you are satisfied with the positioning of the pins, backstitch the line using your black yarn as you did with the first line. You can either use the same strand of yarn as you did for the first line if it was long enough, or cut a new strand of yarn. Once you have backstitched the line all the way around the ball, move to Step 3.
- Once you have all your stitches made on the 2 lines that run the entire way around the ball, you can now make the two oval-shaped outlines which are the last two lines needed on the basketball. Use your straight pins to create the outline for the first oval section. I made my oval sections intersect with the line made in Step 2. They intersect the second line made in Step 2 about 3 rounds away from the first line made in Step 1 that runs over Round 9 of the ball. I started pinning at this intersection point and went from there, placing pins so they form an arch that reaches to the other intersection on the other side (which is also about 3 rounds away from the first line made). The highest part of my arch reached to Round 5 of the ball. Then I continued pinning a downward arch (which is a reflection of the top arch over/across the line made in Step 2) until I reached back to where I started at the initial intersection point of the line made in Step 2. When you have your pins in place, use your tapestry needle and a strand of black yarn to stitch the oval on the ball using the same backstitch technique you did in Steps 1 and 2, following the path of the pins. If you have a long enough tail from the last line made, you may choose to use the same strand of yarn or cut a new strand to use for the oval section(s). Once you have the first oval section completely stitched, pin and stitch the second oval section on the other side of the ball. Try to make it the same size, shape, and distance away from the first two lines as you made the first oval section. Again, you may choose to use a new strand of black yarn, or continue using the same strand you used for the first oval section if it is still long enough. Once you have finished stitching the oval sections and you are satisfied with them, secure your yarn tails inside the ball. One way to secure your yarn is to bring two strands out through the same point on the ball, knot them, and then use your tapestry needle to take the strands through the inside of the ball and back out through another place on the outside of the ball. Push the knot you made to the inside of the ball and cut the strands as close to the ball as possible, pushing any extra tails on the outside to the inside of the ball.
***Your mini basketball is finished! Have fun using it for your creative projects or with my Baby Sports Bag Playset!
This pattern is property of TheCrafterLife.com
You may not sell my patterns or claim them as your own. You may make items to sell (i.e. on Etsy) from my patterns but I ask that you link back to my site (TheCrafterLife.com) and provide credit for the pattern. You are welcome to share my patterns on social media as long as you link back directly to my site by providing the link. No copying and pasting of any patterns will be allowed under any circumstances.