Halloween Yarn-Wrapped Letters!
Happy Halloween, everyone! I have always liked the look of yarn-wrapped letters so I decided to try making some of my own. Instead of simply wrapping them and leaving them as plain letters, I made each letter into a Halloween object. Let me just say that it was a lot more difficult than I had originally thought. If you are interested in making some of your own, read below to see how I made them.
General Materials:
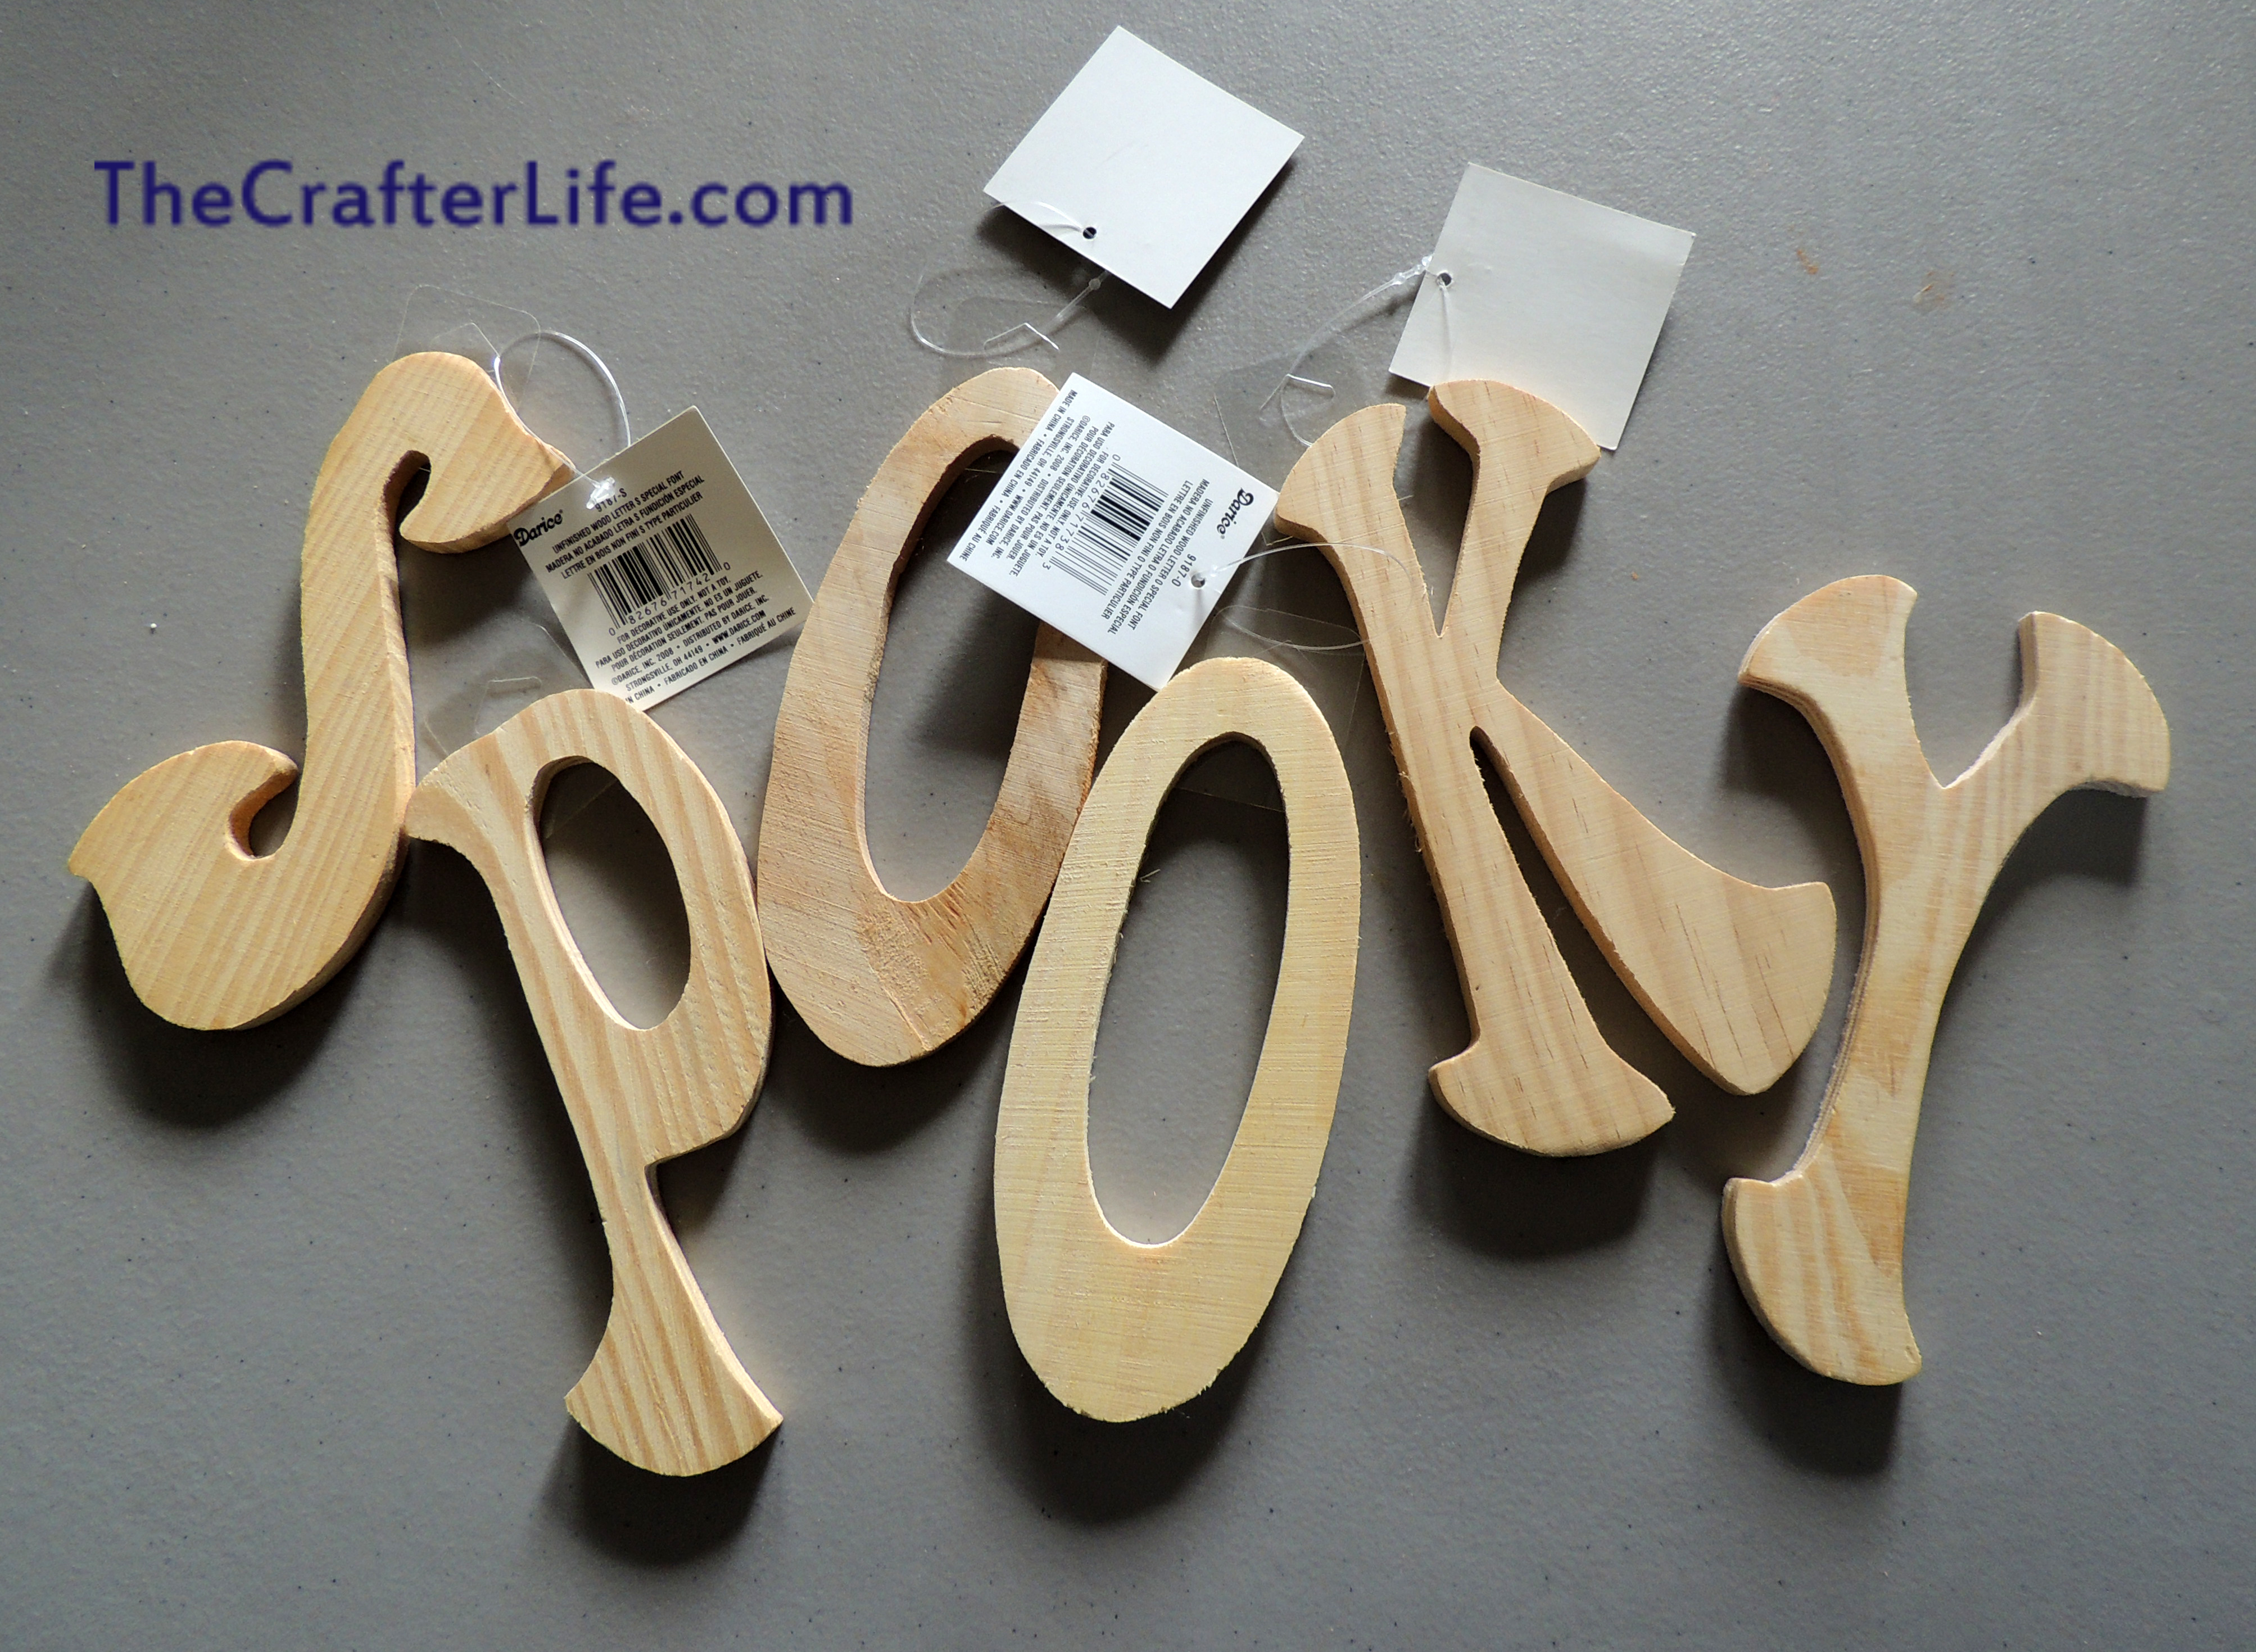
– Wood Craft Letters S, P, O, O, K, Y
– Hot glue gun/glue***
– Scissors
– Yarn in various colors
***You will need a lot of glue for this! I did not expect to use as much glue as I did.
I started with the wooden letters below that I picked up from Jo-Ann Fabrics.
“Ghost” S Letter
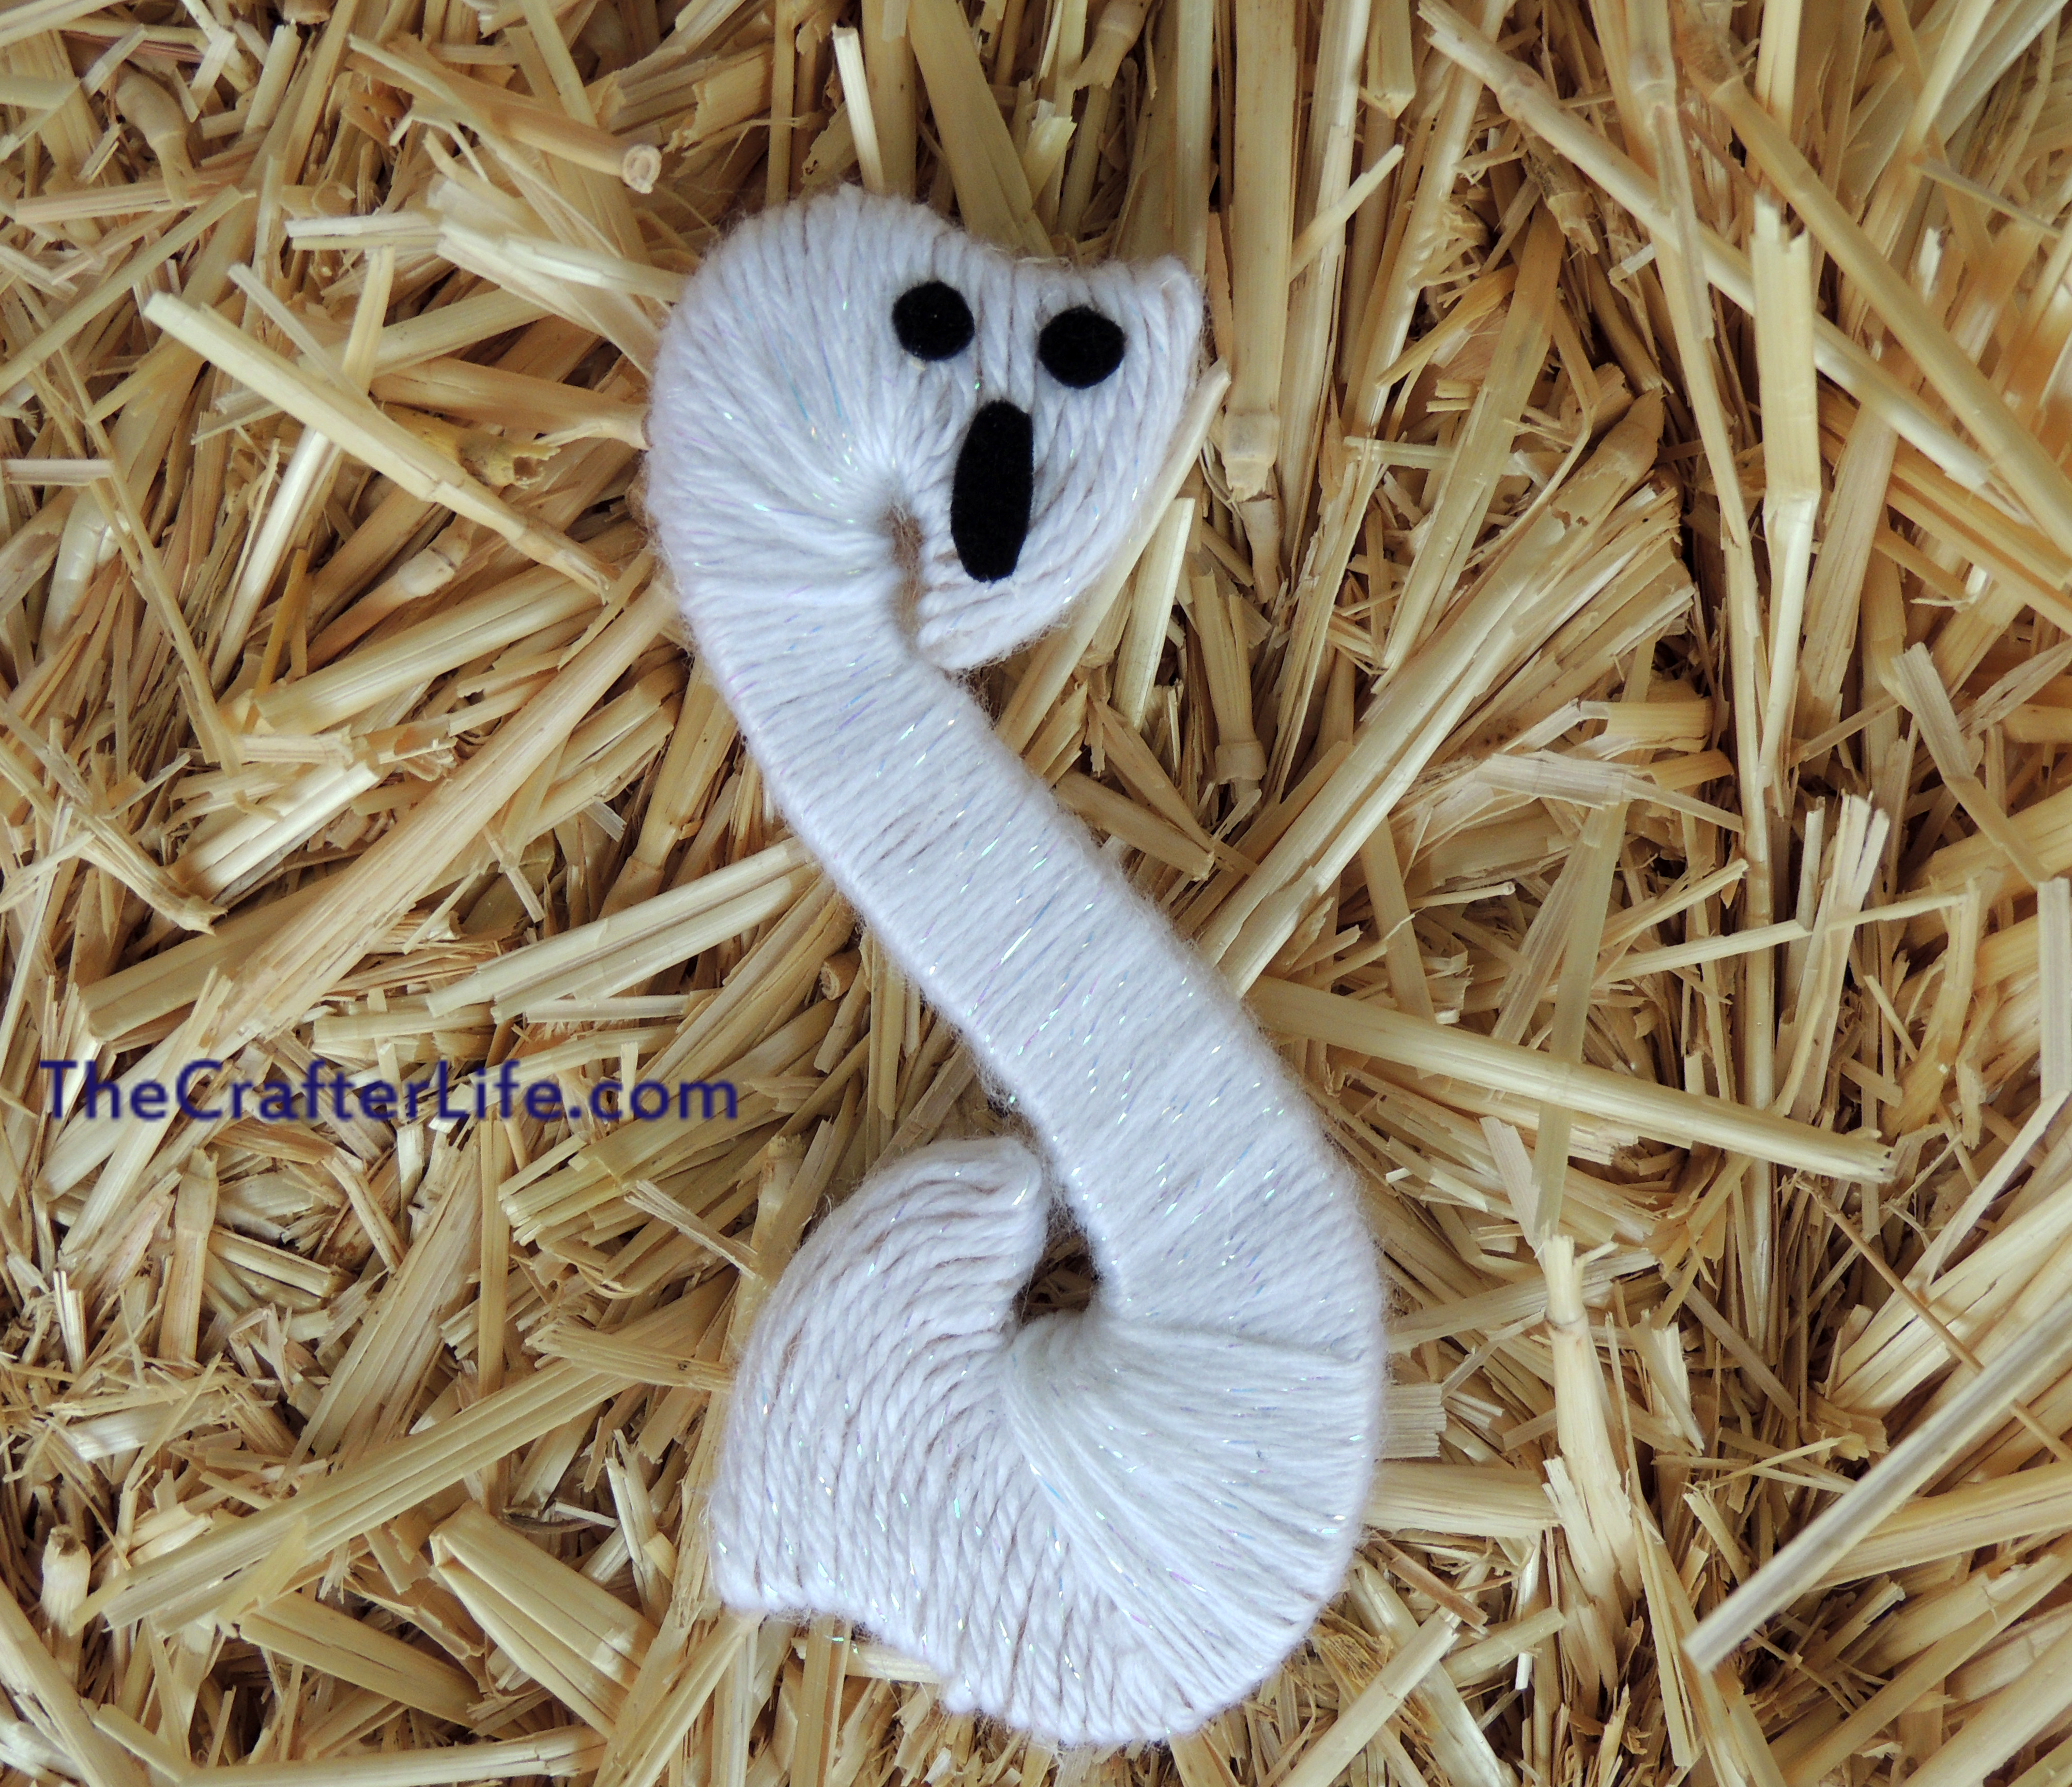
Materials:
– White yarn (I used Loops & Threads Impeccable Glitter yarn in Ice Queen)
– Black felt
Directions:
1. Wrap the S with white yarn. You may need to use hot glue in some areas to hold it in place. You may also need to cut small strips to fill in areas that are missed by wrapping.
2. Cut two eyes and a mouth for the ghost out of black felt.
3. Glue the eyes and mouth in place on the S to form a ghost face.
“Candy Corn” Letter P
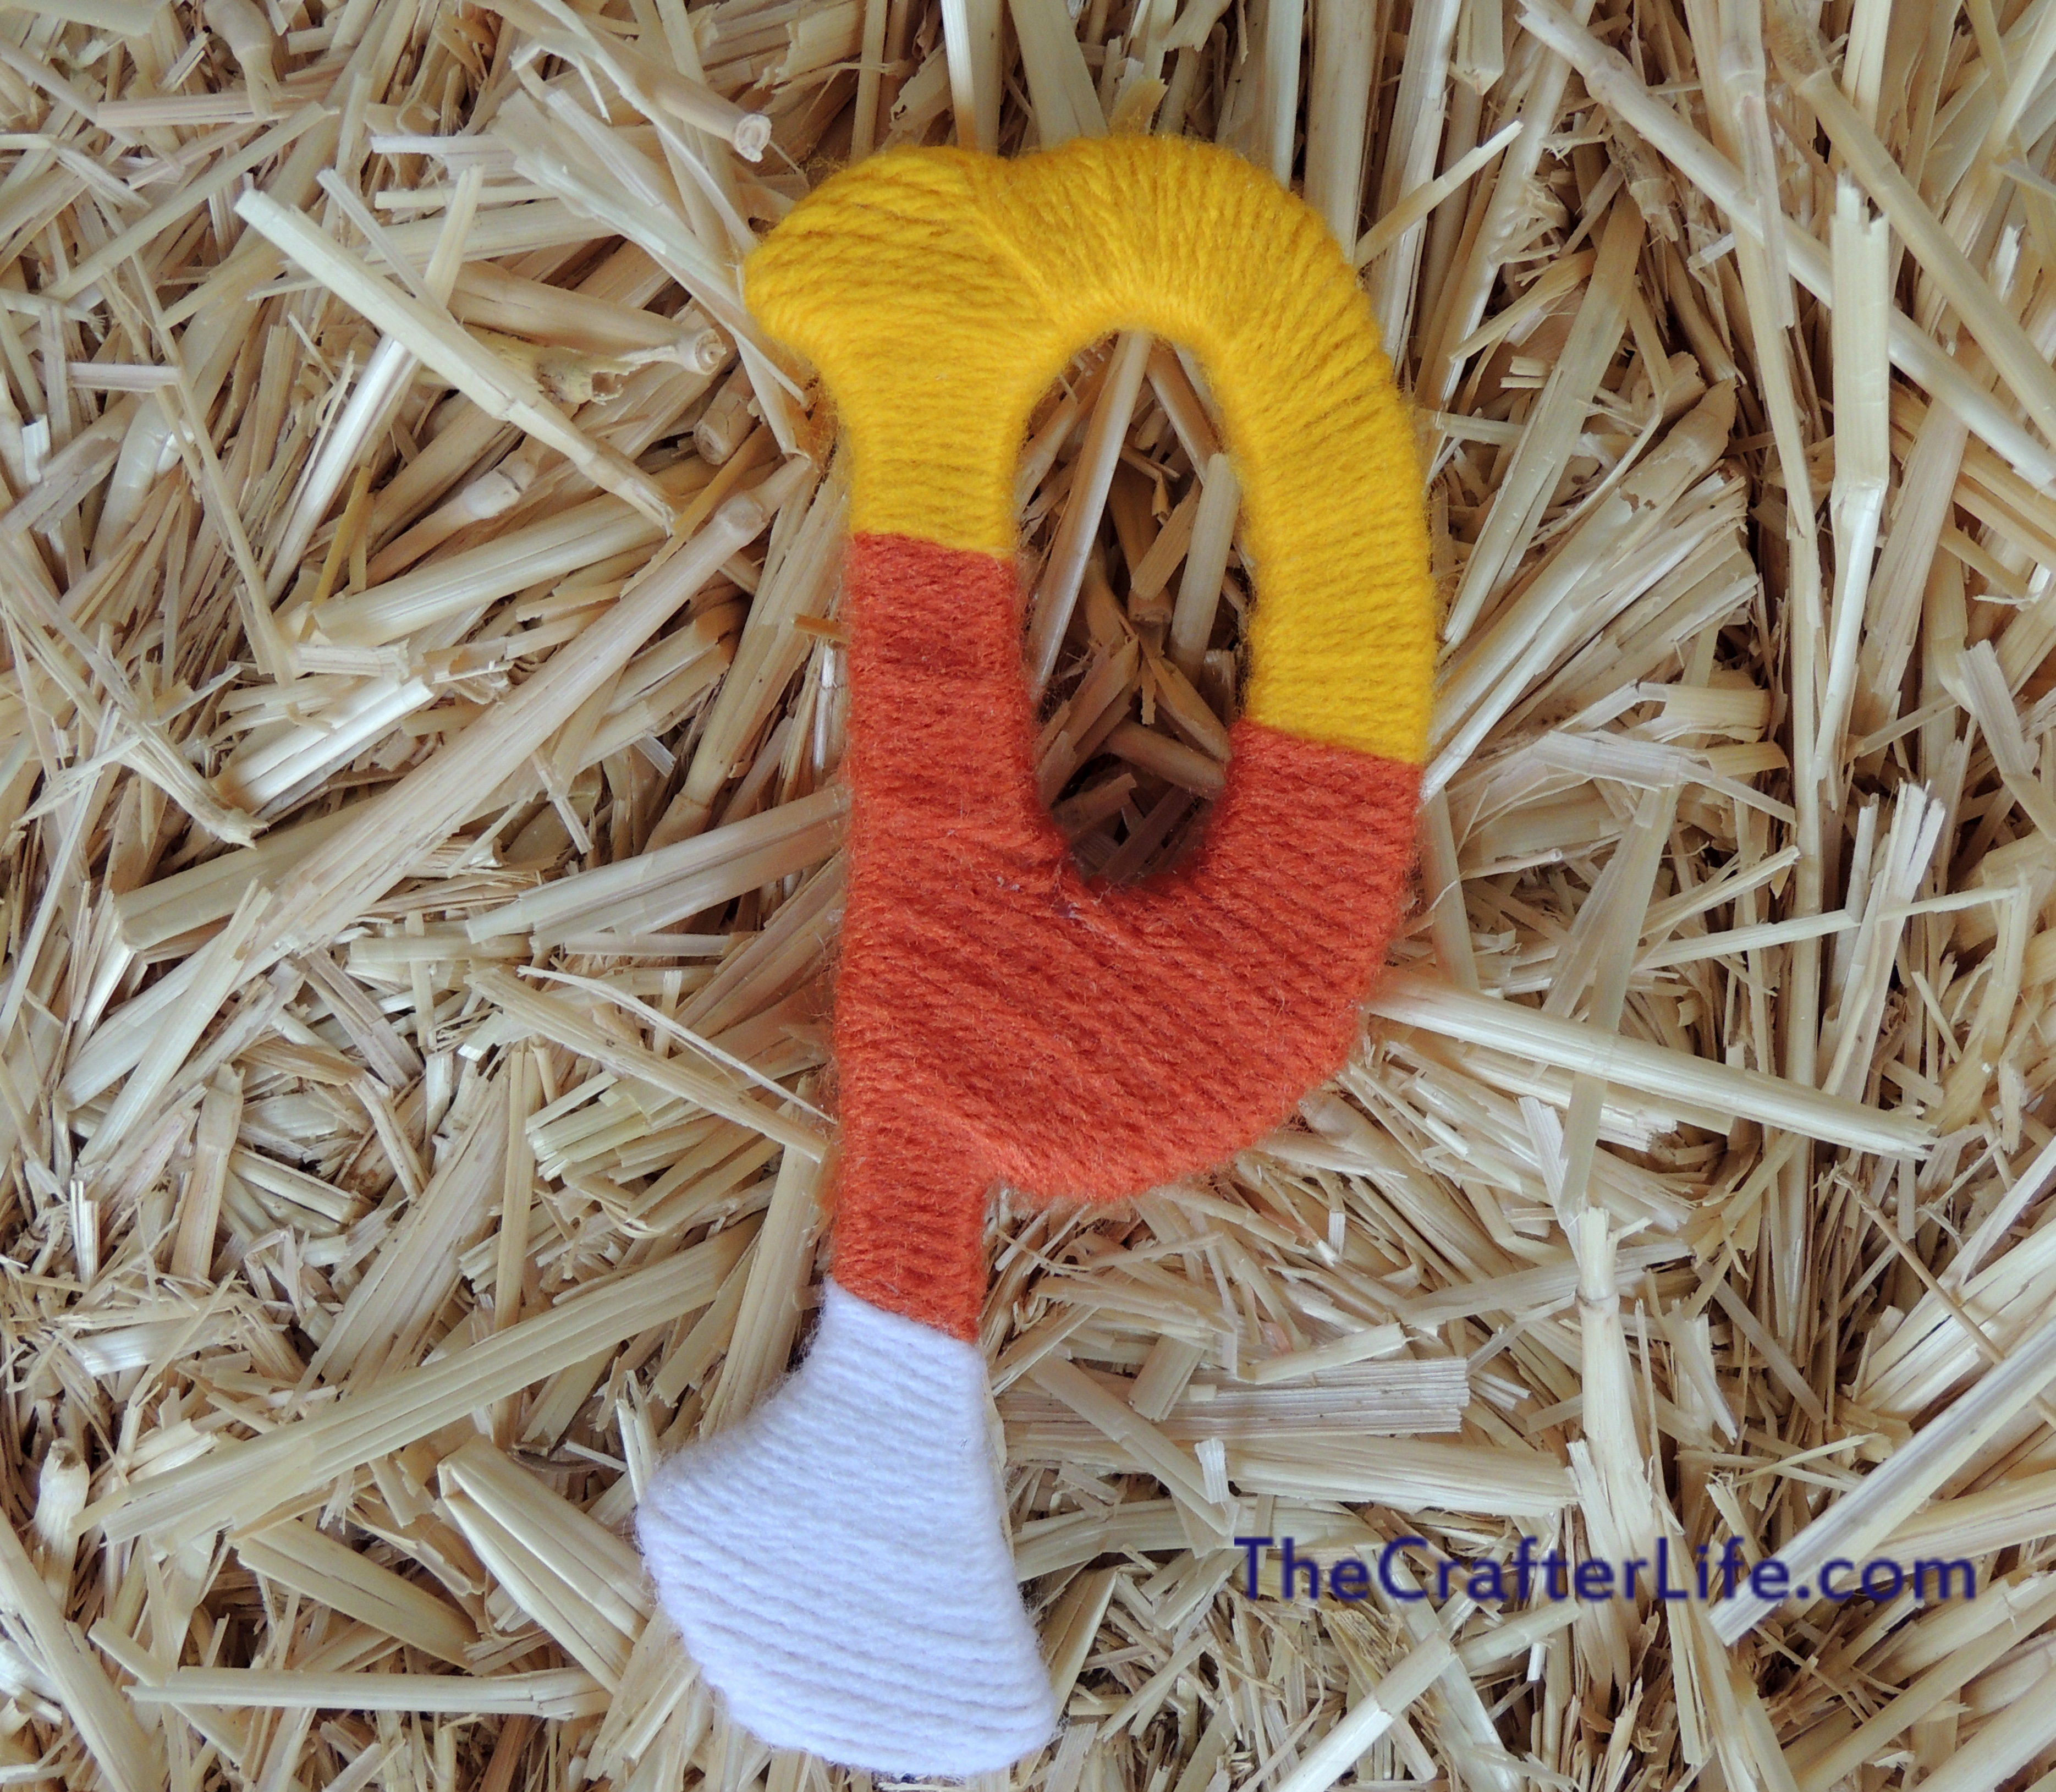
Materials:
– Yellow yarn (I used Loops & Threads Impeccable yarn in Gold)
– Orange yarn (I used Red Heart Super Saver yarn in Carrot)
– White yarn (I used Loops & Threads Impeccable yarn in White)
Directions:
1. Starting at the top of the P, use yellow yarn to wrap the top section. You may need to use hot glue in some areas to hold it in place. You may also need to cut small strips to fill in areas that are missed by wrapping.
2. Use orange yarn to wrap the middle section of the P. You may need to use hot glue in some areas to hold it in place. You may also need to cut small strips to fill in areas that are missed by wrapping.
3. Use white yarn to wrap the bottom tip of the P so it resembles the tip of a piece of candy corn.
“Hanging Bat” Letter O
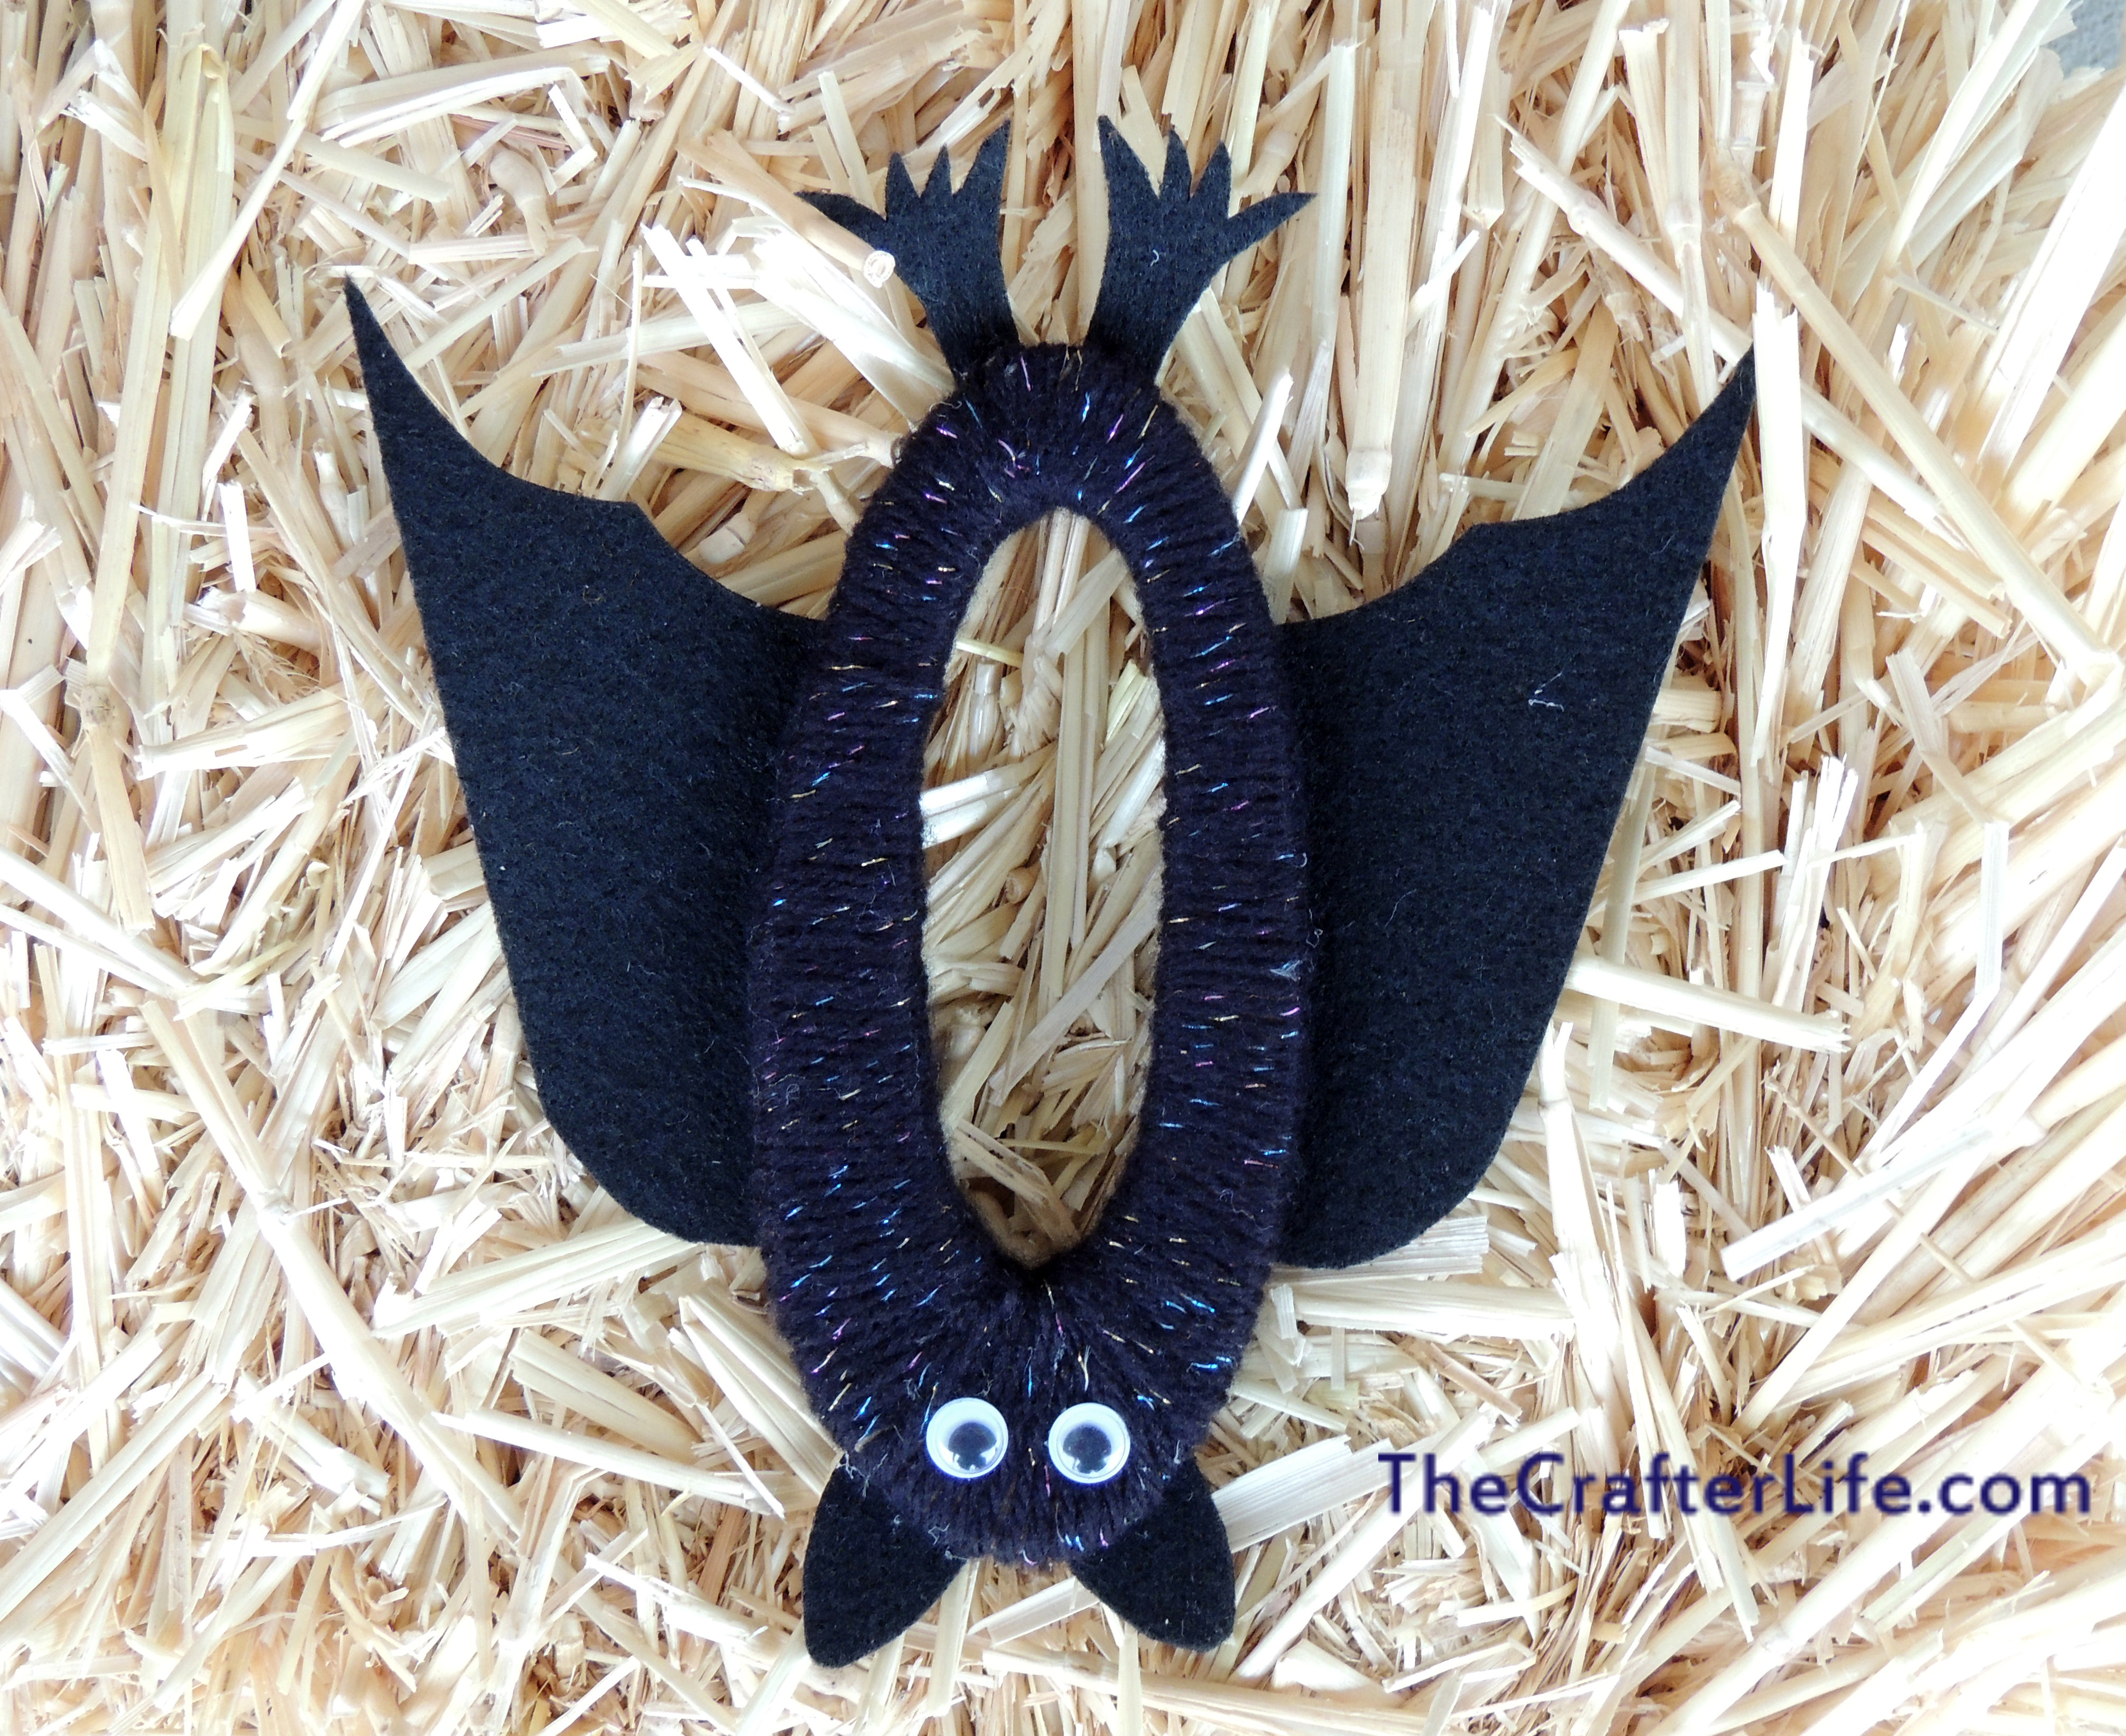
Materials:
– Black yarn (I used Loops & Threads Impeccable Glitter yarn in Mirror)
– Black felt
– Googly eyes
Directions:
1. Wrap the O in the black yarn. You may need to use hot glue in some areas (especially near the curves at the top and bottom) to hold it in place. You may also need to cut small strips to fill in areas that are missed by wrapping.
2. Cut two ears, two wings, and two feet out of black felt. Glue them in place on the back of the O.
3. Glue two googly eyes near the ears on top of the yarn.
“Cobweb-Wrapped Pumpkin” Letter O
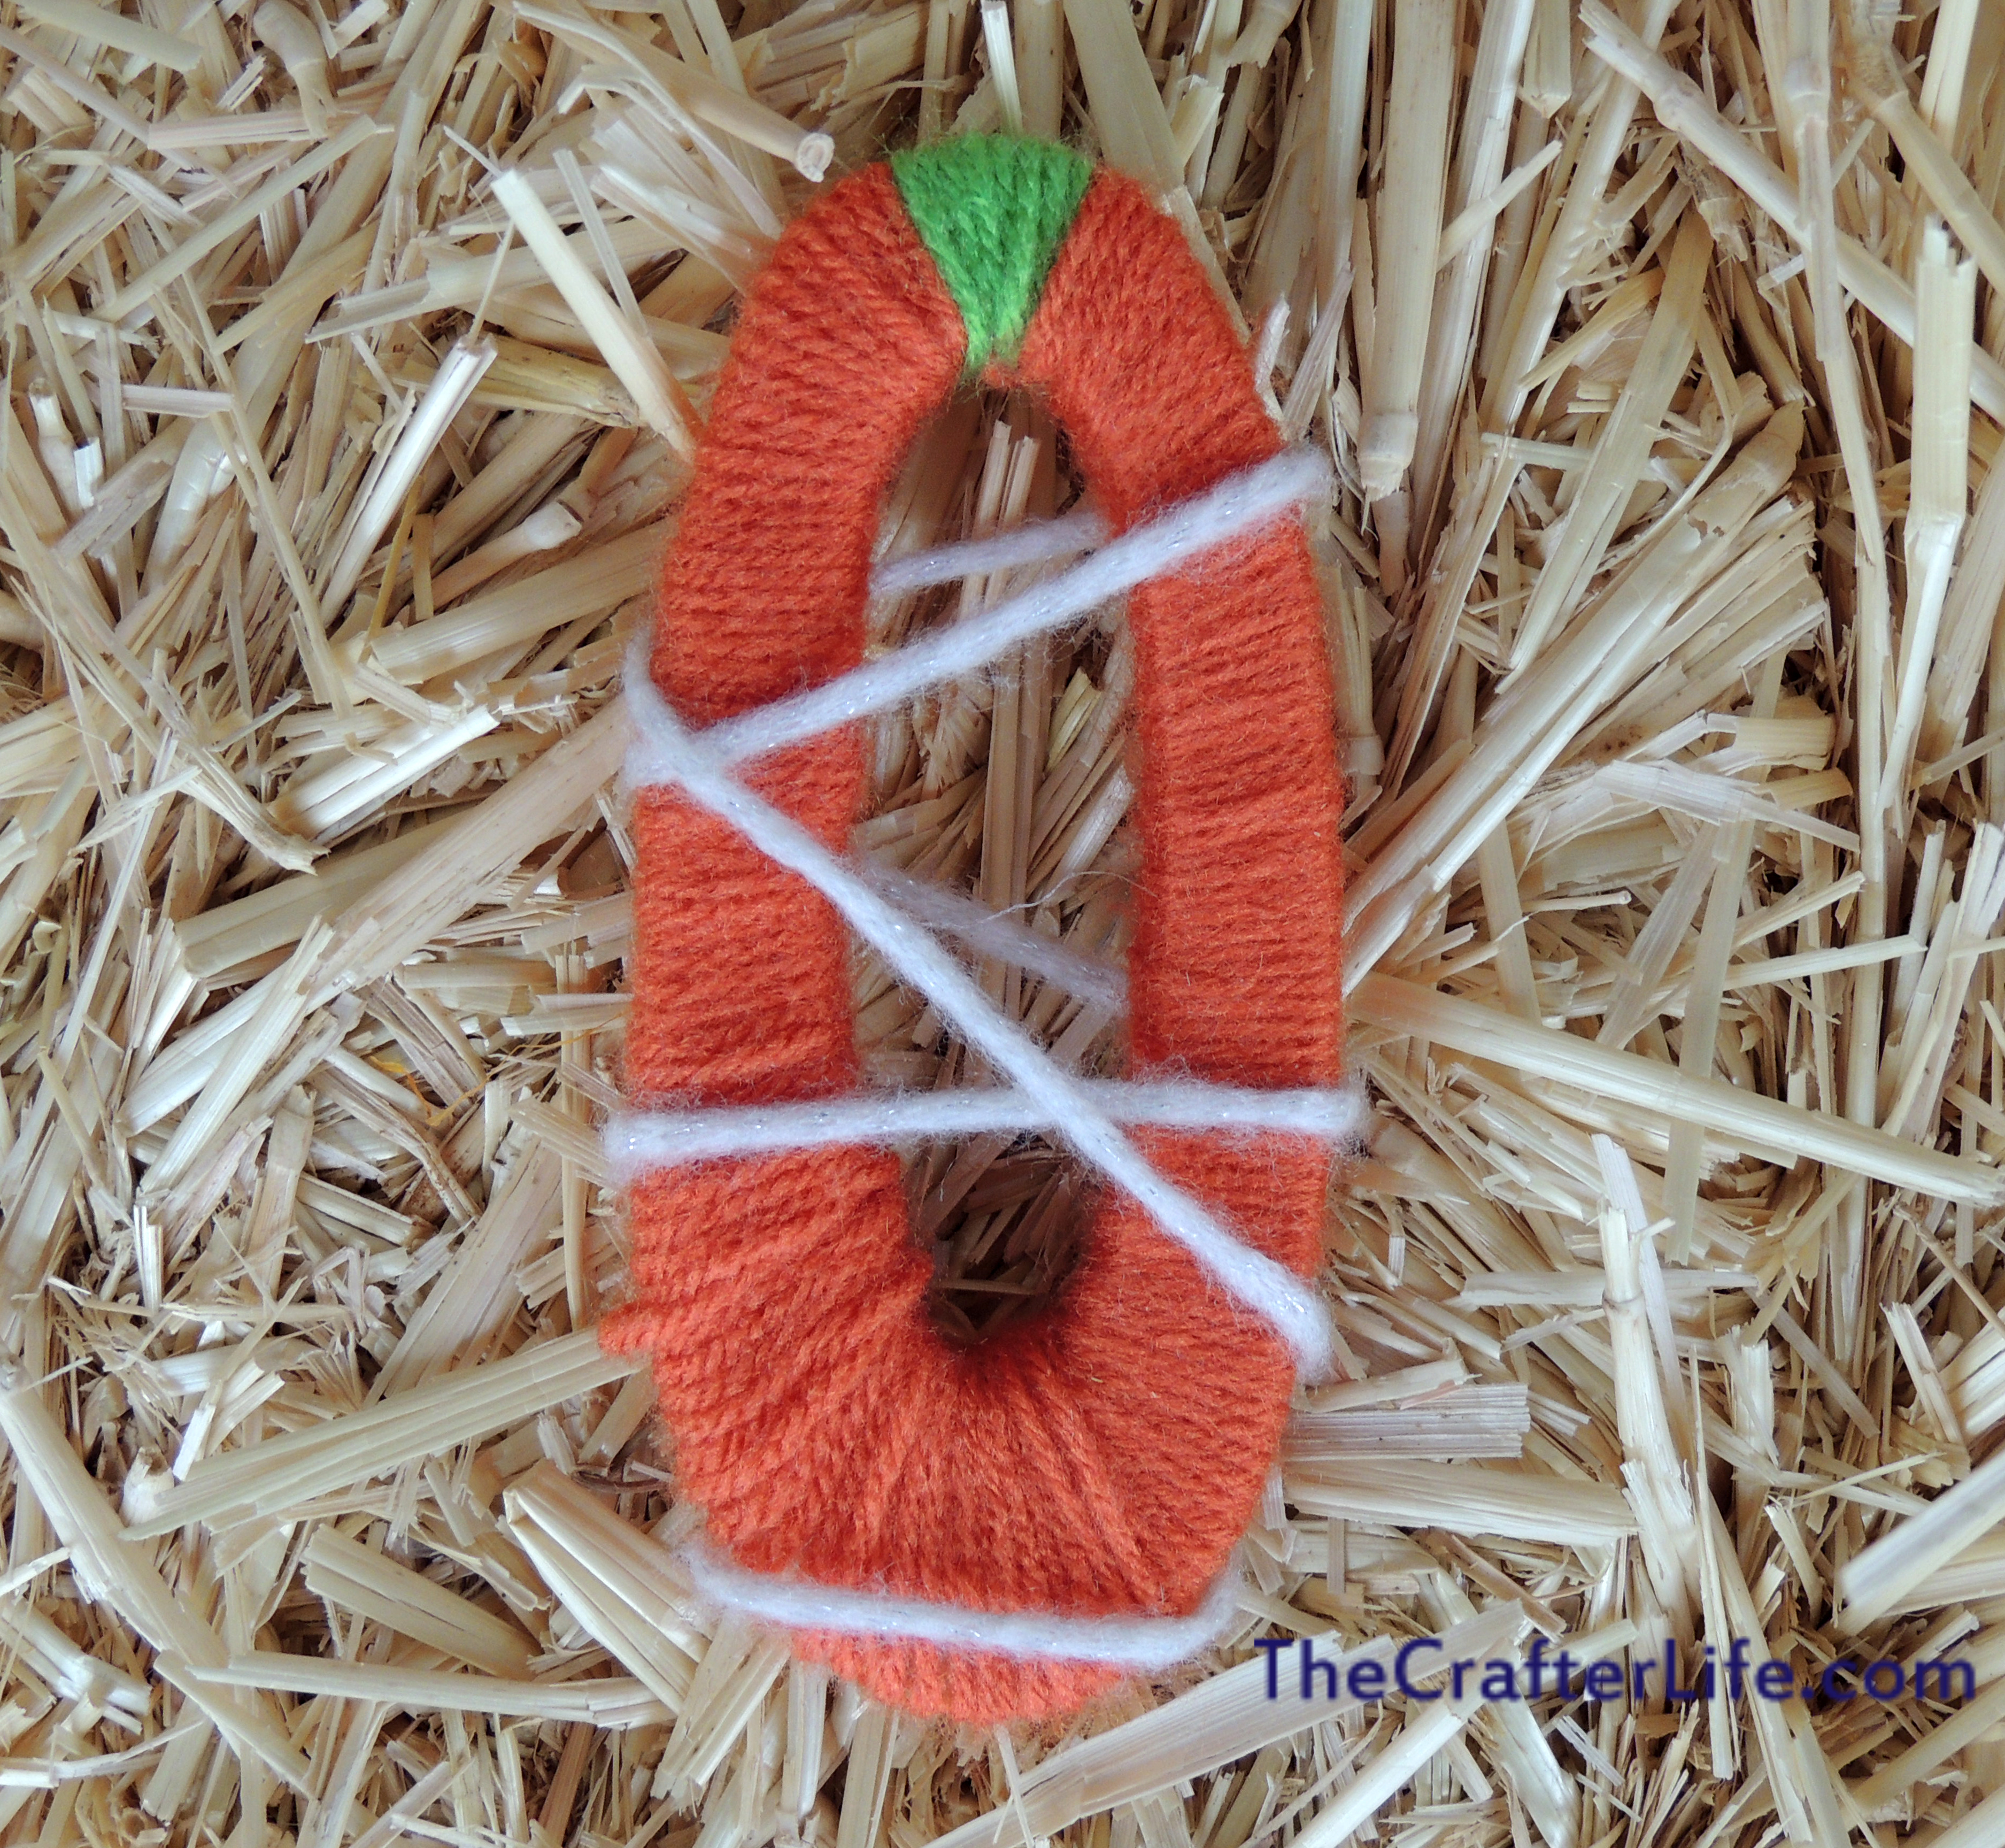
Materials:
– Orange yarn (I used Red Heart Super Saver yarn in Carrot)
– Green yarn (I used Red Heart Super Saver yarn in Spring Green)
– White yarn (I used Isaac Mizrahi Craft Carlyle yarn in Pierre)
Directions:
1. Wrap the O in the orange yarn, leaving space at the top for a small stem. You may need to use hot glue in some areas (especially near the curves at the top and bottom) to hold it in place. You may also need to cut small strips to fill in areas that are missed by wrapping.
2. Wrap the space left at the top of the O for the stem in green yarn. You may need hot glue to keep it in place.
3. Take the white yarn and wrap it around the O to give it a cobweb effect. Use hot glue to hold the ends down in the back.
“Flying Witch” Letter K
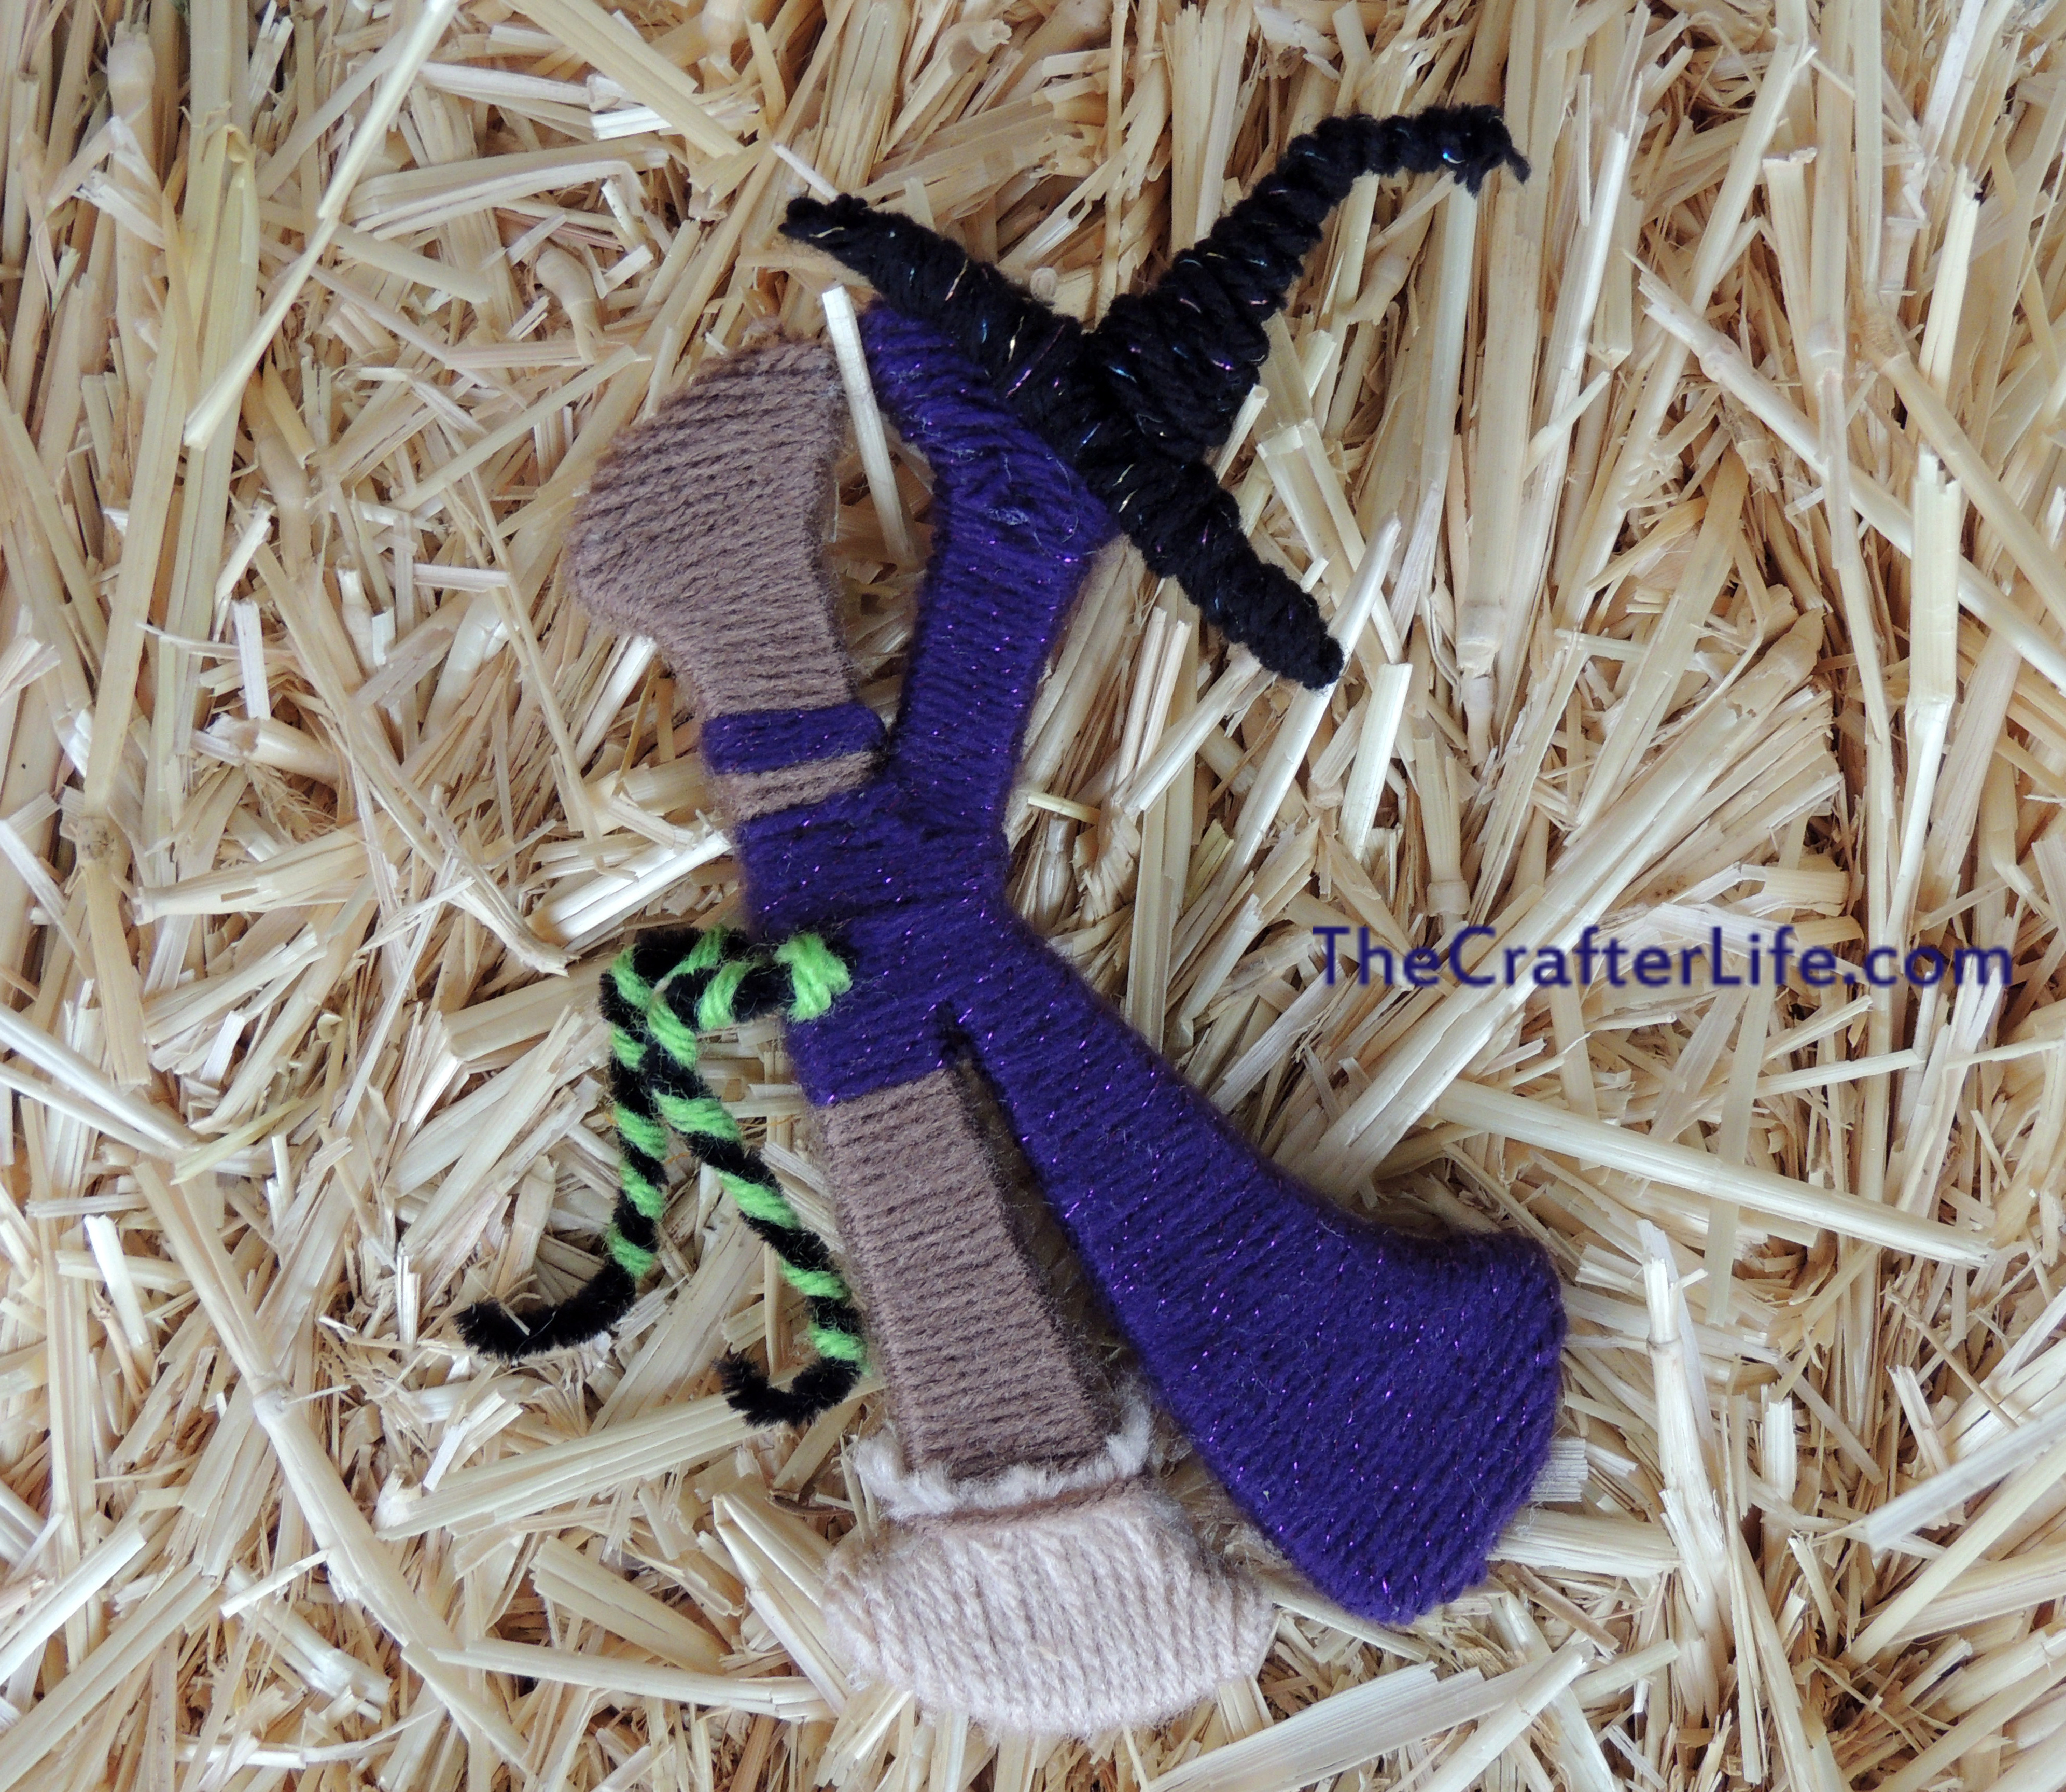
Materials:
– Purple yarn (I used Loops & Threads Impeccable Glitter yarn in Ultra Violet)
– Light brown yarn (I used Red Heart Super Saver yarn in Café Latte)
– Beige yarn (I used Red Heart Super Saver yarn in Buff)
– Green yarn (I used Red Heart Super Saver yarn in Spring Green)
– Black Yarn (I used Loops & Threads Impeccable Glitter yarn in Mirror)
– Two black pipe cleaners
Directions:
1. Bend a black pipe cleaner in half. Each half will be a leg of the witch. Slide the pipe cleaner in between the long part of the K (the broom) and the upper section of the K (the witc’s upper body) so that the legs hang on either side of the K.
2. Wrap the K with the purple yarn in the areas that represent the witch’s body, dress, and cape (see picture). Wrap tightly over the pipe cleaner “legs”. You may want to wrap a small area towards the top of the “broom” to represent the witch’s arm. You may even want to leave a small area exposed where the face would be so it looks like the witch’s nose (I did not do this but thought of it after the fact).
3. Using the light brown yarn, wrap the remaining sections of the long part of the K to form the broomstick. Leave the bottom tip unwrapped.
4. Cut short strips from the beige yarn and hot glue them vertically to the bottom tip of the long part of the K so that it resembles the bottom of a broom. Take a string of the light brown yarn and wrap it once around the beige yarn like in the picture above. It should now look like a broom.
5. Take the other black pipe cleaner and fold it to form a witch’s hat. I started by folding it in half and used that as the tip of the hat. Next, I curled the ends of the pipe cleaner around to form the brim of the hat.
6. Wrap the pipe cleaner “witch hat” in black yarn.
7. Glue the hat to the K.
“Spooky Tree” Letter Y
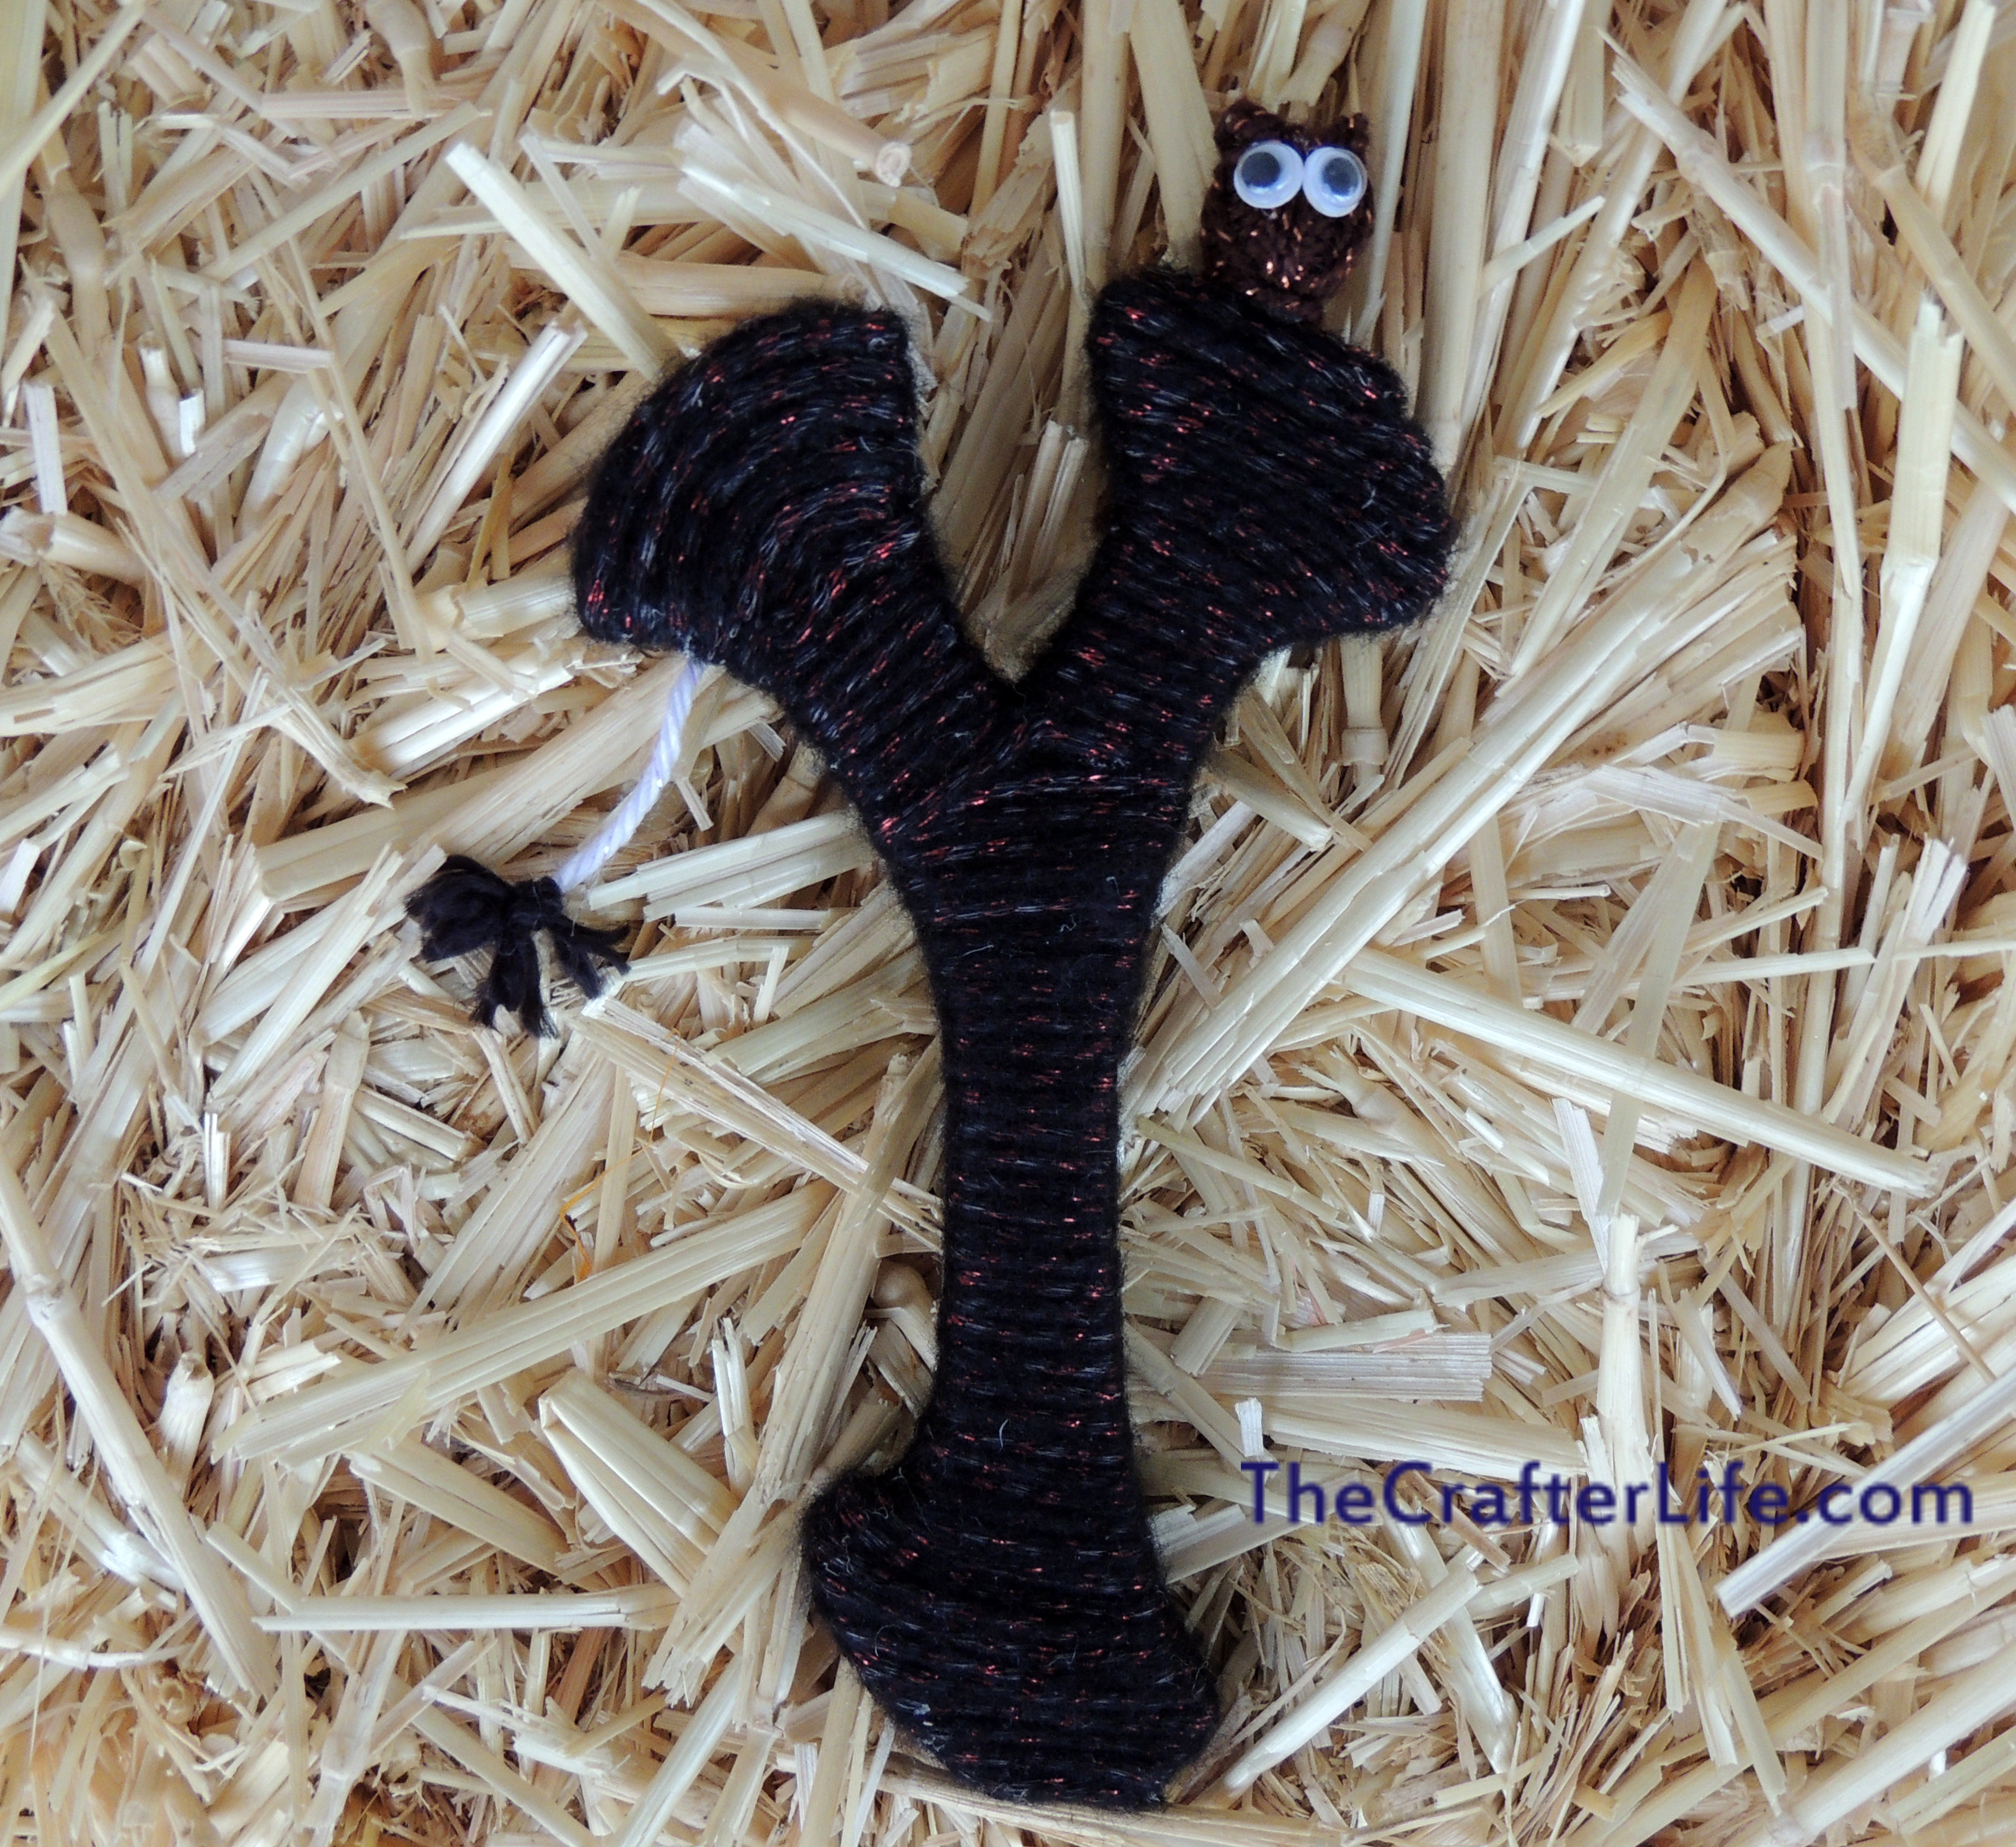
Materials:
– Black yarn (I used Isaac Mizrahi Craft Carlyle yarn in Astoria)
– Brown yarn (I used Vanna’s Glamour Yarn in Copper)
– Small pom pom
– Googly eyes
– Small piece of white yarn
– Small piece of black yarn
Directions:
1. Wrap the Y in black yarn. You may need to use hot glue in some areas to hold it in place. You may also need to cut small strips to fill in areas that are missed by wrapping.
2. Wrap a small pom pom in brown yarn. Pull on the yarn at the top to create the owl’s “ears”.
3. Glue two google eyes to the pom pom to make the owl’s eyes.
4. Glue the owl to the top of the Y.
5. Take tiny strands of black yarn and glue them to a short string of white yarn to create a spider.
6. Glue the white strand of yarn to the tree so it looks like a spider hanging off a branch.
Share your yarn-wrapped letters here or on my facebook page!
**If you like what you see, feel free to pin, share, and link back to my site. Thank you for visiting!