Mummy Topper for Paper Towel Holder
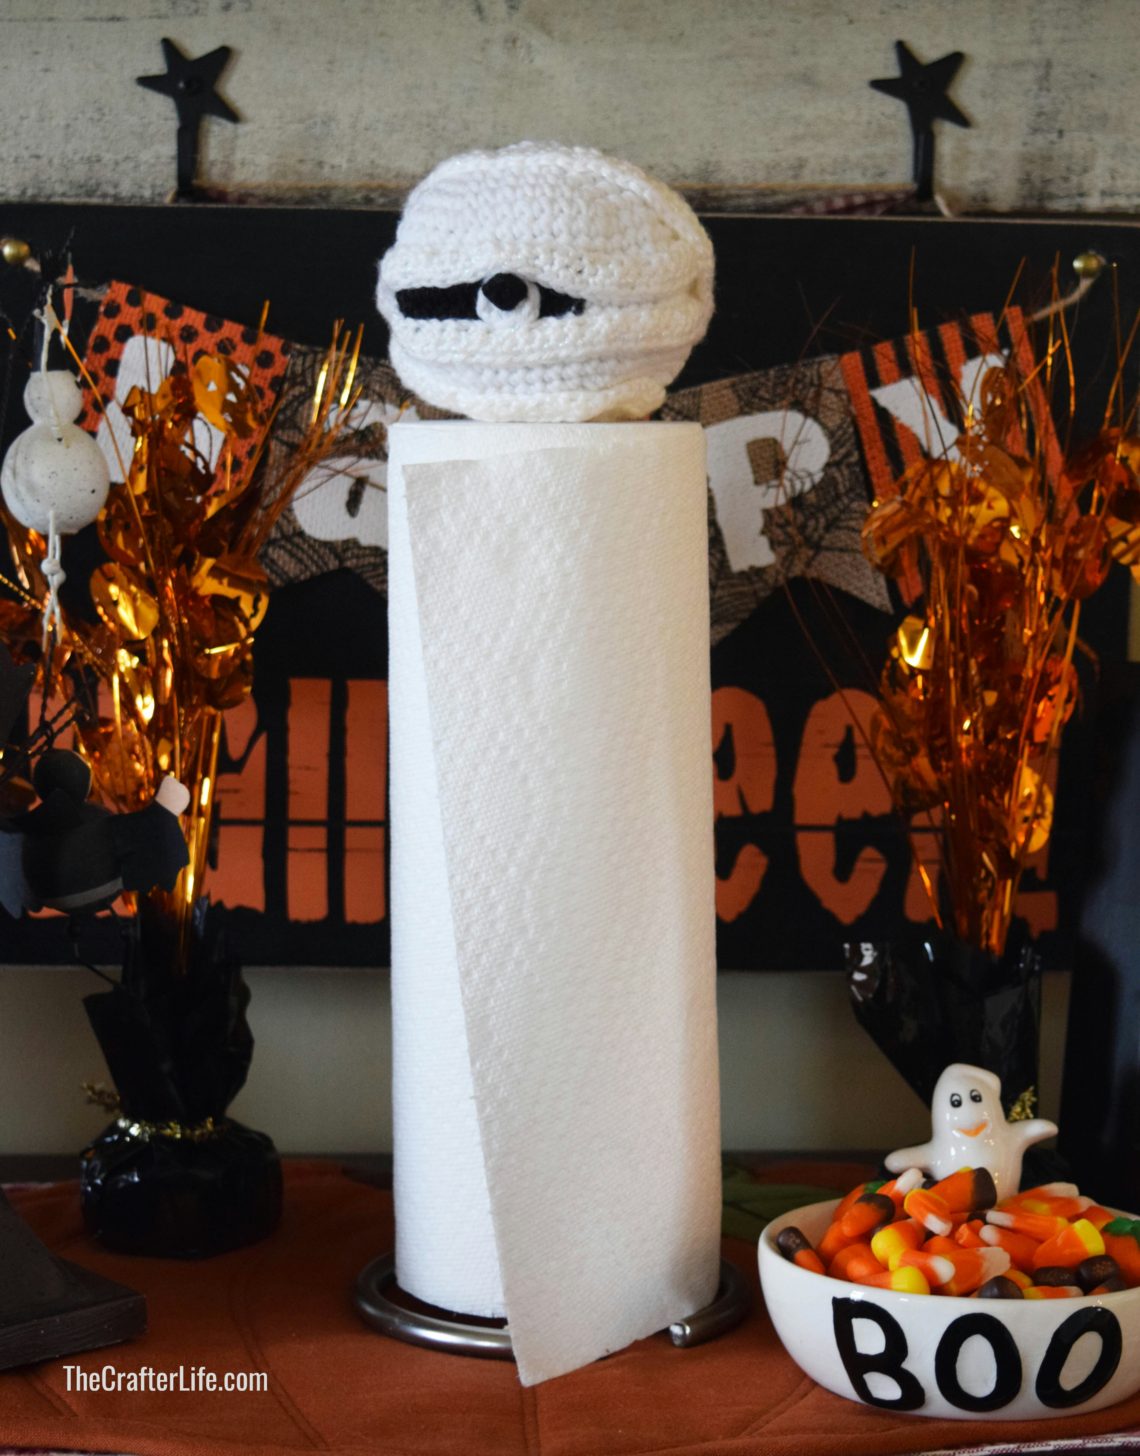
Looking for a cute Halloween project? My mummy paper towel holder topper will make it fun for you to pull off each of your paper towels this season! Not only are you pulling off a paper towel, but you are also “unraveling” this spooky little mummy. It makes a great decoration while adding a little extra to your paper towel holder. A perfect touch for a Halloween party! It could also be used as a cute topper for something else or as an embellishment to another Halloween project or decoration
Mummy Paper Towel Holder Topper
This mummy paper towel holder topper pattern is written to fit most standard-size vertical paper towel holders. You can also use it as a topper/embellishment for something else.
FINISHED MEASUREMENTS
The mummy head is approximately 4 inches tall, 4½ inches wide, and about 13 inches around when fully expanded.
MATERIALS
– Size G/6/4.00mm crochet hook or size needed to obtain gauge
– Size E/4/3.50mm crochet hook
– Worsted weight (4) yarn in White (I used Red Heart Super Saver yarn in White.)
– Worsted weight (4) yarn in Sparkle White (I used Caron Simply Soft Party yarn in Snow Sparkle.)
– Tapestry needle for weaving in ends and sewing eye/wrap onto head
– Scissors
– Measuring tape
Optional Items:
– Stitch markers (if needed for marking/counting stitches or rounds)
– Straight pins (if needed for positioning the wrap in place on head before sewing)
ABBREVIATIONS
– ch = chain
– chs = chains
– sc = single crochet
– sc2tog = single crochet 2 together (single crochet decrease)
– slst = slip stitch
– st = stitch
– sts = stitches
GAUGE
4 sc = 1 inch; 4 rounds = 1 inch
PATTERN NOTES
• The mummy is made with joined rounds of single crochet stitches. Each round is completed with a slip stitch to the first stitch of the round (do not count the slip stitch used to join each round as a stitch).
• The first stitch of each round is made in the very first stitch of the previous round (the same stitch in which the join/slip stitch and ch-1 was made).
• Repeated portions of the pattern are indicated by brackets [ ]. The section of the pattern that is inside the brackets represents the part to be repeated.
• When changing color from white to black, carry the white yarn under the black stitches, so you can pick it back up in the same round. Don’t carry the black yarn under the white stitches, since you will be able to see it through the white yarn on the back of the head. Instead, let the black end hang loose until the next round and simply carry it up when you need it. You could also cut the black yarn each round, but since you won’t see the inside of the head, feel free to carry it up.
• When changing color, join the new color while completing the last sc (single crochet) of the previous color (by pulling through the new color when you have two loops on the hook in the previous color to complete the final sc).
DIRECTIONS
Mummy Head
*Use your 4.00 mm hook and white worsted weight yarn to begin the first round.
*Make sure to pull the magic ring closed and weave in/secure end at closure at the beginning.
Round 1: Make a magic ring, ch 1, work 6 sc in magic ring, pull ring closed, join to first sc with a slst. (6 sc)
Round 2: Ch 1, 2 sc in each st around, join to first sc with a slst. (12 sc)
Round 3: Ch 1, repeat [sc in next st, 2 sc in next st] around, join to first sc with a slst. (18 sc)
Round 4: Ch 1, repeat [sc in next 2 sts, 2 sc in next st] around, join to first sc with a slst. (24 sc)
Round 5: Ch 1, repeat [sc in next 3 sts, 2 sc in next st] around, join to first sc with a slst. (30 sc)
Round 6: Ch 1, repeat [sc in next 4 sts, 2 sc in next st] around, join to first sc with a slst. (36 sc)
Round 7: Ch 1, repeat [sc in next 5 sts, 2 sc in next st] around, join to first sc with a slst. (42 sc)
Round 8: Ch 1, repeat [sc in next 6 sts, 2 sc in next st] around, join to first sc with a slst. (48 sc)
Rounds 9–10: Ch 1, sc in each st around, join to first sc with a slst. [48 sc]
***Rounds 11–13 are color-changing rounds where you will start each of the rounds with white yarn, then change to black yarn in the middle of each round, and then change back to white yarn to finish each round. As you work the black stitches, you can carry your white yarn behind/under the stitches so you can continue the round in white once the black section is finished. You can carry the black yarn up for each of these rounds instead of cutting it with each color change.
Rounds 11–13: Ch 1, sc in next 18 sts with white yarn, sc in next 12 sts with black yarn, sc in next 18 sts with white yarn, join to first sc with a slst. (48 sc]
***Use white yarn to complete the rest of the rounds of the mummy. Cut your black yarn and weave in/secure the tail ends.
Rounds 14–17: Ch 1, sc in each st around, join to first sc with a slst. [48 sc]
Round 18: Ch 1, repeat [sc in next 6 sts, sc2tog] around, join to first sc with a slst. (42 sc)
Round 19: Ch 1, repeat [sc in next 5 sts, sc2tog] around, join to first sc with a slst. (36 sc)
Round 20: Ch 1, repeat [sc in next 4 sts, sc2tog] around, join to first sc with a slst. (30 sc)
Round 21: Ch 1, repeat [sc in next 3 sts, sc2tog] around, join to first sc with a slst. (24 sc)
Round 22: Ch 1, repeat [sc in next 2 sts, sc2tog] around, join to first sc with a slst. (18 sc)
Mummy Eye (White)
***Use your 4.00mm hook and white yarn for the eye.
Round 1: Make a magic ring, ch 1, work 7 sc in magic ring, pull ring closed, join to first sc with a slst, fasten off, leaving a long tail for sewing onto the head.I
Mummy Pupil (Black)
***Use a size 3.50mm hook and black yarn for the pupil of the eye.
Round 1: Make a magic ring, ch 1, work 4 sc into magic rind, pull ring closed, join to first sc with a slst, fasten off, leaving a long tail for sewing onto the eye.
Eye Assembly/Attachment
1. Position the black pupil of the eye onto the front of the white eye where you would like it. Sew it into place on the eye using your tapestry needle and the black tail you left on the pupil. Weave in/secure the yarn when finished.
2. Position the assembled eye (eye with attached pupil) onto the black area of the mummy head here you would like it. Sew it into place using your tapestry needle and the white tail of yarn you left on the eye. Weave in/secure the yarn inside the mummy head when finished.
Mummy Wrap
***Use your 4.00mm hook and white sparkle yarn to make the wrap.
Row 1: Ch 250, sc in 2nd ch from hook and in each ch across. (249 sc)
Row 2: Ch 1, turn, sc in each st across, fasten off, leaving a really long tail for sewing the wrap onto the mummy head. (249 sc)
Mummy Wrap Assembly/Attachment
1. Position the mummy wrap around the head in the formation you like. Make sure the head is fully expanded and not pushed in anywhere when you do this. You may want to use straight pins to hold the wrap in place since it is long and will have some overlap when you wrap it around the head. You will want to mask the edges if the black section of the head so that it appears the eye is peaking out.
2. Once you are satisfied with your arrangement of the wrap, use your tapestry needle and the long tail you left on the wrap to sew it in place on the head. I sewed mine along the middle of the two rows of the wrap. Again, make sure the head is fully expanded as you sew so the wrap doesn’t end up being too tight and misshaping the head. Be careful of the straight pins if you decided to use them!
3. After you finish sewing the wrap around the head, secure and cut your yarn on the inside of the head.
***After securing all of your loose ends inside the head, your mummy is now ready to put on top of your paper towel holder to become unraveled! Or, use it as a cute topper/embellishment for something else!

The pattern and photos of this item are the property of TheCrafterLife. This pattern and design are subject to copyright, and are for personal, non-commercial use only. You may not distribute, sell this pattern, or claim it as your own under any circumstances.
You may not sell my patterns or claim them as your own. You may make items to sell (i.e. on Etsy) from my patterns but I ask that you link back to my site and provide credit for the pattern. You are welcome to share my patterns on social media as long as you link back directly to my site by providing the link. No copying and pasting of any patterns will be allowed under any circumstances.


