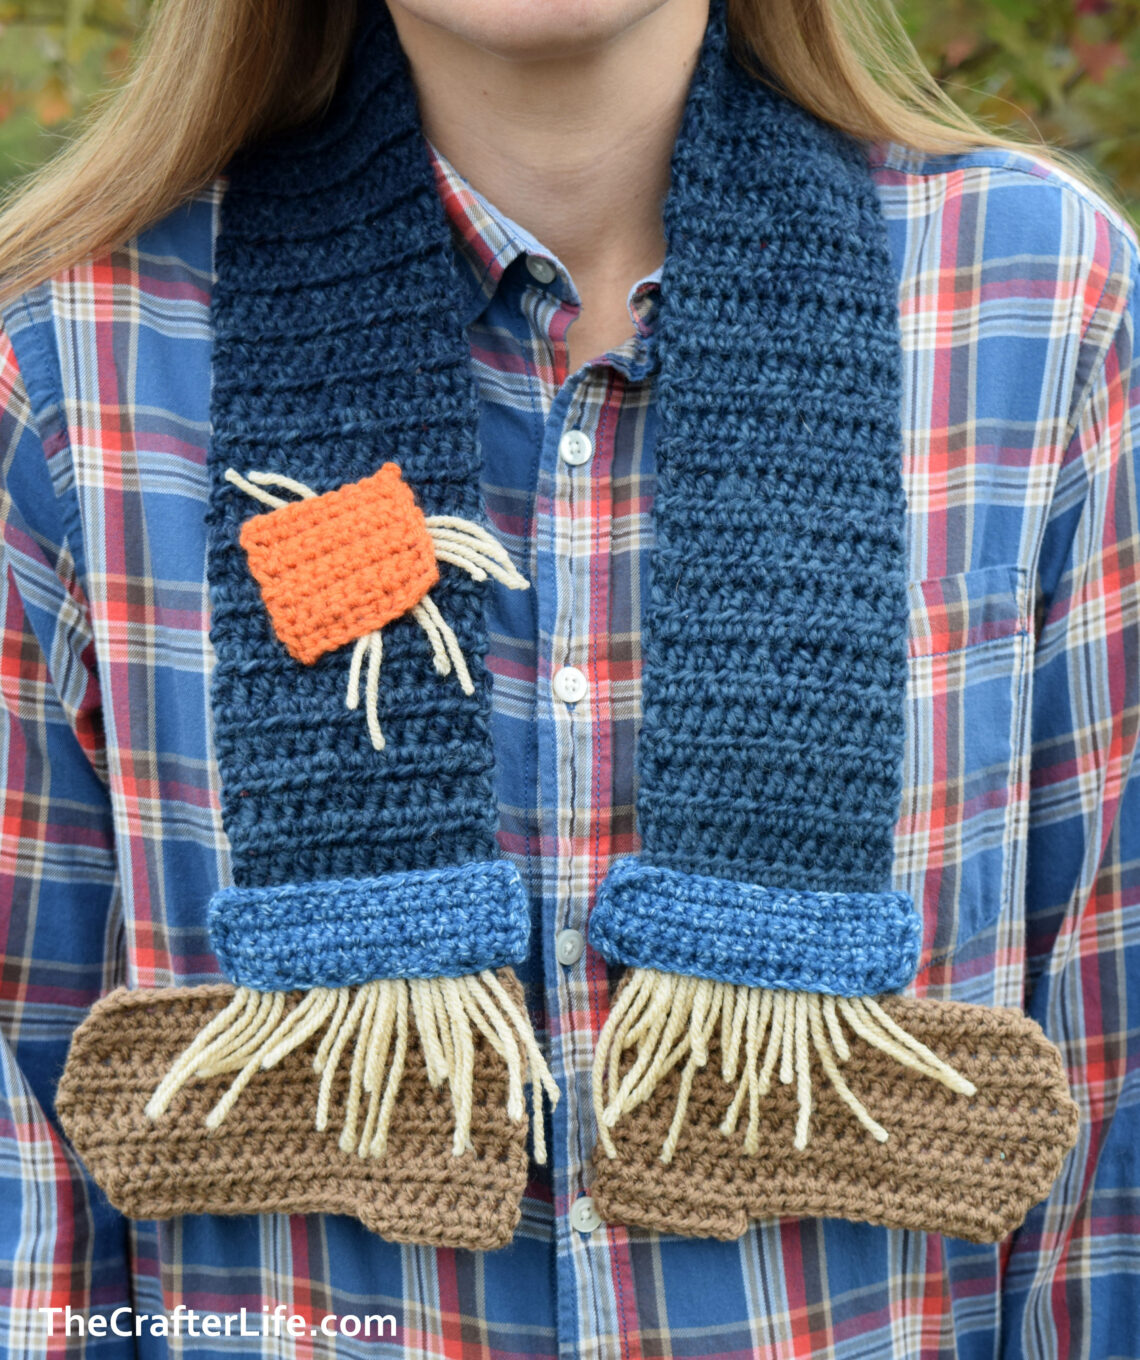
Scarecrow Legs Scarf
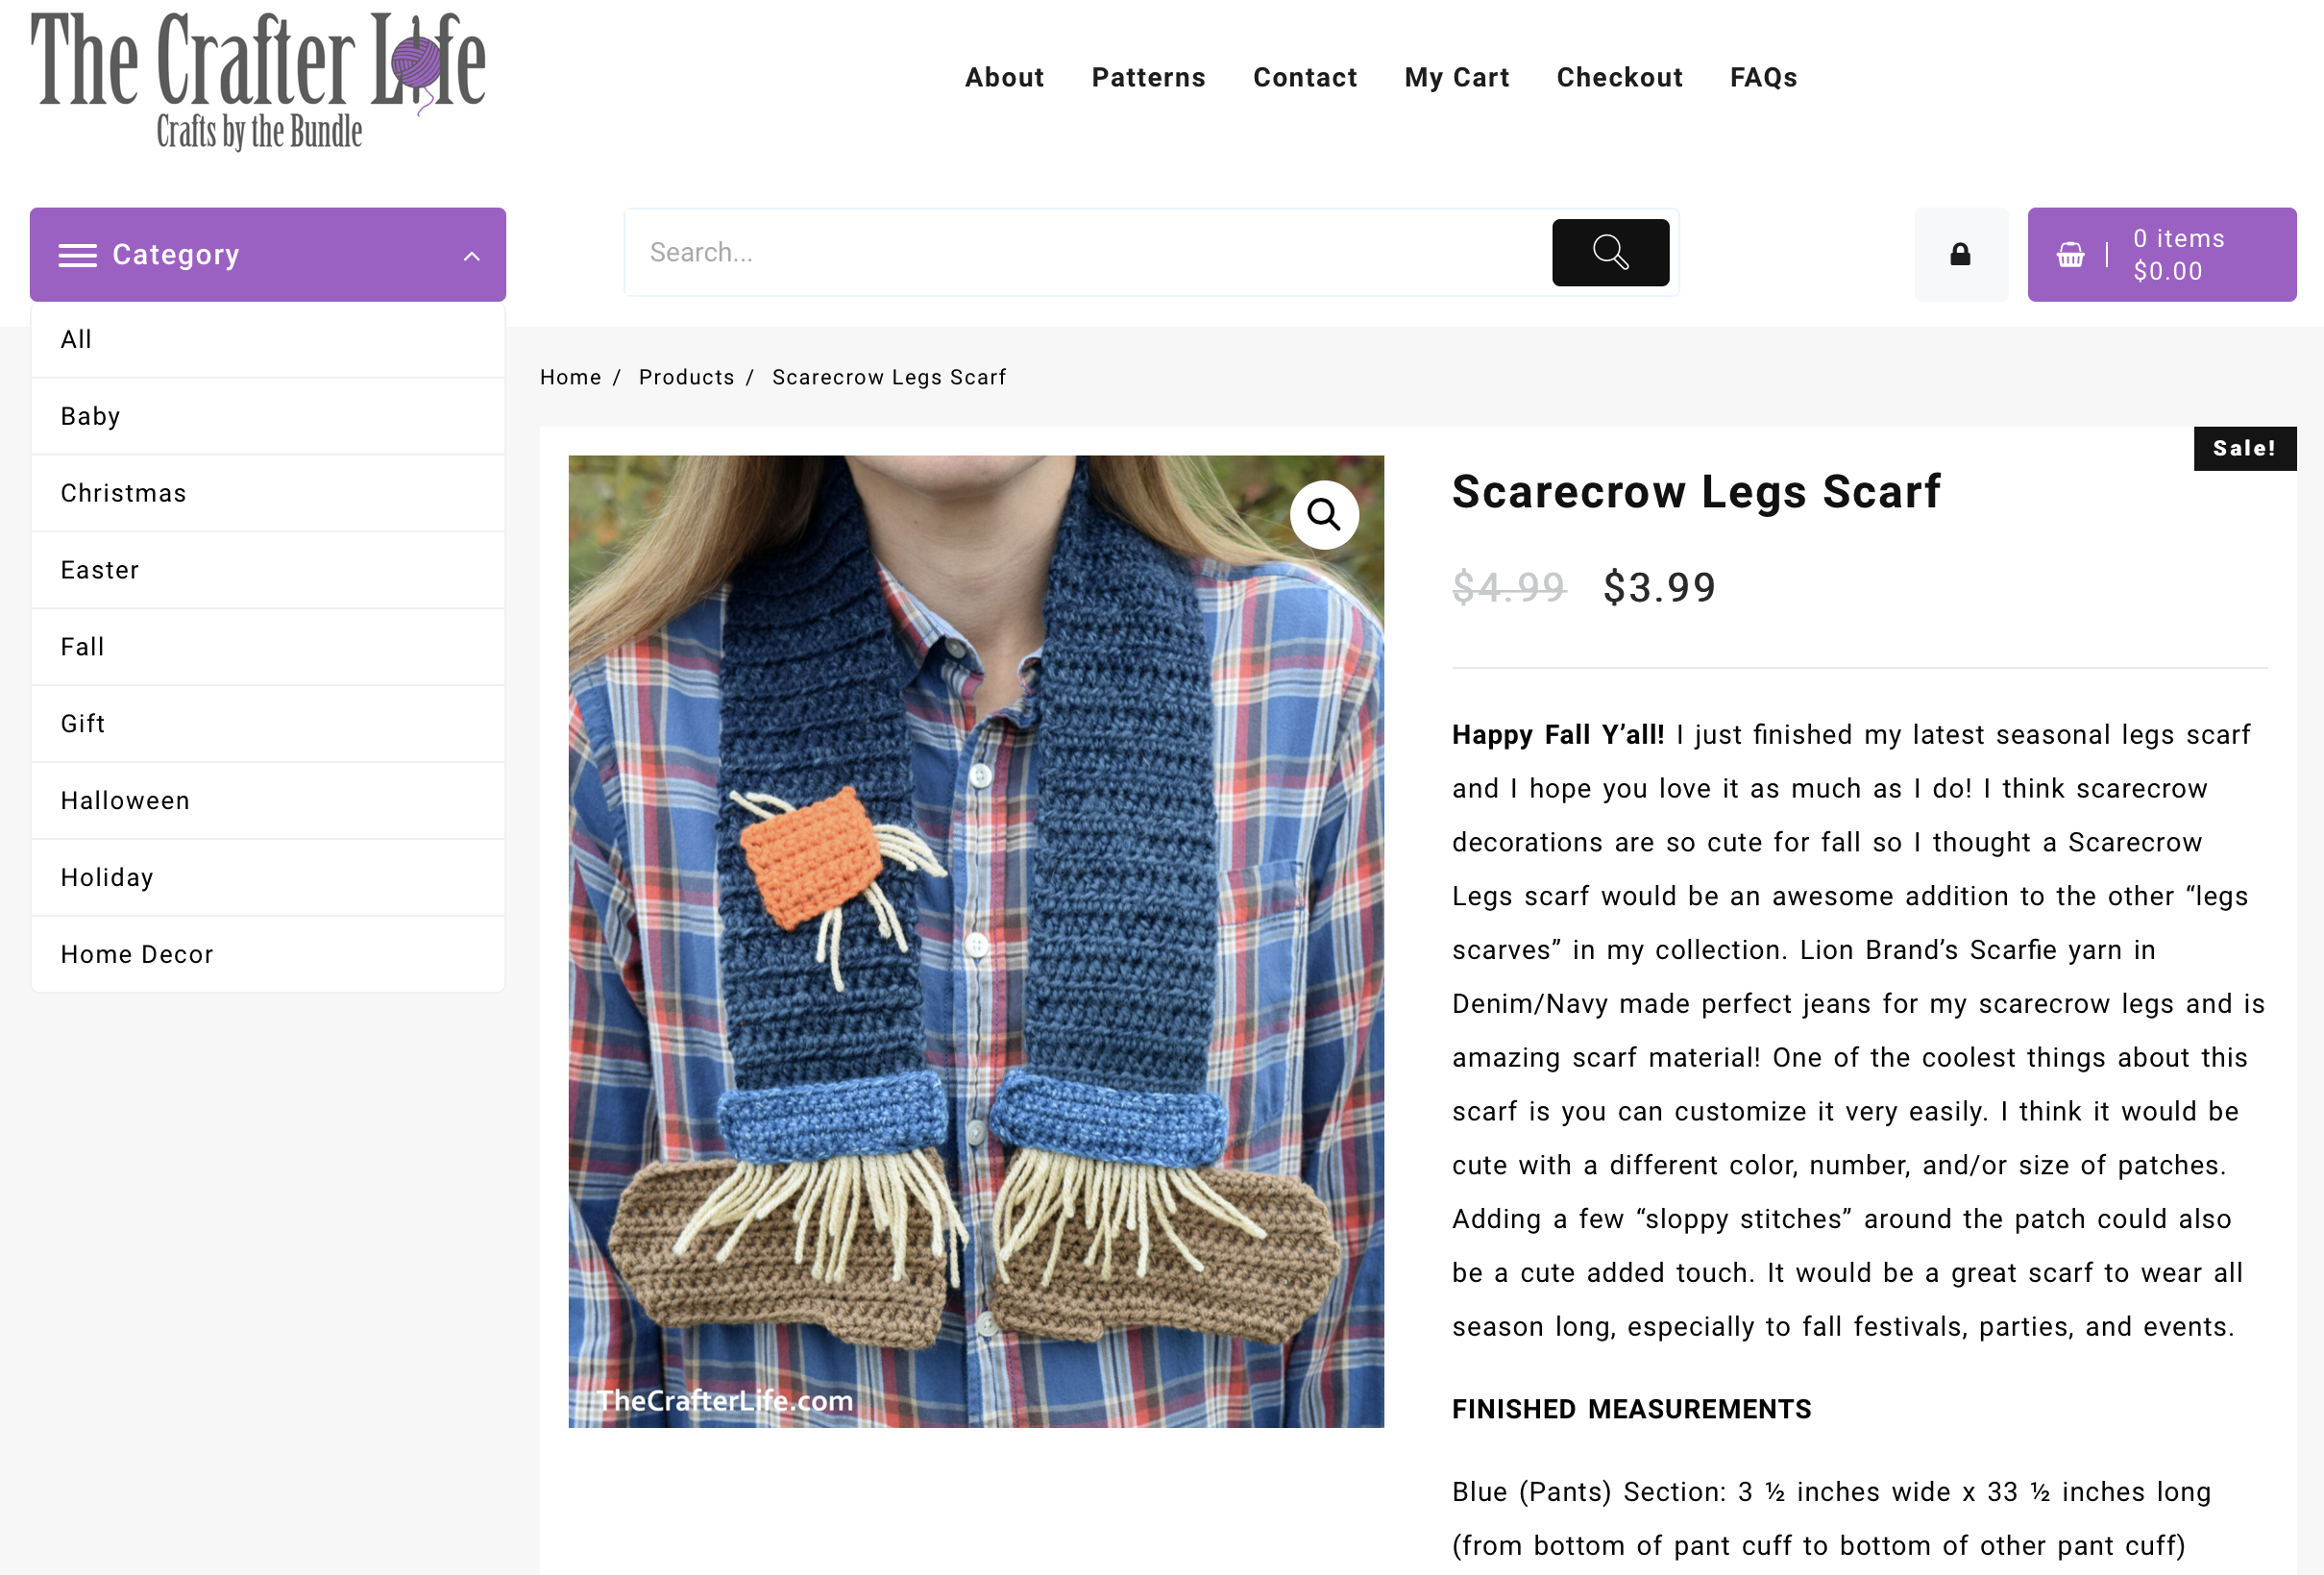
Happy Fall Y’all! I just finished my latest seasonal legs scarf and I hope you love it as much as I do! I think scarecrow decorations are so cute for fall so I thought a Scarecrow Legs scarf would be an awesome addition to the other “legs scarves” in my collection. Lion Brand’s Scarfie yarn in Denim/Navy made perfect jeans for my scarecrow legs and is amazing scarf material! One of the coolest things about this scarf is you can customize it very easily. I think it would be cute with a different color, number, and/or size of patches. Adding a few “sloppy stitches” around the patch could also be a cute added touch. It would be a great scarf to wear all season long, especially to fall festivals, parties, and events. If you choose to make one, see below for my pattern and definitely share a picture of your finished creation with me on Facebook!
This scarf pattern is written for an adult-size scarf meant to fit most adults (and older children/teens). The length can be adjusted by adding or subtracting rows from the body of the scarf.
You can buy an Ad-free, large print – PDF in my TheCrafterLife pattern shop!
FINISHED MEASUREMENTS
Blue (Pants) Section: 3 ½ inches wide x 33 ½ inches long (from bottom of pant cuff to bottom of other pant cuff)
Boots: 6 inches wide at the widest part (from heel to toe) x 3 ½ inches tall (from top of cuff to bottom of heel)
Total Scarf Measurements: Approximately 3 ½ inches wide (blue section) x 40 inches long (from bottom of boot to bottom of opposite boot)
MATERIALS
– Size I/9/5.50mm crochet hook or size needed to obtain gauge
– Size H/8/5.00mm crochet hook or size needed to obtain gauge
– Bulky weight (5) yarn in Blue/Denim/Navy (I used Lion Brand Scarfie yarn in Denim/Navy.)
– Worsted Weight (4) yarn in Lighter Blue/Lighter Denim (I used Lion Brand Jeans yarn in Stonewash.)
– Worsted weight (4) yarn in Brown (I used Red Heart Super Saver yarn in Cafe Latte)
– Worsted weight (4) yarn in Tan (I used Red Heart Super Saver yarn in Buff.)
– Worsted weight (4) yarn in Burnt Orange/Your Choice of Patch color (I used Red Heart Super Saver yarn in Carrot.)
– Scissors
– Tapestry needle for weaving in ends/sewing cuff and patch onto scarf
– Measuring tape
– Stitch markers (Optional – if needed for counting/marking stitches/rows)
– Straight pins (Optional – if needed for positioning and holding patch or cuff in place when sewing onto scarf)
You can buy an Ad-free, large print – PDF in my pattern shop!
ABBREVIATIONS
– ch = chain
– chs = chains
– hdc = half double crochet
– hdc2tog = half double crochet 2 together (half double crochet decrease)
– sc = single crochet
– st = stitch
– sts = stitches
– hdc2tog (hdc decrease): Yarn over, insert your hook under the first stitch, yarn over and pull up a loop (you should now have 3 loops on your hook). Then, yarn over and insert your hook under the next stitch, yarn over, and pull up a loop (you should now have 5 loops on your hook). With five loops now on your hook, yarn over and pull through all five loops.
GAUGE
Blue (Pants) and Brown (Boots) Sections:
4 hdc = 1 inch
3 rows of hdc = 1 inch
Pant Cuff:
5 sc = 1 inch
2 rows of sc = 3/8 inch
Square Pants Patch:
4 sc = 1 inch
4 rows of sc = 1 inch
PATTERN NOTES
- The blue body of the scarf is made first. Leave the blue tail from your beginning slip knot and the tail from fastening off at the end hang loose so you can use them as reference points when attaching the boots.
- You can lengthen or shorten the scarf as needed by adding or deleting rows. Add or delete rows two at a time, so the scarf always has an even number of rows.
- The first half double crochet stitch of each row is always done in the same stitch as the chain 2 unless otherwise stated (the chain-2 does not count as a stitch, so don’t skip the first stitch of the row).
- Do not fasten off after the last row of the blue body of the scarf. Instead, you will change color to brown when you complete your last half double crochet stitch of the row. When you have three loops of blue on your hook, you will pull through brown yarn to complete the stitch. You can start from there to begin the boot.
DIRECTIONS
Blue Body of Scarf
***Use your size 5.50mm hook and your Bulky weight Denim/Navy yarn for the body of the scarf.
HINT: Leave the very first end/tail from the beginning of your starting chain/slip knot loose (don’t weave it in) so you can use it as a reference point when starting the Second Boot.
Row 1: Ch 14, hdc in 3rd ch from hook, hdc in next 11 chs across. (12 hdc)
Rows 2-86: Ch 2, turn, hdc in each st across. (12 hdc)
***At the end of Row 86 (the last row), when finishing the final hdc of the row, change yarn color to Brown (boot color) by pulling through brown yarn once you have three blue loops on your hook to complete the hdc (see picture below).
You will continue from here (with brown yarn on hook) to begin the First Boot. Before continuing to make the First Boot, change to a size 5.00mm hook (or size needed for boot gauge) when working with the worsted weight brown yarn for the boot. Once you have your brown yarn on your size 5.00mm hook, follow the directions below to make the First Boot.
***Make sure the blue (legs) section of the scarf is to your desired length before starting to make the first brown boot. Simply add or subtract rows to make it longer or shorter. Make sure to add or subtract them two at a time so you always end up with an even number of rows.
First Boot
***You should now have your brown yarn attached on your size 5.00 mm hook at the end of Row 86 (the last row) of the blue scarf body, so you are ready to start Row 1 of the First Boot. Follow the directions below for the First Boot.
Row 1: Ch 10, turn your work, hdc in 3rd ch from hook and in next 7 chs across, hdc in each st of Row 86 (the last row) of blue body of scarf across. (20 hdc)
Row 2: Ch 2, turn, hdc in next 19 sts, 2 hdc in last st. (21 hdc)
Row 3: Ch 2, turn, hdc in each st across. (21 hdc)
Row 4: Ch 2, turn, hdc in next 20 sts, 2 hdc in last st. (22 hdc)
Row 5: Ch 2, turn, hdc in each st across. (22 hdc)
Row 6: Ch 2, turn, hdc in next 20 sts, hdc2tog. (21 hdc)
Row 7: Ch 2, turn, hdc in each st across. (21 hdc)
Row 8: Ch 2, turn, hdc in next 19 sts, hdc2tog. (20 hdc)
Row 9: Ch 2, turn, hdc in each st across. (20 hdc)
Row 10: Ch 2, turn, hdc in next 7 sts, fasten off, weave in tail end. (7 hdc)
**The First Boot is now complete. Follow the below directions to begin the Second Boot.
Ad-Free, large-print PDF digital pattern with several pictures available in TheCrafterLife Etsy Shop

Second Boot
***You need to decide which side of the scarf to attach the brown yarn for the Second Boot. The toe of the boot will point to whichever side you attach it. If you previously let the tail from your slip knot at the beginning of Row 1 of the scarf body hang loose for reference, you would attach your yarn to the opposite side of Row 1. So, it would be attached to the 12th chain of Row 1 (make sure not to attach it to the turning chains).
HINT: Orient your scarf as if you have it around your neck in order to figure out which side to attach the brown yarn for the Second Boot (see picture below). Attach it to the side you want the toe to point. After the first row of the Second Boot, check to make sure it is pointing in the correct direction before continuing.
* Hold the end of your scarf so the starting tail from your beginning slip knot is on the left. Attach the brown yarn to the 12th chain of Row 1 of the blue scarf body (this would be on the opposite side of the beginning slip knot).
Row 1: After attaching your brown yarn, Ch 10, hdc in 3rd ch from hook and in next 7 chs across, hdc in each ch of Row 1 of Blue Body of Scarf. (20 hdc)
***After completing Row 1 of the Second Boot, follow the pattern directions for the First Boot starting at Row 2 (Rows 2–10 of the First and Second Boots are the same).
***Once you have completed both boots and tucked in all loose ends, follow the directions below to make and attach the “straw” to the bottom of the legs.
Making/Attaching Straw on Top of Boot
- Cut 6 strands of tan (straw-color) yarn that are each 6 ½ inches long.
- Cut 5 strands of tan (straw-color) yarn that are each 4 ½ inches long.
- Start with the First Boot. You will attach the strands of yarn on top of the boot by knotting them to the stitches in the second Blue/Denim row above the boot (this should be Row 85 of the Body of the Scarf). Attach your longer (6 ½ -inch) strands first by knotting them to every other stitch of Row 85. Then attach the 5 shorter (4 ½ -inch) strands to the stitches in between. You can attach/knot them to the stitches however you prefer. I used the latch hook method to attach my strands. I folded a strand in half, then used my 5.00mm hook to go under a stitch from the 85th row, pulled through the loop (the fold of my strand), then pulled the two tail ends through the loop, which attached the strand to the stitch. I then pulled on the tail ends so the loop attached tightly to the stitch.
- Repeat Steps 1 – 3 three more times for the back of the First Boot and for both sides of the Second Boot. Once you get to the Second Boot, you will be attaching your straw-colored strands to Row 2 of the Body of the Scarf.
***Once you have all of your tan (straw-color) yarn attached to the top of the boots, follow the directions below to make the Pant Cuffs.
Pant Cuff (Make 4)
Use your size 5.50mm hook and worsted weight light blue/denim yarn to make the cuffs. The cuff should turn out to be a little wider than the width of the body of the scarf. Adjust hook size as needed.
Row 1: Ch 19, sc in 2nd ch from hook and in next 17 chs across. (18 sc)
Rows 2-6: Ch 1, turn, sc in each st across. (18 sc)
At the end of Row 6, fasten off, leaving a long tail for sewing onto the scarf.
***Once you have 4 pant cuffs made, follow the directions below to sew them onto the scarf
Attaching Pant Cuffs
You will use your tapestry needle and the long tail you left on the pant cuff to sew it to the scarf above the boot. Start with the First Boot. Align a pant cuff on each side of the scarf directly above the boot so that they cover where the tan strands of yarn are attached. You may wish to use straight pins to hold the cuffs in place. Begin sewing them together and through the scarf. I sewed the short edges together and I sewed along the top and bottom of the long edges to hold it down. Once you are finished sewing and are satisfied with the position of the cuff, make sure to knot/secure your yarn before cutting it. Do the same for the Second Boot and other two cuff pieces. Once you have fastened off/secured your yarn and tucked in the ends, follow the directions below to make the Pant Patch.
Pant Patch
Use your size 5.00mm hook and your worsted weight burnt orange (or your choice of patch color) yarn.
Row 1: Ch 9, sc in 2nd ch from hook and in next 7 chs across. (8 sc)
Rows 2-8: Ch 1, turn, sc in each st across. (8 sc)
At the end of Row 8, fasten off and leave a long tail for sewing onto the scarf.
***If you want your scarf to be double sided, make a 2nd pant patch so you can attach it to the reverse side of the scarf.
Attaching Pant Patch
- Decide where you want to place your patch on the scarf. I placed mine a little slanted between the 8th and 14th row above the cuff of the First Boot.
- Before sewing the patch onto the scarf, attach a few strands of tan (straw-color) yarn to the scarf where the patch will be placed. This is so it appears that some straw is popping through from underneath the patch. I attached 5 strands to my scarf underneath the patch. I cut each of my strands about 4 ½ inches long and attached them using the same method as I did with the strands above the boot.
- Using your tapestry needle and the long tail you left on the patch, sew the patch in place on the scarf. You may want to use straight pins to hold it in place as you sew. Make sure the patch covers where you attached the tan strands of yarn so only the tails of the tan strands stick out from the patch. Before cutting your yarn when you are done sewing the patch onto the scarf, make sure to weave in/knot/secure your yarn.
- You may want to trim a few of the tan strands to different lengths so they appear more realistic.
- If you made a second Pant Patch because you want your scarf to be reversible, flip the leg with the patch over and attach the second patch to that side of the scarf, making sure to place it directly on top of the first patch. You may also want to add a few tan “straw” pieces underneath the second patch as well. I chose not to make a second patch so my scarf has specific front and back sides.
***Once you are finished your patch and weave in all loose ends, your scarf is finished and ready to wear! 🙂
Ad-Free, large-print PDF digital pattern with several pictures available in TheCrafterLife Etsy Shop


The pattern and photos of this item are the property of TheCrafterLife. This pattern and design are subject to copyright, and are for personal, non-commercial use only. You may not distribute, sell this pattern, or claim it as your own under any circumstances.
You may not sell my patterns or claim them as your own. You may make items to sell (i.e. on Etsy) from my patterns but I ask that you link back to my site and provide credit for the pattern. You are welcome to share my patterns on social media as long as you link back directly to my site by providing the link. No copying and pasting of any patterns will be allowed under any circumstances.

Mummy Topper for Paper Towel Holder