Butterball Baby “Coops” the Chick
Butterball Baby: “Coops” the Chick
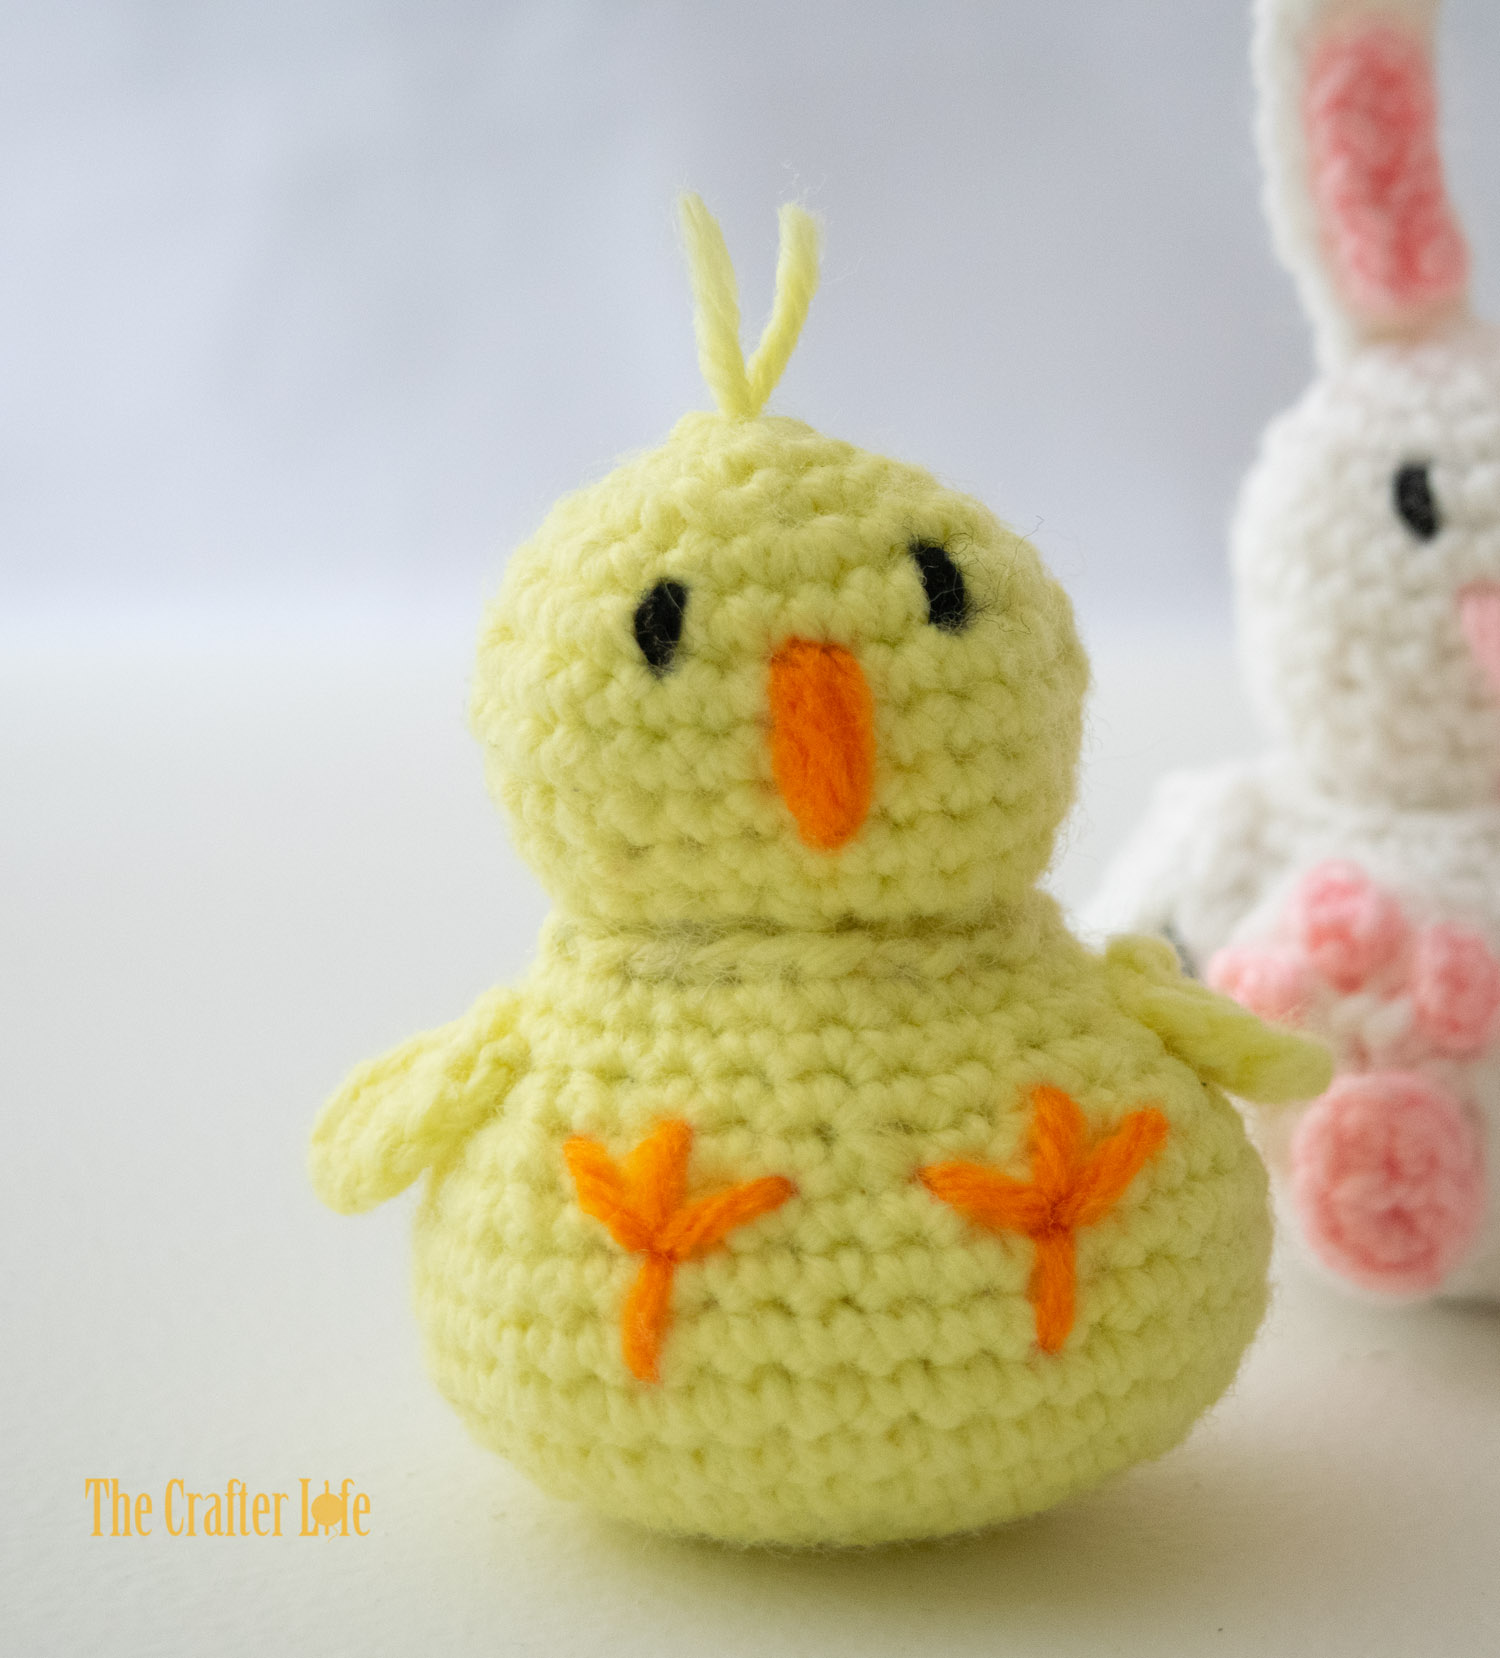
Meet Coops – the name I gave to my new little crochet Butterball Chick! Little chicks are so cute and a widely recognized sign of spring! Since it is now officially spring, I decided to make a cute little chick that I plan to give to my baby for Easter. Coops turned out so cute, I might make more for spring decorations! See below if you are interested in my crochet pattern so you can make one for yourself or for someone else.
FINISHED MEASUREMENTS
The baby chick is about 3½ inches tall and 3 inches wide across the front (about 7½ inches around the widest part of the body).
MATERIALS
– Size 4.00 mm crochet hook or size needed to obtain gauge
– Worsted weight (4) acrylic yarn in Yellow (I used Red Heart Super Saver yarn in Pale Yellow.)
– Worsted weight (4) acrylic yarn in Orange (I used Red Heart Super Saver Yarn in Pumpkin.)
– Worsted weight (4) acrylic yarn in Black (I used Red Heart Super Saver Yarn in Black.)
– Fiberfill
– Scissors
– Tapestry needle for weaving in ends
– Stitch markers
– Measuring tape
ABBREVIATIONS
– ch = chain
– chs = chains
– sc = single crochet
– sc2tog = single crochet 2 together (single crochet decrease)
– slst = slip stitch
– st = stitch
– sts = stitches
GAUGE
3 sc = ½ inch
3 rounds of sc = ½ inch
PATTERN NOTES
- The body and head of the baby chick are made separately, each in continuous rounds. Do not join continuous rounds unless otherwise stated. Simply work the first stitch of each round in the first stitch of the previous round. Attach a stitch marker to mark rounds and move marker as you complete each round.
- Brackets [ ] indicate portions of the pattern to be repeated.
 DIRECTIONS
Body of Chick
*Use your 4.00 mm hook and yellow worsted weight yarn to complete the body of the chick.
*The chick body is worked in continuous rounds. Work first stitch of round in first stitch of previous round. Use a stitch marker if needed.
*Make sure to pull the magic ring closed and weave in/secure end at closure at the beginning. This is because it will be harder to do later once the body gets larger.
Round 1: Make a magic ring, ch 1, work 6 sc in the ring, pull ring closed. (6 sc)
Round 2: Work 2 sc in each st around. (12 sc)
Round 3: 2 sc in next 3 sts, sc in next 3 sts, 2 sc in next 3 sts, sc in next 3 sts. (18 sc)
Round 4: Sc in first st, 2 sc in next st, sc in next 2 sts, 2 sc in next st, sc in next 2 sts, 2 sc in next st, sc in next 2 sts, 2 sc in next st, sc in next 2 sts, 2 sc in next sts, sc in next 2 sts, 2 sc in next st, sc in next st. (24 sc)
Round 5: Sc in next 2 sts, 2 sc in next st, sc in next st, 2 sc in next st, sc in next st, 2 sc in next st, sc in next 7 sts, 2 sc in next st, sc in next st, 2 sc in next st, sc in next st, 2 sc in next st, sc in next 5 sts. (30 sc)
Round 6: Sc in next 3 sts, 2 sc in next st, repeat [sc in next 4 sts, 2 sc in next st] 5 times, sc in last st. (36 sc)
Round 7: Repeat [sc in next 3 sts, 2 sc in next st] 3 times, sc in next 9 sts, 2 sc in next st, sc in next 3 sts, 2 sc in next st, sc in next 3 sts, 2 sc in next st, sc in next 6 sts. (42 sc)
Rounds 8-10: Sc in each st around. (42 sc)
Round 11: Repeat [sc in next 3 sts, sc2tog] 3 times, sc in next 9 sts, sc2tog, sc in next 3 sts, sc2tog, sc in next 3 sts, sc2tog, sc in next 6 sts. (30 sc, 6 sc2tog; 36 total sts)
Round 12: Sc in next 3 sts, sc2tog, repeat [sc in next 4 sts, sc2tog] 5 times, sc in last st. (24 sc, 6 sc2tog; 30 total sts)
Round 13: Sc in next 2 sts, sc2tog, sc in next st, sc2tog, sc in next st, sc2tog, sc in next 7 sts, sc2tog, sc in next st, sc2tog, sc in next st, sc2tog, sc in next 5 sts. (18 sc, 6 sc2tog; 24 total sts)
Round 14: Sc in each st around, fasten off, leaving a really long tail for sewing the body to the heads. (24 sc)
**Make sure to weave in all loose ends except for the long tail you left at the end of Round 14.
Head of Chick
*Use your 4.00 mm hook and yellow worsted weight yarn to complete the head of the chick.
*The chick head is worked in continuous rounds. Work first stitch of round in first stitch of previous round. Use a stitch marker if needed.
*Make sure to pull the magic ring closed and weave in/secure end at closure at the beginning. This is because it will be harder to do later once the head gets larger.
Round 1: Make a magic ring, ch 1, work 6 sc in the ring, pull ring closed. (6 sc)
Round 2: Work 2 sc in each st around. (12 sc)
Round 3: 2 sc in next 3 sts, sc in next 3 sts, 2 sc in next 3 sts, sc in next 3 sts. (18 sc)
Round 4: Sc in next st, 2 sc in next st, sc in next 2 sts, 2 sc in next st, sc in next 2 sts, 2 sc in next st, sc in next 2 sts, 2 sc in next st, sc in next 2 sts, 2 sc in next st, sc in next 2 sts, 2 sc in next st, sc in next st. (24 sc)
Round 5: Sc in next 2 sts, 2 sc in next st, sc in next st, 2 sc in next st, sc in next st, 2 sc in next st, sc in next 7 sts, 2 sc in next st, sc in next st, 2 sc in next st, sc in next st, 2 sc in next st, sc in next 5 sts. (30 sc)
Rounds 6-7: Sc in each st around. (30 sc)
Round 8: Sc in next 2 sts, sc2tog, sc in next st, sc2tog, sc in next st, sc2tog, sc in next 7 sts, sc2tog, sc in next st, sc2tog, sc in next st, sc2tog, sc in next 5 sts. (18 sc, 6 sc2tog; 24 total sts)
Round 9: Sc in each st around. (24 sc)
Round 10: Sc in next st, sc2tog, repeat [sc in next 2 sts, sc2tog] 5 times, sc in next st. (12 sc, 6 sc2tog; 18 total sts)
Round 11: Repeat [sc2tog] 3 times, sc in next 3 sts, repeat [sc2tog] 3 times, sc in next 3 sts, fasten off and weave in loose ends. (6 sc2tog, 6 sc; 12 total sts)
Wing of Chick (Make 2)
*Use your 4.00 mm hook and yellow worsted weight yarn to complete the wings of the chick.
*Leave a longer tail on your beginning slipknot of the ch-5 in Row 1 so you can use it when sewing wing onto body.
Row 1: Ch 5, sc in 2nd ch from hook and in next 3 chs. (4 sc)
Row 2: Ch 1, turn, sc2tog, sc in next st, slst in last st, fasten off and weave in end. (3 total sts)
ASSEMBLY
Body Assembly
- Use a small tapestry/sewing needle and orange yarn to stitch two feet on the front of the body between Rounds 8 and 13. Each foot is made of 4 straight stitches (2 make the main vertical line in the center and the other two stitches form a V shape from the point where the 2 vertical stitches meet). Make sure to secure your yarn on the inside of the body. I made my first vertical stitch run from the top of Round 8 straight up to the top of Round 10. Then my second vertical stitch ran from the top of Round 12 straight down to the same place in the top of Round 10. I started the side stitches at the top of Round 11 and took them back down through the same place at the top of Round 10. I used a second strand of yarn to make the other foot. I started the bottom of the second foot about 6 stitches over from the bottom of the first foot at the top of Round 8. I made the second foot the same way as the first.
- Use a small tapestry/sewing needle and the long tail you left at the beginning of each wing to sew the tops of the wings onto each side of the body. The rounded part of the wings should face the front side of the body. Make sure to secure your yarn on the inside of the body. I sewed my wings to the top of Round 14 about 3 stitches over from the top of the feet.
- Once you have secured all loose yarn ends on the inside of the body, use fiberfill to stuff the body to your desired level.
Head Assembly
- Use a small tapestry/sewing needle and orange yarn to stitch a beak on the front of the head. The beak is made with 3 straight stitches. Make a narrow V shape with the first two stitches and place the third stitch between them to cover up any yellow space in the middle. Make sure to secure your yarn on the inside of the head. I stitched mine between Rounds 5 and 9 of the head (it overlaps Rounds 6, 7, and 8).
- Use a small tapestry needle and black yarn to stitch two eyes onto the front of the head, centered on either side of the beak. Each eye is made with 2 short vertical stitches (each stitch is only one round high). Make sure to secure your yarn on the inside of the head. I placed my eyes on top of Round 5 (from the very top of Round 4 to the bottom of Round 6) about 2 stitches over from the top of the beak.
- Use a small tapestry/sewing needle and a strand of yellow yarn to attach 2 “hair strands” to the top of the head. Use your needle to run one of the ends of the yellow strand of yarn up through the center of the starting magic ring of Round 1. Then use your needle to run the other end of the yellow strand up through a spot in the middle of Rounds 1 and 2 of the head (so it is a stitch over from the center of the magic ring). Pull both ends to even them out and so the loop is taught on the inside against the top of the head. Tie the ends one time (as you would when beginning to tie a pair of shoes) and pull tight. Next, take your tapestry needle and run each tail/end back down through the same hole the second tail/end was brought up through between Rounds 1 and 2 and then run each tail/end back up through the center of the magic ring. The hair strands should now be securely attached to the top of the head so both come out of the center hole. Cut the tails/ends to your desired length.
- Once you have secured all loose yarn ends on the inside of the head, use fiberfill to stuff the head to your desired level.
Sewing Body to Head
Use a tapestry needle and the long tail you left on the body of the chick to sew the top of the body to the bottom of the head. Make sure to sew them together so the face of the head is centered with the feet and wings of the body. Run your needle under/through each stitch from Round 14 of the body and then up through a hole in between Rounds 10 and 11 of the head that is directly above each stitch. Once you have sewn them together all the way around and you are satisfied with the appearance/position of the head on the body, secure and fasten off your yarn by running it through the inside of the body a few times before cutting it and tucking it inside the body.
***Your baby chick is finished and ready to spread some spring cheer!

The pattern and photos of this item are the property of TheCrafterLife. This pattern and design are subject to copyright, and are for personal, non-commercial use only. You may not distribute, sell this pattern, or claim it as your own under any circumstances.
You may not sell my patterns or claim them as your own. You may make items to sell (i.e. on Etsy) from my patterns but I ask that you link back to my site and provide credit for the pattern. You are welcome to share my patterns on social media as long as you link back directly to my site by providing the link. No copying and pasting of any patterns will be allowed under any circumstances.