Spring Basket
SPRING BASKET
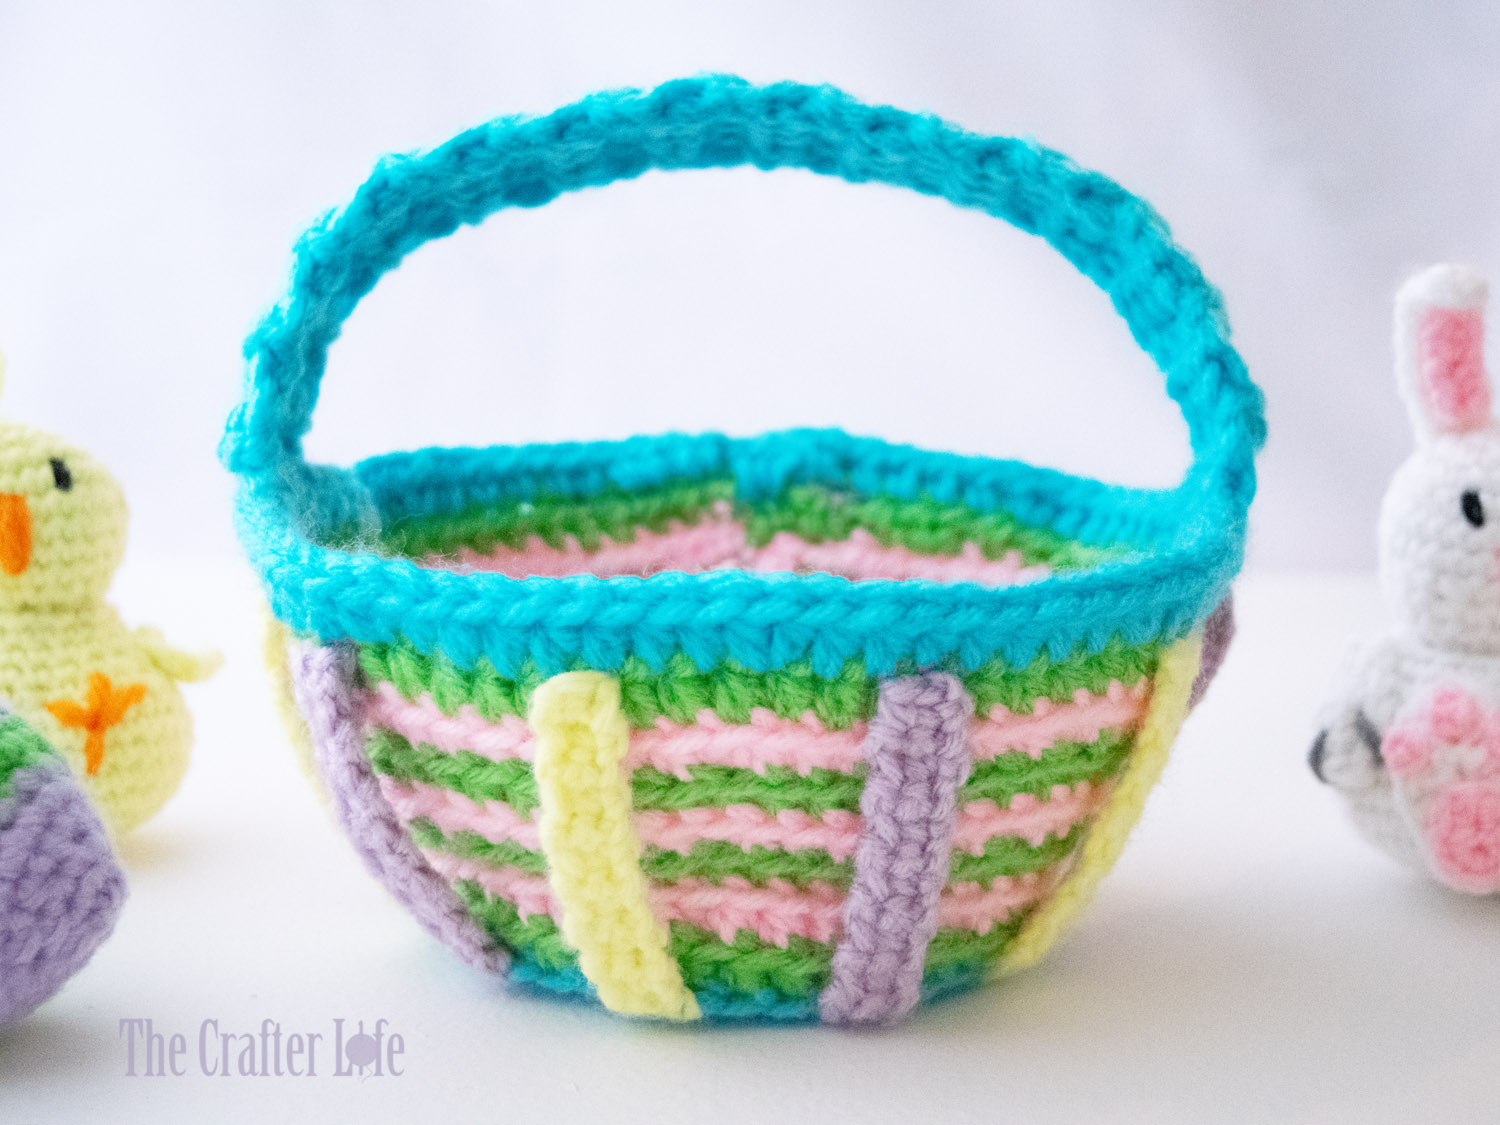
I made this spring basket for my baby girl for Easter as part of my Easter Basket Playset. I designed it to hold Coops the Chick, Hops the Bunny, and my Striped Easter Egg. It could be used as a fun candy dish or a spring decoration. It would also look cute holding some plastic Easter eggs! If you are interested in making this spring basket, see below for my pattern.
FINISHED MEASUREMENTS
The basket is about 6½ inches tall (from bottom of basket to top of handle when extended). The top opening of the basket is about 6½ inches across (diameter).
MATERIALS
– Size 5.00 mm crochet hook or size needed to obtain gauge
– Size 4.00 mm crochet hook or size needed to obtain gauge
– Worsted weight (4) yarn in Blue/Turquoise (I used Red Heart Super Saver in Turqua.)
– Worsted weight (4) yarn in Green (I used Red Heart Super Saver in Spring Green.)
– Worsted weight (4) yarn in Pink (I used Red Heart Super Saver in Baby Pink.)
– Worsted weight (4) yarn in Yellow (I used Red Heart Super Saver in Pale Yellow.)
– Worsted weight (4) yarn in Purple (I used Red Heart Super Saver in Lilac.)
– Tapestry needle
– Scissors
– Measuring tape
Optional Items:
– Stitch markers (if needed for marking/counting stitches or rounds)
ABBREVIATIONS
– ch = chain
– chs = chains
– hdc = half double crochet
– sc = single crochet
– slst = slip stitch
– st = stitch
– sts = stitches
GAUGE
(5.00 mm hook is used with hdc in this pattern)
4 hdc = 1 inch; 3 rounds/rows of hdc = 1 inch height
(4.00 mm hook is used with sc in this pattern)
2 sc = ½ inch; 5 rows of sc = 1 inch
PATTERN NOTES
- The main body of the basket is made first with joined rounds of half double crochet stitches. Each round is completed with a slip stitch to the first stitch of the round (do not count the slip stitch used to join each round as a stitch).
- The first stitch of each round is made in the very first stitch of the previous round (the same stitch in which the join/slip stitch and ch-1 was made).
- The main basket body is made with two strands of yarn held together. This is to make it more sturdy/stiff to serve its purpose.
- When changing color on the stripes, join the new color while completing the last hdc (half double crochet) of the previous color (by pulling through the new color when you have three loops on the hook in the previous color to complete the final hdc).
- The yarn is cut after each color change. When you cut the yarn after changing color, leave a long enough tail to weave in the ends as you work.
- The pink and green stripes of the basket are worked in the back loops only of the stitches.
- Brackets [ ] indicate portions of the pattern to be repeated.
- The top handle of the basket is made in rows of half double crochet.
DIRECTIONS
Main Basket Body
*The main basket body is made with two strands of yarn held together. To begin, hold two strands of your turquoise yarn together. Crochet as you normally would holding the two strands of yarn together as if they were one strand. When you join a new color, make sure to use 2 strands of that color.
*The yarn is cut after each color change. Weave in ends as you work.
*Use a 5.00 mm hook.
*Make sure to pull the magic ring closed and weave in/secure end at closure at the beginning.
*The main body of the basket is worked in joined rounds of half double crochet stitches. Join to the first stitch of each round with a slip stitch.
*The first stitch of each round is made in the very first stitch of the previous round (the same stitch in which the join/slip stitch and ch-1 was made).
Round 1: Holding two strands of turquoise yarn together, make a magic ring, ch 1, work 8 hdc in magic ring, pull ring closed, slst in first st of round. (8 hdc)
Round 2: Ch 1, 2 hdc in each st around, slst in first st of round. (16 hdc)
Round 3: Ch 1, Repeat [hdc in next st, 2 hdc in next st] around, slst in first st of round. (24 hdc)
Round 4: Ch 1, Repeat [hdc in next 2 sts, 2 hdc in next st] around, slst in first st of round. (32 hdc)
Round 5: Ch 1, Repeat [hdc in next 3 sts, 2 hdc in next st] around, pull through green yarn to complete the last hdc of the round (see pattern notes), slst in back loop only of first hdc of round. (40 hdc)
HINT: You should now have green yarn on your hook to begin Round 6.
Round 6: Ch 1, hdc in back loop only of each st around, pull through pink yarn when completing the last hdc of round, slst in back loop only of first st of round. (40 hdc)
Round 7: Ch 1, repeat [hdc in back loop only of next 4 sts, 2 hdc in back loop only of next st] around, pull through green yarn when completing last hdc of round, slst in back loop only of first st of round. (48 hdc)
Round 8: Ch 1, hdc in back loop only of each st around, pull through pink yarn when completing the last hdc of round, slst in back loop only of first st of round. (48 hdc)
Round 9: Ch 1, repeat [hdc in back loop only of next 5 sts, 2 hdc in back loop only of next st] around, pull through green yarn when completing last hdc of round, slst in back loop only of first st of round. (56 hdc)
Round 10: Ch 1, idc in back loop only of each st around, pull through pink yarn when completing the last hdc of round, slst in back loop only of first st of round. (56 hdc)
Round 11: Ch 1, repeat [hdc in back loop only of next 6 sts, 2 hdc in back loop only of next st] around, pull through green yarn when completing last hdc of round, slst in back loop only of first st of round. (64 hdc)
Round 12: Ch 1, hdc in back loop only of each st around, pull through blue/turquoise yarn when completing the last hdc of round, slst in back loop only of first st of round. (64 hdc)
Round 13: Ch 1, repeat [hdc in next 7 sts, 2 hdc in next st] around, slst in first st of round, fasten off, weave in loose ends. (72 hdc)
***The main body of the basket is now complete. Follow the directions below to make the handle of the basket.
Handle of Basket
*The handle of the basket body is made in rows of hdc with two strands of yarn held together. Crochet as you normally would holding the two strands of yarn together as if they were one strand.
*Attach yarn to 16th stitch of Round 13 of basket.
*Use a 5.00 mm hook.
Row 1: With 2 strands of turquoise yarn held together, attach yarn to 16th st of Round 13 of basket, ch 1, hdc in same stitch (16th stitch of Round 13), hdc in next 3 sts (17th, 18th, and 19th sts of Round 13). (4 hdc)
Rows 2-26: Ch 1, turn, hdc in each st across. (4 hdc)
*At the end of Row 26, fasten off, leaving a long tail for sewing onto the other side of the basket. Follow the next set of directions to sew to the other side.
1. Use your tapestry needle and the tail(s) you left at the end of Row 26 to sew the stitches of Row 26 to the 54th, 55th, 56th, and 57th sts of Round 13 of the basket. Make sure to keep the handle straight across to the other side of the basket (don’t let it get twisted). The 1st stitch of Row 26 of the handle should be sewn to the 54th stitch of Round 13 of the basket. The 2nd stitch of Row 26 of the handle should be sewn to the 55th stitch of Round 13. The third stitch of Row 26 of the handle should be sewn to the 56th stitch of Round 13. The fourth stitch of Row 26 of the handle should be sewn to the 57th stitch of Round 13. Once you have the stitches matched up and sewn together, make sure to secure your yarn on the inside of the basket.
***The handle of the basket is now complete. Follow the directions below to make the vertical stripes of the basket.
Vertical Stripes of Basket
- Use a 4.00 mm hook and your purple and yellow worsted weight yarn to make the vertical stripes.
- Each vertical stripe is made with one strand of yarn in rows of single crochet.
- When starting each stripe, it is attached to the front loops of two consecutive stitches from Round 5 of the basket.
- Each stripe is two stitches wide. There are two stitches from Round 5 of the basket in between each stripe. The stripes alternate colors.
- Start wherever you want to on Round 5 of the basket and attach purple yarn to a front loop of one of the stitches (do this with bottom outer side of basket facing you). Then follow the below pattern to complete each stripe.
PATTERN FOR VERTICAL STRIPES:
*Repeat this below pattern for each vertical stripe, alternating yarn color between purple and yellow and making sure to skip 2 stitches from Round 5 of the basket between each stripe.
*I started my first (purple) stripe with the front loops of the last stitch and the first stitch from Round 5 to help cover up the slst in that round.
Row 1: With outside of the bottom of basket facing, attach yarn to front loop only of a stitch from Round 5, ch 1, sc in front loop only of same stitch from Round 5, sc in front loop only of next st of Round 5. (2 sc)
Rows 2- 13: Ch 1, turn, sc in each st across. (2 sc)
*At the end of Row 13, the stripe should be long enough to reach the bottom of Round 13 of the body of the basket when the basket is expanded. Add or subtract rows to make it longer or shorter if necessary.
At the end of Row 13, fasten off and leave a long tail for sewing onto the basket. Use a tapestry needle and the long tail left to sew the last row of the stripe (Row 13) to the bottom of Round 13 of the body of the basket. Make sure to get the stripe as straight up as possible. You may want to sew the entire stripe down, but I chose to simply sew the top edge to the basket and leave the rest of the strip loose. Make sure to secure your yarn on the inside of the basket (or the inside of the vertical stripe). You might want to wait until you have all the stripes on before you secure the yarn in case you need to reposition/move a stripe.
*Once you have all the stripes completed, attached, and have woven in/secured all loose ends, your basket is complete!!!

The pattern and photos of this item are the property of TheCrafterLife. This pattern and design are subject to copyright, and are for personal, non-commercial use only. You may not distribute, sell this pattern, or claim it as your own under any circumstances.
You may not sell my patterns or claim them as your own. You may make items to sell (i.e. on Etsy) from my patterns but I ask that you link back to my site and provide credit for the pattern. You are welcome to share my patterns on social media as long as you link back directly to my site by providing the link. No copying and pasting of any patterns will be allowed under any circumstances.

Butterball Baby: Hops the Bunny