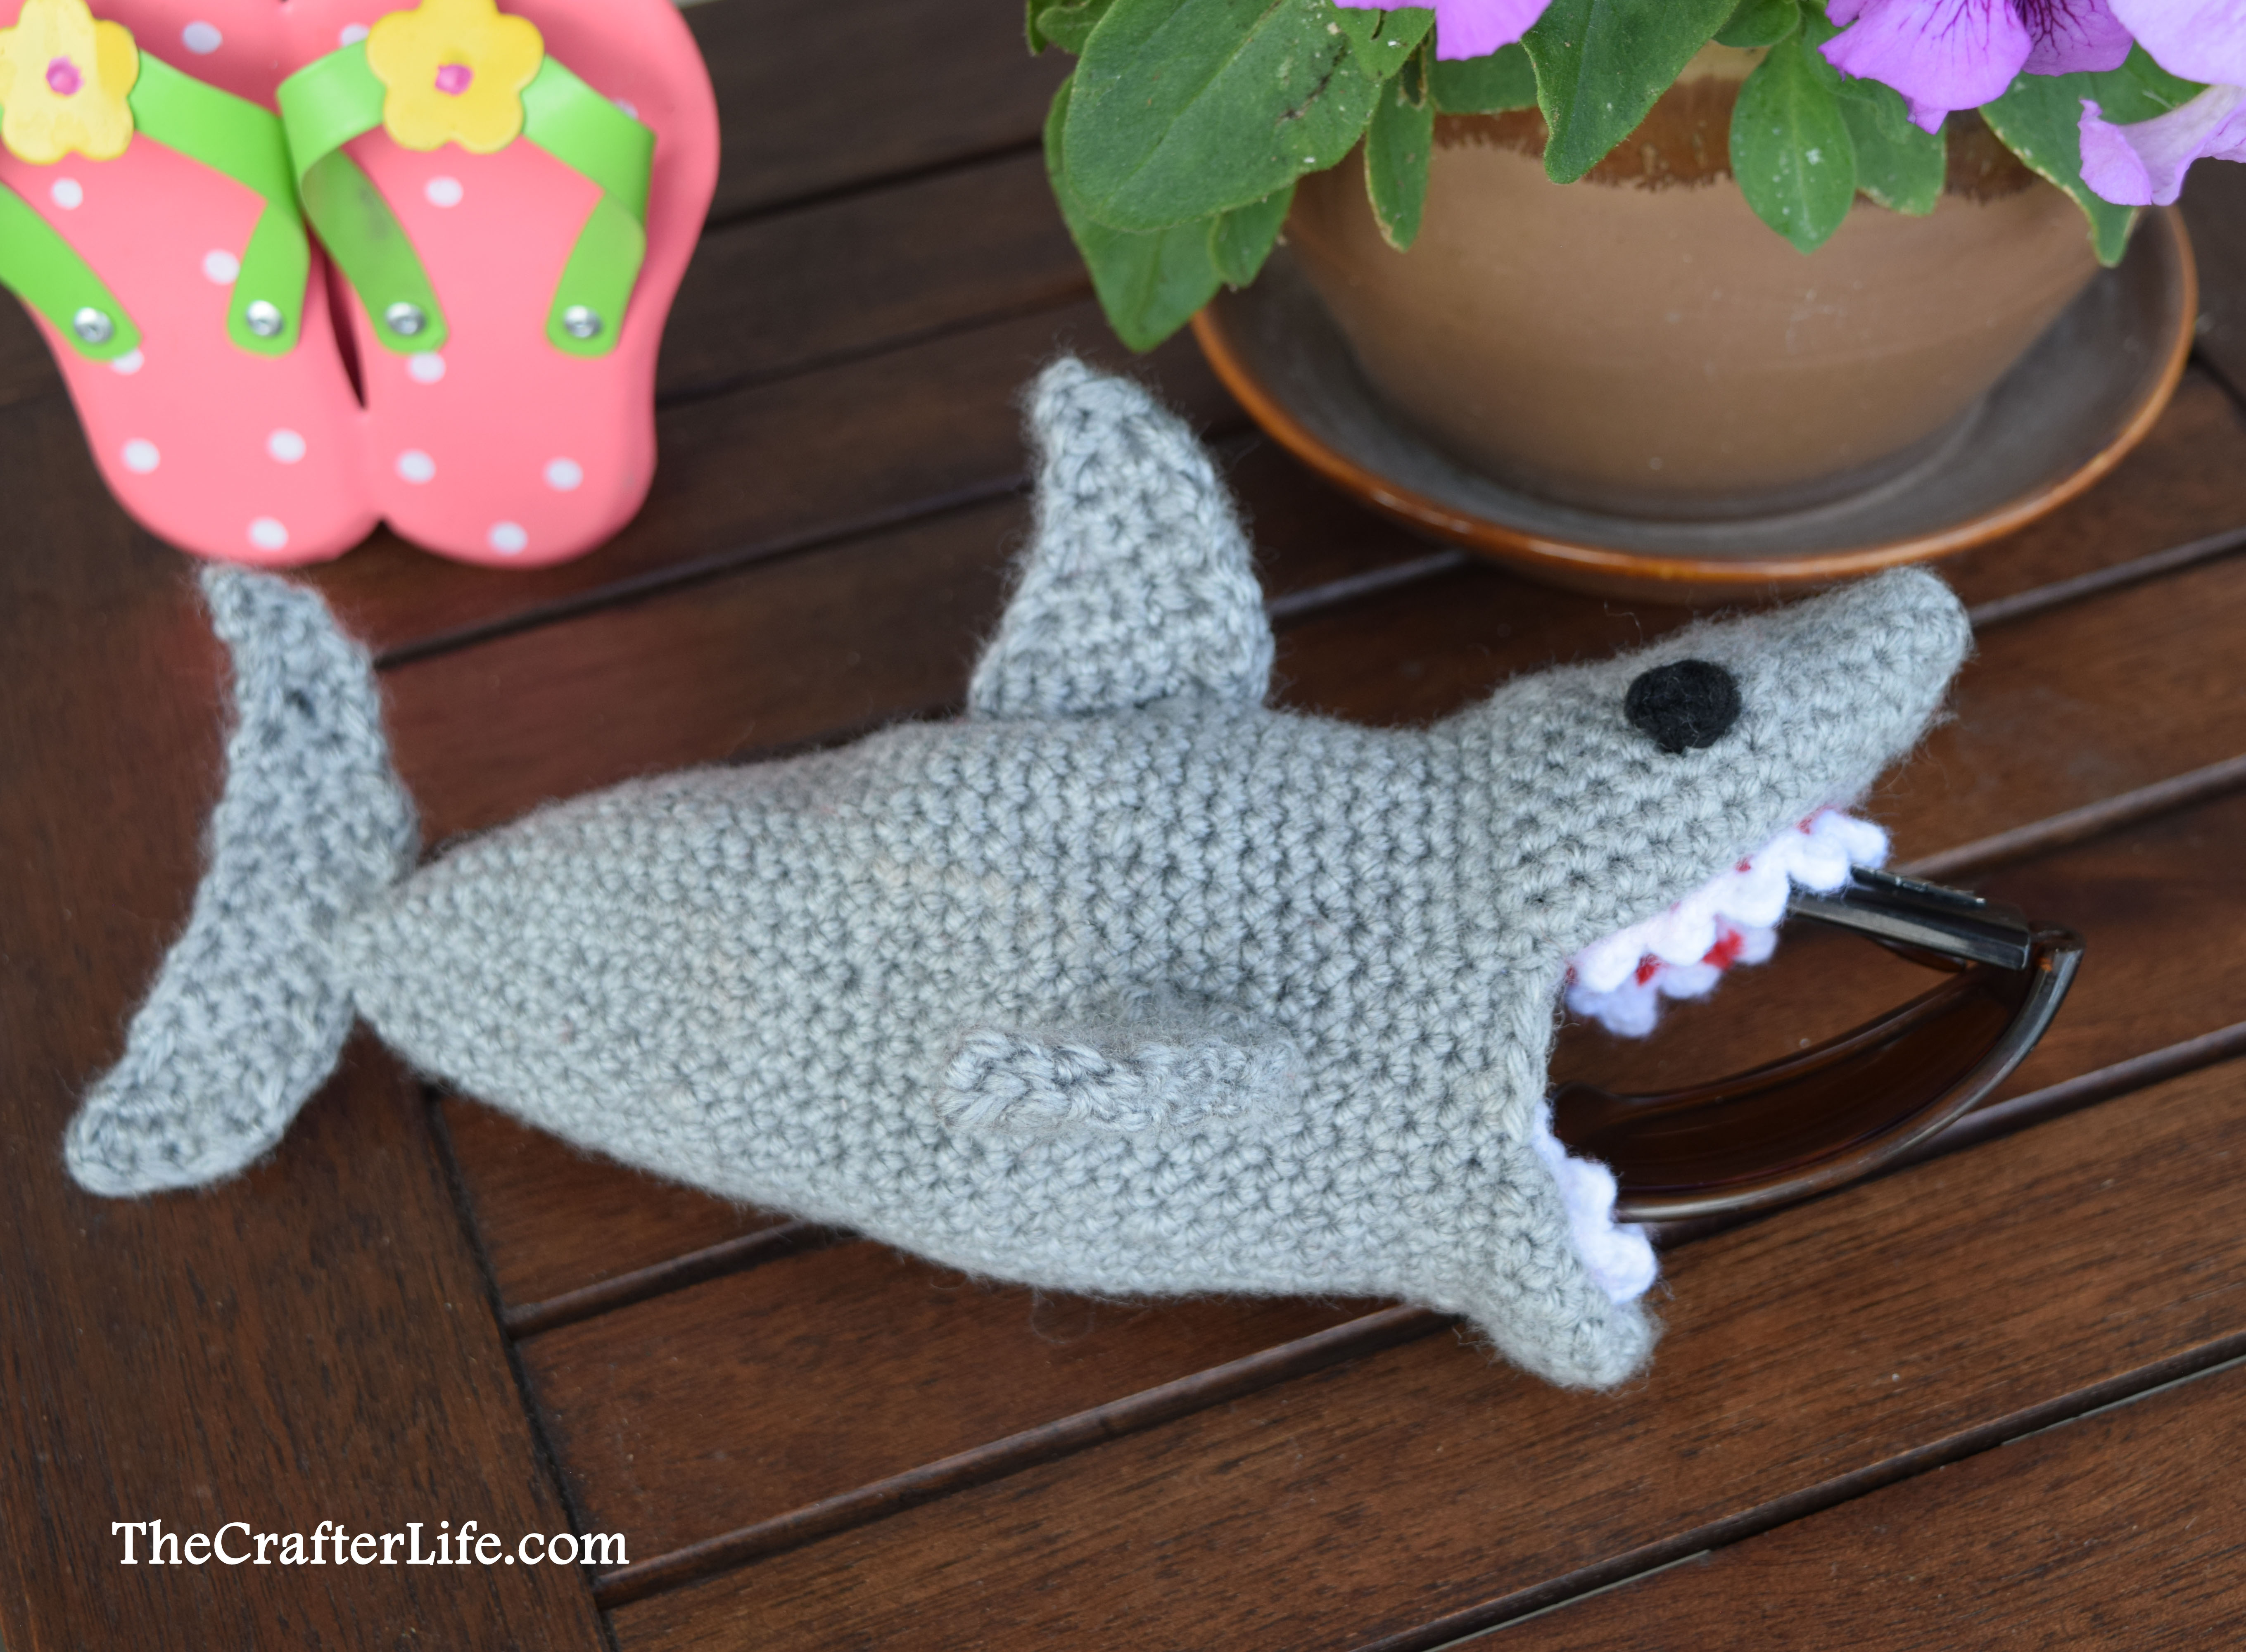
Shark Sunglass Case
If you are looking to “sink your teeth” into a fun summer crochet project, check out my new shark sunglass case pattern! This week, I had fun watching the Shark Week shows on the Discovery Channel while making this cute sunglass case for my son. I bit off more than I could chew with this project since it took a lot longer than I expected to finish, but I am more than happy with how it turned out in the end! A great finale to Shark Week! This would make a fun gift for any shark fan or someone who wants their sunglasses to have a little protection. Simply slide your sunglasses into the jaws of the shark and close the mouth with the strings so the sunglasses stay inside the shark’s belly. If you are interested in making one, see below for my pattern.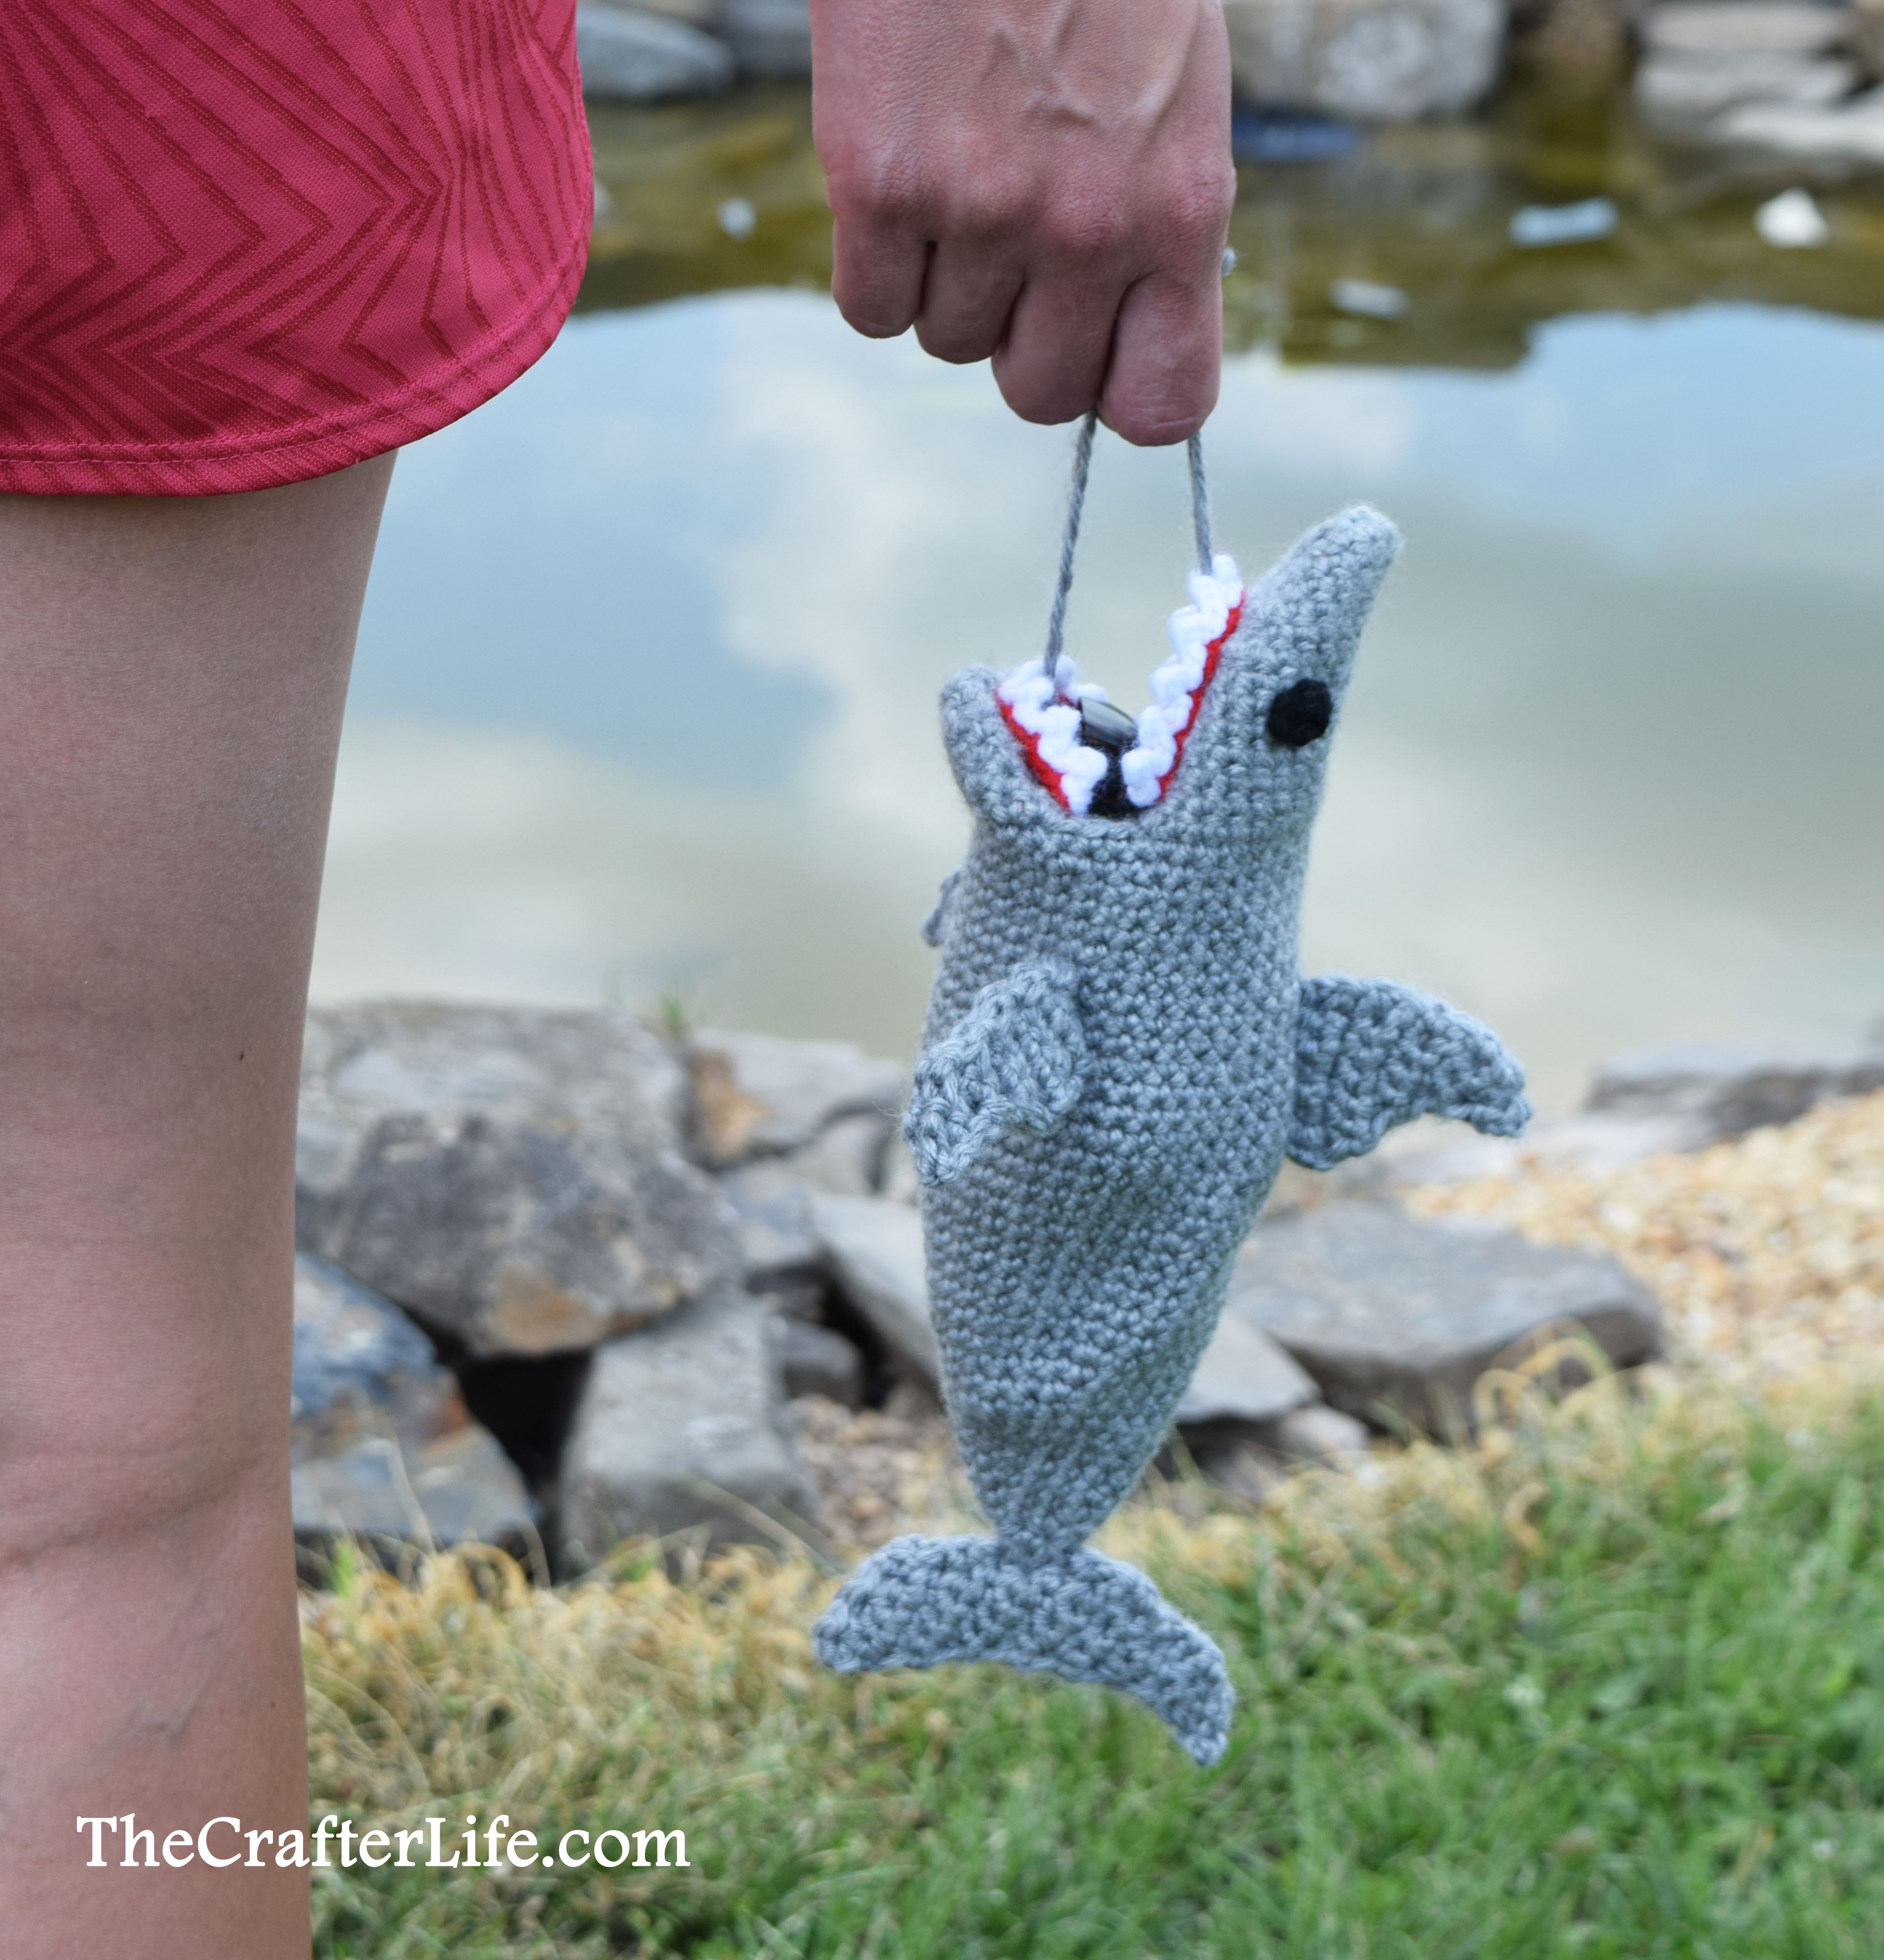
Ad-Free, large-print PDF with instructional pictures available on Etsy
This sunglass case pattern is written to hold most adult-size sunglasses. Smaller sunglasses will also fit inside the case.
FINISHED MEASUREMENTS
The shark case is approximately 10 inches long and 8½ inches around (circumference). It has a diameter of almost 2¾ inches.
MATERIALS
– Size H/8/5.00mm crochet hook or size needed to obtain gauge
– Size F/5/3.75mm crochet hook or size needed to obtain appropriate sized embellishments
– Worsted weight (4) yarn in Gray or your choice of color for the shark body (I used Red Heart Soft in Light Grey Heather.)
– Worsted weight (4) yarn in Red or your choice of color for the shark body (I used Red Heart Super Saver in Cherry Red.)
– Worsted weight (4) yarn in White or your choice of color for the shark body (I used Red Heart Super Saver in White.)
– Worsted weight (4) yarn in Black (I used Red Heart Super Saver in Black.)
– Tapestry needle for weaving in ends and sewing parts onto body
– Scissors
– Stitch markers
– Measuring tape
Optional Items:
– Straight pins (if needed for positioning the body parts in place before sewing)
Ad-Free, large-print PDF with instructional pictures available on Etsy
ABBREVIATIONS
– ch = chain
– chs = chains
– sc = single crochet
– sc2tog = single crochet 2 together (single crochet decrease)
– sc3tog = single crochet 3 together (single crochet decrease over 3 stitches)
– slst = slip stitch
– st = stitch
– sts = stitches
SPECIAL STITCHES
sc3tog: Insert your hook under the next stitch, yarn over and pull up a loop (2 loops now on hook), insert your hook under the next stitch, yarn over and pull up a loop (3 loops now on hook), insert your hook under the next stitch, yarn over and pull up a loop (4 loops now on hook), yarn over and pull through all 4 loops.
GAUGE
5 sc = 1 inch; 6 rounds = 1 inch
PATTERN NOTES
• The body of the shark case is made first with continuous rounds of single crochet stitches. Simply place the first st of each round into the first st of the previous round (do not join or chain at the beginning of a round unless otherwise stated). You can use stitch markers to help you keep track of the beginning of each round.
• Repeated portions of the pattern are indicated by brackets [ ]. The section of the pattern that is inside the brackets represents the part to be repeated.
DIRECTIONS
Body of Shark
*Use your gray/main body color worsted weight yarn and size 5.00mm hook to begin the first round.
*Make sure to pull the magic ring closed and weave in/secure end at closure at the beginning.
*You may want to mark the first stitch of each round with a stitch marker.
Round 1: Make a magic ring, ch 1, work 6 sc in magic ring, pull ring closed. (6 sc)
Round 2: 2 sc in first st, sc in next 2 sts, 2 sc in next st, sc in last 2 sts. (8 sc)
Round 3: Repeat [2 sc in next st, sc in next st] around. (12 sc)
Round 4: Sc in each st around. (12 sc)
Round 5: Repeat [2 sc in next, sc in next 2 sts] around. (16 sc)
Rounds 6–7: Sc in each st around. (16 sc)
Round 8: Repeat [2 sc in next st, sc in next st] around. (24 sc)
Rounds 9–10: Sc in each st around. (24 sc)
Round 11: Repeat [2 sc in next st, sc in next 5 sts] around. (28 sc)
Round 12: Sc in each st around. (28 sc)
Round 13: Repeat [2 sc in next st, sc in next 6 sts] around. (32 sc)
Rounds 14–18: Sc in each st around. (32 sc)
Round 19: Repeat [2 sc in next st, sc in next 3 sts] around. (40 sc)
Rounds 20–26: Sc in each st around. (40 sc)
Round 27: Repeat [sc2tog, sc in next 8 sts] around. (36 sc)
Rounds 28–35: Sc in each st around. (36 sc)
Round 36: Repeat [2 sc in next st, sc in next 8 sts] around. (40 sc)
Round 37: Sc in each st around, slst to first st of round, do not fasten off, begin the Top Jaw from here. (40 sc)
***Hint: Mark the 19th st of Round 37 with a stitch marker.
Ad-Free, large-print PDF with instructional pictures available on Etsy
Top Jaw
With your yarn still on your hook after completing Round 37 of the shark body:
Ch 11, join the ch-11 with a slst to 19th st of Round 37 (so the chain is attached to the 19th stitch and runs across the opening of the shark body).
*Once you have your chain attached, you can now begin Round 1 of the Top Jaw. Round 1 will be worked in the first 19 stitches from Round 37 and in the 11 chains across the opening.
Round 1: Ch 1, sc in same st (the 19th st of Round 37) and in next 18 sts (the last st should be the first st of Round 37), sc in next 11 chs across. (30 sc)Round 2: Sc in each st around. (30 sc)
Round 3: Sc in next 22 sts, sc2tog, sc in next st, sc2tog, sc in next 3 sts. (28 sc)
Round 4: Sc in next 21 sts, sc2tog, sc in next st, sc2tog, sc in next 2 sts. (26 sc)
Round 5: Sc in next 20 sts, sc2tog, sc in next st, sc2tog, sc in next st. (24 sc)
Round 6: Sc in next 19 sts, sc2tog, sc in next st, sc2tog. (22 sc)
Round 7: Sc in next 3 sts, sc2tog, sc in next 9 sts, sc2tog, sc in next 6 sts. (20 sc)
Round 8: Sc2tog, sc in next 14 sts, sc2tog, sc2tog. (17 sc)
Round 9: Sc in next 2 sts, sc2tog, sc in next 9 sts, sc2tog, sc in next 2 sts. (15 sc)
Round 10: Sc2tog, sc in next 11 sts, sc2tog. (13 sc)
Round 11: Sc2tog, sc in next 9 sts, sc2tog. (11 sc)
Round 12: Sc2tog, sc in next 9 sts, fasten off, close the open end using your tapestry needle (by weaving in and out of the top two loops of each st around) to form the tip of the nose, weave in and secure ends once finished. (10 sc)
***You should now have the Top Jaw complete. Follow the directions below to begin the Bottom Jaw.
Bottom Jaw
Attach your yarn to the 23rd stitch of Round 37 of the shark body (this is four stitches over from the 19th stitch where you attached your chain for the Top Jaw).
After attaching your yarn to the 23rd stitch:
Ch 9, join the ch-9 with a slst to 37th st of Round 37 (so the chain is attached to the 37th stitch and runs across the opening of the shark body).
*Once you have your chain attached, you can now begin Round 1 of the Bottom Jaw. Round 1 will be worked in the 23rd through 37th stitches from Round 37 and in the 9 chains across the opening.
Round 1: Ch 1, sc in same st (the 23rd st of Round 37) and in next 14 sts (the last st should be the 37th st of Round 37), sc in next 9 chs across. (24 sc)
Round 2: Sc in next 16 sts, sc2tog, sc in next 2 sts, sc2tog, sc in next 2 sts. (22 sc)
Round 3: Sc in next 15 sts, sc3tog, sc in next st, sc3tog. (18 sc)
Round 4: Sc2tog, sc in next st, sc2tog, sc in next 5 sts, sc2tog, sc in next st, sc2tog, sc in next 3 sts. (14 sc)
Round 5: Repeat [sc2tog] 7 times around, fasten off, close the open end using your tapestry needle (by weaving in and out of the top two loops of each st around) to form the end of the bottom jaw, weave in and secure ends once finished. (7 sc)
***You should now have the Bottom Jaw complete. Follow the directions below to make and attach the teeth.
Teeth
You will need to make a set of teeth for the Top Jaw and a set of teeth for the Bottom Jaw. You will need both your 5.00mm hook and your 3.75mm hook for the teeth. You will also need your red and white yarn.
Ad-Free, large-print PDF with instructional pictures available on Etsy
(Top Teeth)
Row 1: Using your 5.00mm hook and red yarn, ch 22, fasten off.
Row 2: Using your 3.75mm hook and white yarn, attach yarn to the back ridge (back bump) of the first red ch. Ch 2, slst in 2nd ch from hook, slst in back ridge of next red ch, repeat [slst in back ridge of next red ch, ch 2, slst in 2nd ch from hook, slst in back ridge of next red ch] across the entire red ch, fasten off, weave in loose ends.
***You should now have the top set of teeth complete with a total of 11 teeth.
(Bottom Teeth)
Row 1: Using your 5.00mm hook and red yarn, ch 14, fasten off.
Row 2: Using your 3.75mm hook and white yarn, attach yarn to the back ridge (back bump) of the first red ch. Ch 2, slst in 2nd ch from hook, slst in back ridge of next red ch, repeat [slst in back ridge of next red ch, ch 2, slst in 2nd ch from hook, slst in back ridge of next red ch] across the entire red ch, fasten off, weave in loose ends.
***You should now have the bottom set of teeth complete with a total of 7 teeth.
Attaching Teeth
Use your tapestry needle and a long piece of gray (your main body color) yarn to sew the two sets of teeth to their respective jaws.
Position the top set of teeth how you want it on the top jaw (you may want to use pins to hold it in place before sewing). Sew through the back-side loops of the red chain (the loops on the inside/wrong side of the teeth) and through only the bottom layer of the underside of the top jaw. DO NOT sew through the top of the head (only sew through the inside flap of the top jaw). You may want to wait to secure the ends until you have sewn on the bottom set of teeth in case you want to re-position the teeth to align better with the bottom.
Position the bottom set of teeth how you want it on the bottom jaw (you may want to use pins to hold it in place before sewing). Sew through the back-side loops of the red chain (the loops on the inside/wrong side of the teeth) and through only the top layer of the topside of the bottom jaw. DO NOT sew through the bottom of the head (only sew through the inside flap of the bottom jaw).
Once your teeth are sewn in place where you would like them to be, make sure to weave in and secure/knot your yarn ends. This can be done on the inside of each jaw “flap” since you won’t see under the flaps.
Shark Eye (Make 2)
*Use your black worsted weight yarn and size 3.75mm hook to begin the first round.
*Make sure to pull the magic ring closed and weave in/secure end at closure at the beginning.
Round 1: Make a magic ring, ch 1, work 2 sc in magic ring, fasten off, pull ring closed and secure that loose end but leave a long tail from fastening off to use when sewing the eye onto the shark. (2 sc)
***You should have two eyes, each with one long tail you can use to sew them onto the head.
Attaching Eyes
1. Position the eyes on the head of the shark where you would like them to sit. You may want to use straight pins before sewing them.
2. Use your tapestry needle and the long tail left on one of the eyes to sew it in place. Make sure to only sew through one layer of the head. Do the same thing with the other eye.
3. Once you are satisfied with the positioning/attachment of the eyes, make sure to secure your yarn on the underside of the head.
***You should now have both eyes attached to the head of the shark. Follow the directions below to make and attach the Top Fin.
Ad-Free, large-print PDF with instructional pictures available on Etsy
Top Fin (Make 2)
*Use your gray (main body color) yarn and 5.00mm hook to make the Top Fin.
*You will make 2 top fins and sew them together to create a thicker fin.
Row 1: Ch 2, sc in 2nd ch from hook. (1 sc)
Row 2: Ch 1, turn, 2 sc in next st. (2 sc)
Row 3: Ch 1, turn, 2 sc in first st, sc in last st. (3 sc)
Row 4: Ch 1, turn, sc in next 2 sts, 2 sc in last st. (4 sc)
Row 5: Ch 1, turn, 2 sc in first st, sc in next st, sc2tog. (4 sc)
Row 6: Ch 1, turn, 2 sc in first st, sc in next 2 sts, 2 sc in last st. (6 sc)
Row 7: Ch 1, turn, 2 sc in first st, sc in next 3 sts, sc2tog. (6 sc)
Row 8: Ch 1, turn, 2 sc in first st, sc in next 4 sts, 2 sc in last st. (8 sc)
Row 9: Ch 1, turn, sc in next 6 sts, sc2tog, fasten off, leaving a long tail for sewing. (7 sc)
Top Fin Assembly & Attachment
1. Use your tapestry needle and one of the long tails on one of your fin pieces to sew the two top fin pieces together to create a thicker fin. Place one top fin piece directly on top of the other so their edges match up and sew through both pieces along their perimeters. Tie off and secure the yarn tail when you have completely sewn them together around their perimeters.
2. Use your tapestry needle and the other long tail left on the second fin piece to sew the thick top fin onto the back of the shark. Make sure to place the fin in the middle of the back so it is centered between the eyes of the shark. Tie off and secure your yarn once you have finished attaching the top fin to the body.
***After you have your Top Fin attached to the body, follow the directions below to make and attach the Tail Fin.
Ad-Free, large-print PDF with instructional pictures available on Etsy
Tail Fin (Make 2)
*Use your gray (main body color) yarn and 5.00mm hook to make the Tail Fin.
*You will make 2 tail fins and sew them together to create a thicker tail.
Row 1: Ch 2, sc in 2nd ch from hook. (1 sc)
Row 2: Ch 1, turn, 2 sc in next st. (2 sc)
Row 3: Ch 1, turn, sc in each st across. (2 sc)
Row 4: Ch 1, turn, sc in first st, 2 sc in last st. (3 sc)
Row 5: Ch 1, turn, 2 sc in first st, sc2tog. (3 sc)
Row 6: Ch 1, turn, sc in each st across. (3 sc)
Row 7: Ch 1, turn, 2 sc in first st, sc in next 2 sts. (4 sc)
Row 8: Ch 1, turn, sc in first st, 2 sc in next st, sc in next 2 sts. (5 sc)
Row 9: Ch 1, turn, 2 sc in first st, sc in next 2 sts, sc2tog. (5 sc)
Row 10: Ch 1, turn, sc2tog, sc in next 2 sts, 2 sc in last st. (5 sc)
Row 11: Ch 1, turn, 2 sc in first st, sc in next 2 sts, sc2tog. (5 sc)
Row 12: Ch 1, turn, sc2tog, sc in next 2 sts, 2 sc in last st. (5 sc)
Row 13: Ch 1, turn, 2 sc in first st, sc in next 2 sts, sc2tog. (5 sc)
Row 14: Ch 1, turn, sc2tog, sc in next 2 sts, 2 sc in last st. (5 sc)
Row 15: Ch 1, turn, 2 sc in first st, sc in next 2 sts, sc2tog. (5 sc)
Row 16: Ch 1, turn, sc2tog, sc in next 2 sts, 2 sc in last st, fasten off, leaving a long tail for sewing. (5 sc)
Tail Fin Assembly & Attachment
1. Use your tapestry needle and one of the long tails on one of your tail pieces to sew the two tail fin pieces together to create a thicker tail. Place one tail fin piece directly on top of the other so their edges match up and sew through both pieces along their perimeters. Tie off and secure the yarn tail when you have completely sewn them together around their perimeters.
2. Use your tapestry needle and the other long tail of yarn left on the second tail piece to sew the thick tail fin onto the end of the shark body. You can weave the long tail of yarn up through the tail fin until you reach the mid-point of the fin where you need to sew it to the body. Make sure to place the tail fin so it is centered and sticks and vertical when looking at the shark from the side. Tie off and secure your yarn once you have finished attaching the tail fin to the body.
***After you have your Tail Fin attached to the body, follow the directions below to make and attach the Side Fins.
Side Fins (Make 4)
*Use your gray (main body color) yarn and 5.00mm hook to make the Side Fins.
*You will make 4 side fins and sew two pairs together to create thicker fins.
Row 1: Ch 2, sc in 2nd ch from hook. (1 sc)
Row 2: Ch 1, turn, 2 sc in next st. (2 sc)
Row 3: Ch 1, turn, sc in each st across. (2 sc)
Row 4: Ch 1, turn, sc in first st, 2 sc in last st. (3 sc)
Row 5: Ch 1, turn, 2 sc in first st, sc2tog. (3 sc)
Row 6: Ch 1, turn, sc in next 2 sts, 2 sc in last st. (4 sc)
Row 7: Ch 1, turn, 2 sc in first st, sc in next 3 sts. (5 sc)
Row 8: Ch 1, turn, sc in each st across. (5 sc)
Row 9: Ch 1, turn, sc2tog, sc in next 3 sts. (4 sc)
Row 10: Ch 1, turn, sc2tog, sc in next 2 sts. (3 sc)
Row 11: Ch 1, turn, sc in each st across, fasten off, leaving a long tail for sewing. (3 sc)
Ad-Free, large-print PDF with instructional pictures available on Etsy
Side Fin Assembly & Attachment
1. Use your tapestry needle and one of the long tails on one of your fin pieces to sew two fin pieces together to create a thicker side fin. Place one tail fin piece directly on top of the other so their edges match up and sew through both pieces along their perimeters. Tie off and secure the yarn tail when you have completely sewn them together around their perimeters. Sew the other pair of side fin pieces together in the same way.
2. Use your tapestry needle and the other long tail of yarn left on one of the side fins to sew it in place on the side of the shark body. Tie off and secure your yarn once you have finished attaching the side fin to the body. Sew the other side fin on the opposite side of the shark body and secure your yarn once you are finished.
***After you have your Side Fins attached to the body, follow the directions below for the ties.
Ties
1. Cut two gray (main body color) strands of yarn that are each about 20 inches long.
2. Thread one of the strands of yarn through your tapestry needle and insert the needle through the center of the roof of the shark’s mouth from the inside behind the teeth and up through the outside of the top of the head so it comes up behind the eyes. Then take your needle back down, about one stitch over, so it comes back through the inside of the roof of the mouth. Cut the two ends of the yarn so they are even lengths. Tie the two ends of yarn together with a knot almost placed at the very tips of the ends.
3. Thread the other strand of yarn through your tapestry needle and insert the needle through the center of the bottom of the shark’s mouth from the inside behind the teeth and down through the outside of bottom of the jaw. Then take your needle back up, about one stitch over, so it comes back through the inside of the bottom jaw. Cut the two ends of the yarn so they are even lengths. Tie the two ends of yarn together with a knot almost placed at the very tips of the ends.
4. You can now tie the top string to the bottom string when you want to close the sunglass case.
***Once you have the ties finished and have made sure to weave in and secure all loose ends, you are ready to use your shark sunglass case! Place your favorite pair of sunglasses inside the bag for a totally unique way of protecting them.

The pattern and photos of this item are the property of TheCrafterLife. This pattern and design are subject to copyright, and are for personal, non-commercial use only. You may not distribute, sell this pattern, or claim it as your own under any circumstances.
You may not sell my patterns or claim them as your own. You may make items to sell (i.e. on Etsy) from my patterns but I ask that you link back to my site and provide credit for the pattern. You are welcome to share my patterns on social media as long as you link back directly to my site by providing the link. No copying and pasting of any patterns will be allowed under any circumstances.