Mini Cupcake Mermaid Tail
Years ago, I had the idea of making a mermaid tail out of mini cupcakes since they would be perfect for the scales of the tail. As with many of my ideas, I never actually got around to trying it out and since no opportunity ever arose where I needed such a concoction, it got put on the back burner. Well, my daughter just turned one at the end of May and I decided to have a mermaid themed party! I knew it was either now or never if I was ever going to make the mini cupcake mermaid tail, so I decided to finally try it. I made two of them since I was having two separate, smaller parties. I think they turned out pretty cute considering I didn’t have too long to make them (I made them about an hour before the first party was to start). And how cute are mini cupcakes at a one-year-old’s party!? If you are looking for a quick (or last-minute) cake idea for your mermaid themed party, this is pretty fun and easy to make! This would also be a really fun baking activity for kids since they can be creative with the colors, decorating, and layout of the mermaid tail. Below are the directions for what I did to make my mini cupcake mermaid tails.
P.S.: My 1-year-old loved her mini cupcake!
MATERIALS
- Mini Muffin/Cupcake Pan LINK
- Mini Muffin/Cupcake Wrappers
- Regular Size Muffin/Cupcake Pan
- Regular Size Muffin/Cupcake Wrappers
- Your favorite cake mix/recipe + ingredients needed for batter (I used Betty Crocker Super Moist Cake Mix in Yellow and Chocolate Fudge)
- Frosting: Green, Turquoise, Purple (I used Wilton Creamy Decorator Icing in Green*, Pillsbury Funfetti in Aqua Blue Vanilla and Bold Purple)
*I couldn’t find the Pillsbury Vibrant Green Vanilla, which may be more of a “mermaid” color, so I substituted with Wilton Creamy Decorator Icing, which is a little darker green
- White Frosting (if you are mixing/dying your own colors – I used Pillsbury Funfetti in Vanilla)
- Gel Food Dye (I mixed Wilton Gel Icing Colors in Kelly Green and Teal)
- Wilton Color Mist Shimmering Food Color Spray in Gold
- A tray/plate/platter/dish large enough to display the completed tail
- OPTIONAL: Fancy Sprinkles (I used a few of the Cake Mate Cupcake Gems Classic Pearls)
DIRECTIONS
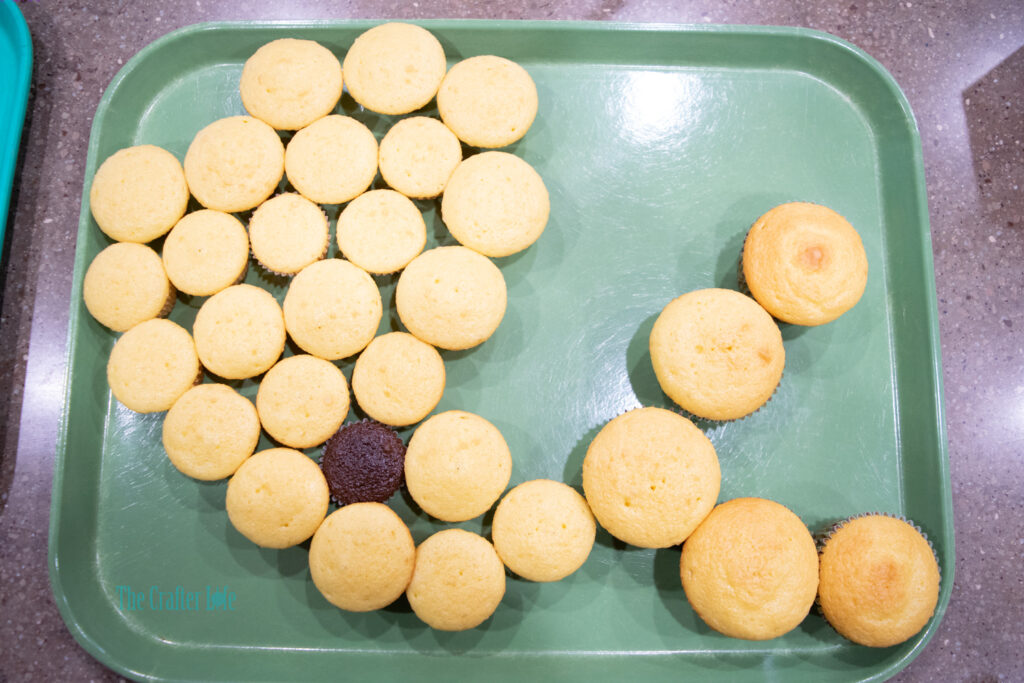
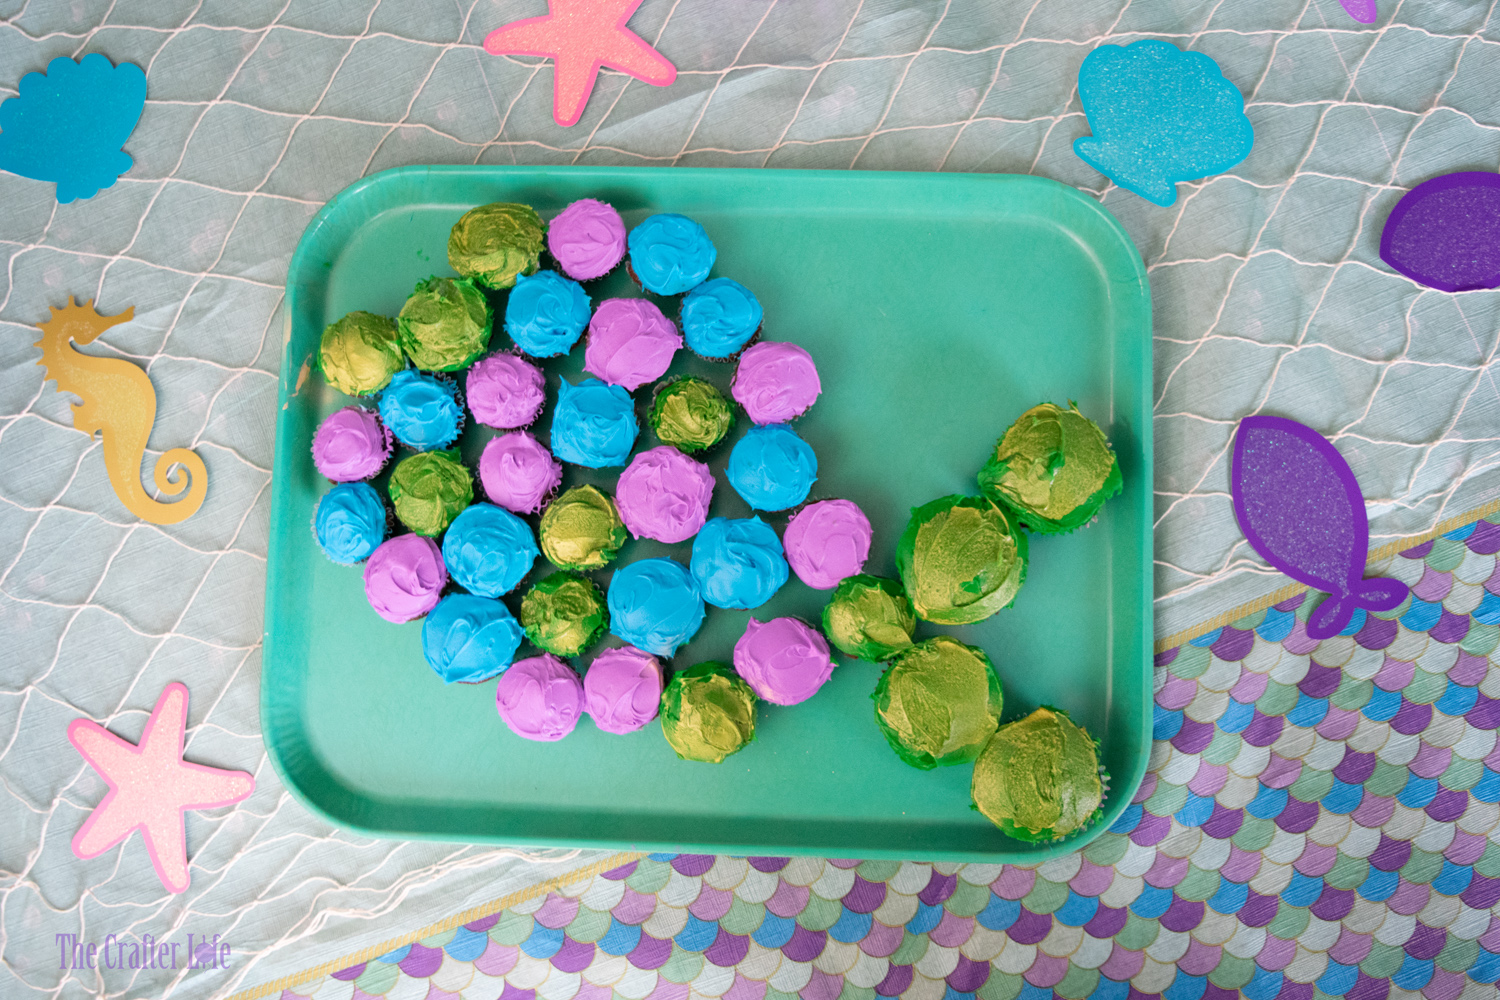
- Place your mini muffin/cupcake wrappers in the mini muffin pan and bake your mini cupcakes. You can make as many cupcakes as you want depending on how big you need your tail to be. I didn’t have many people coming to the two parties and I wanted each of the tails I made to fit on a lunch tray. I used 25 mini cupcakes on the tail shown in the main image and 32 for the other tail since the yellow cupcakes making up the tail in the main image turned out bigger than the chocolate cupcakes I used for the other tail. Let the cupcakes cool before frosting.
- Place your regular size cupcake wrappers in the regular cupcake pan and bake your regular-sized cupcakes. You won’t need as many of these since they are only used for the fins at the end of the tail. I used 6 regular cupcakes for the tail shown in the main image and 4 regular cupcakes for the tail shown in the other image.
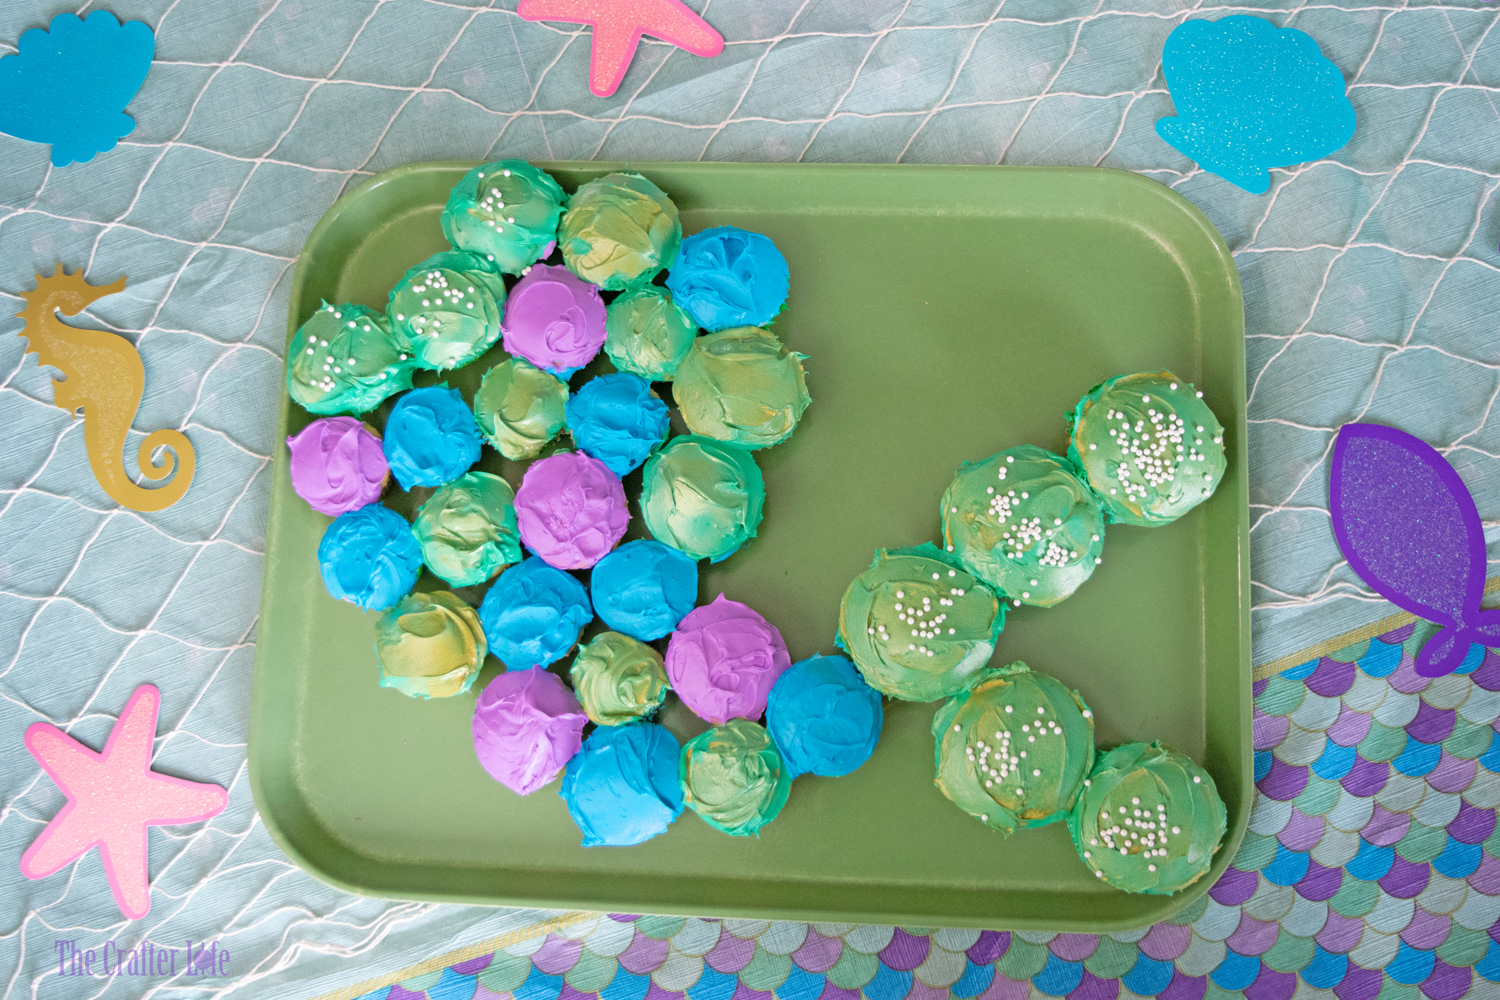
- Arrange your mini cupcakes into the shape of a mermaid tail on top of whatever platter/tray you are using to display it on or transport it. I placed three mini cupcakes along the top to create a waist for the tail. The mini cupcakes represent the scales on the tail. Use the regular sized cupcakes to create the fins at the end of the tail. There are many different ways you may choose to shape the tail. It might help to look at images of tails to help you create the appearance you prefer.
- Once you are satisfied with your cupcake tail arrangement, it is time to frost the cupcakes. Decide on the colors you are using for the scales, the waistline, and the fins at the end of the tail. If you need to mix your own icing colors, do so now. *For my second tail, I made a mint green by mixing Kelly Green and Teal gel icing colors into white frosting.
- Once you have your frosting colors ready, begin frosting the cupcakes, one at a time, by lifting each one from their place in the tail to frost and then carefully putting it back in place before choosing another to frost. You should make the cupcakes that form the waistline the same color. Also, use the same color for the cupcakes that form the fins at the end of the tail. You might want to make a pattern with the scale colors so no two cupcake scales touch that are of the same color, but you can also make the scales random colors. Of course, it is your design and color choices are totally up to you! It is helpful to have a separate knife/spreading tool for each icing color so you don’t mix the colors and make the cupcakes look sloppy.
- Add a shimmer to some of the cupcakes by spraying them with Shimmering Food Color Spray. *I used Wilton Color Mist Shimmering Food Color Spray in Gold and used it to spray on only the green cupcakes.
- If you have any fancy sprinkles, you can add those to the top of some or all of the cupcakes. I happened to have some Betty Crocker Classic Pearl sprinkles that I added to a few cupcakes on my second mermaid tail.
- Clean up any loose sprinkles/icing and your mini cupcake mermaid tail is ready to display and, alas, serve up to eat!

*Options are endless for this project! Have fun adding your own flair and other ideas to make it really shine! Kids who are old enough and enjoy baking/crafting would probably have a lot of fun with this since they can do so much with the layout, colors, and decorating – it allows them to be creative.

The photos of this item are the property of TheCrafterLife. They are subject to copyright, and are for personal, non-commercial use only. You may not distribute or claim it as your own under any circumstances.

Summer Vibes Mermaid Chair Cozy