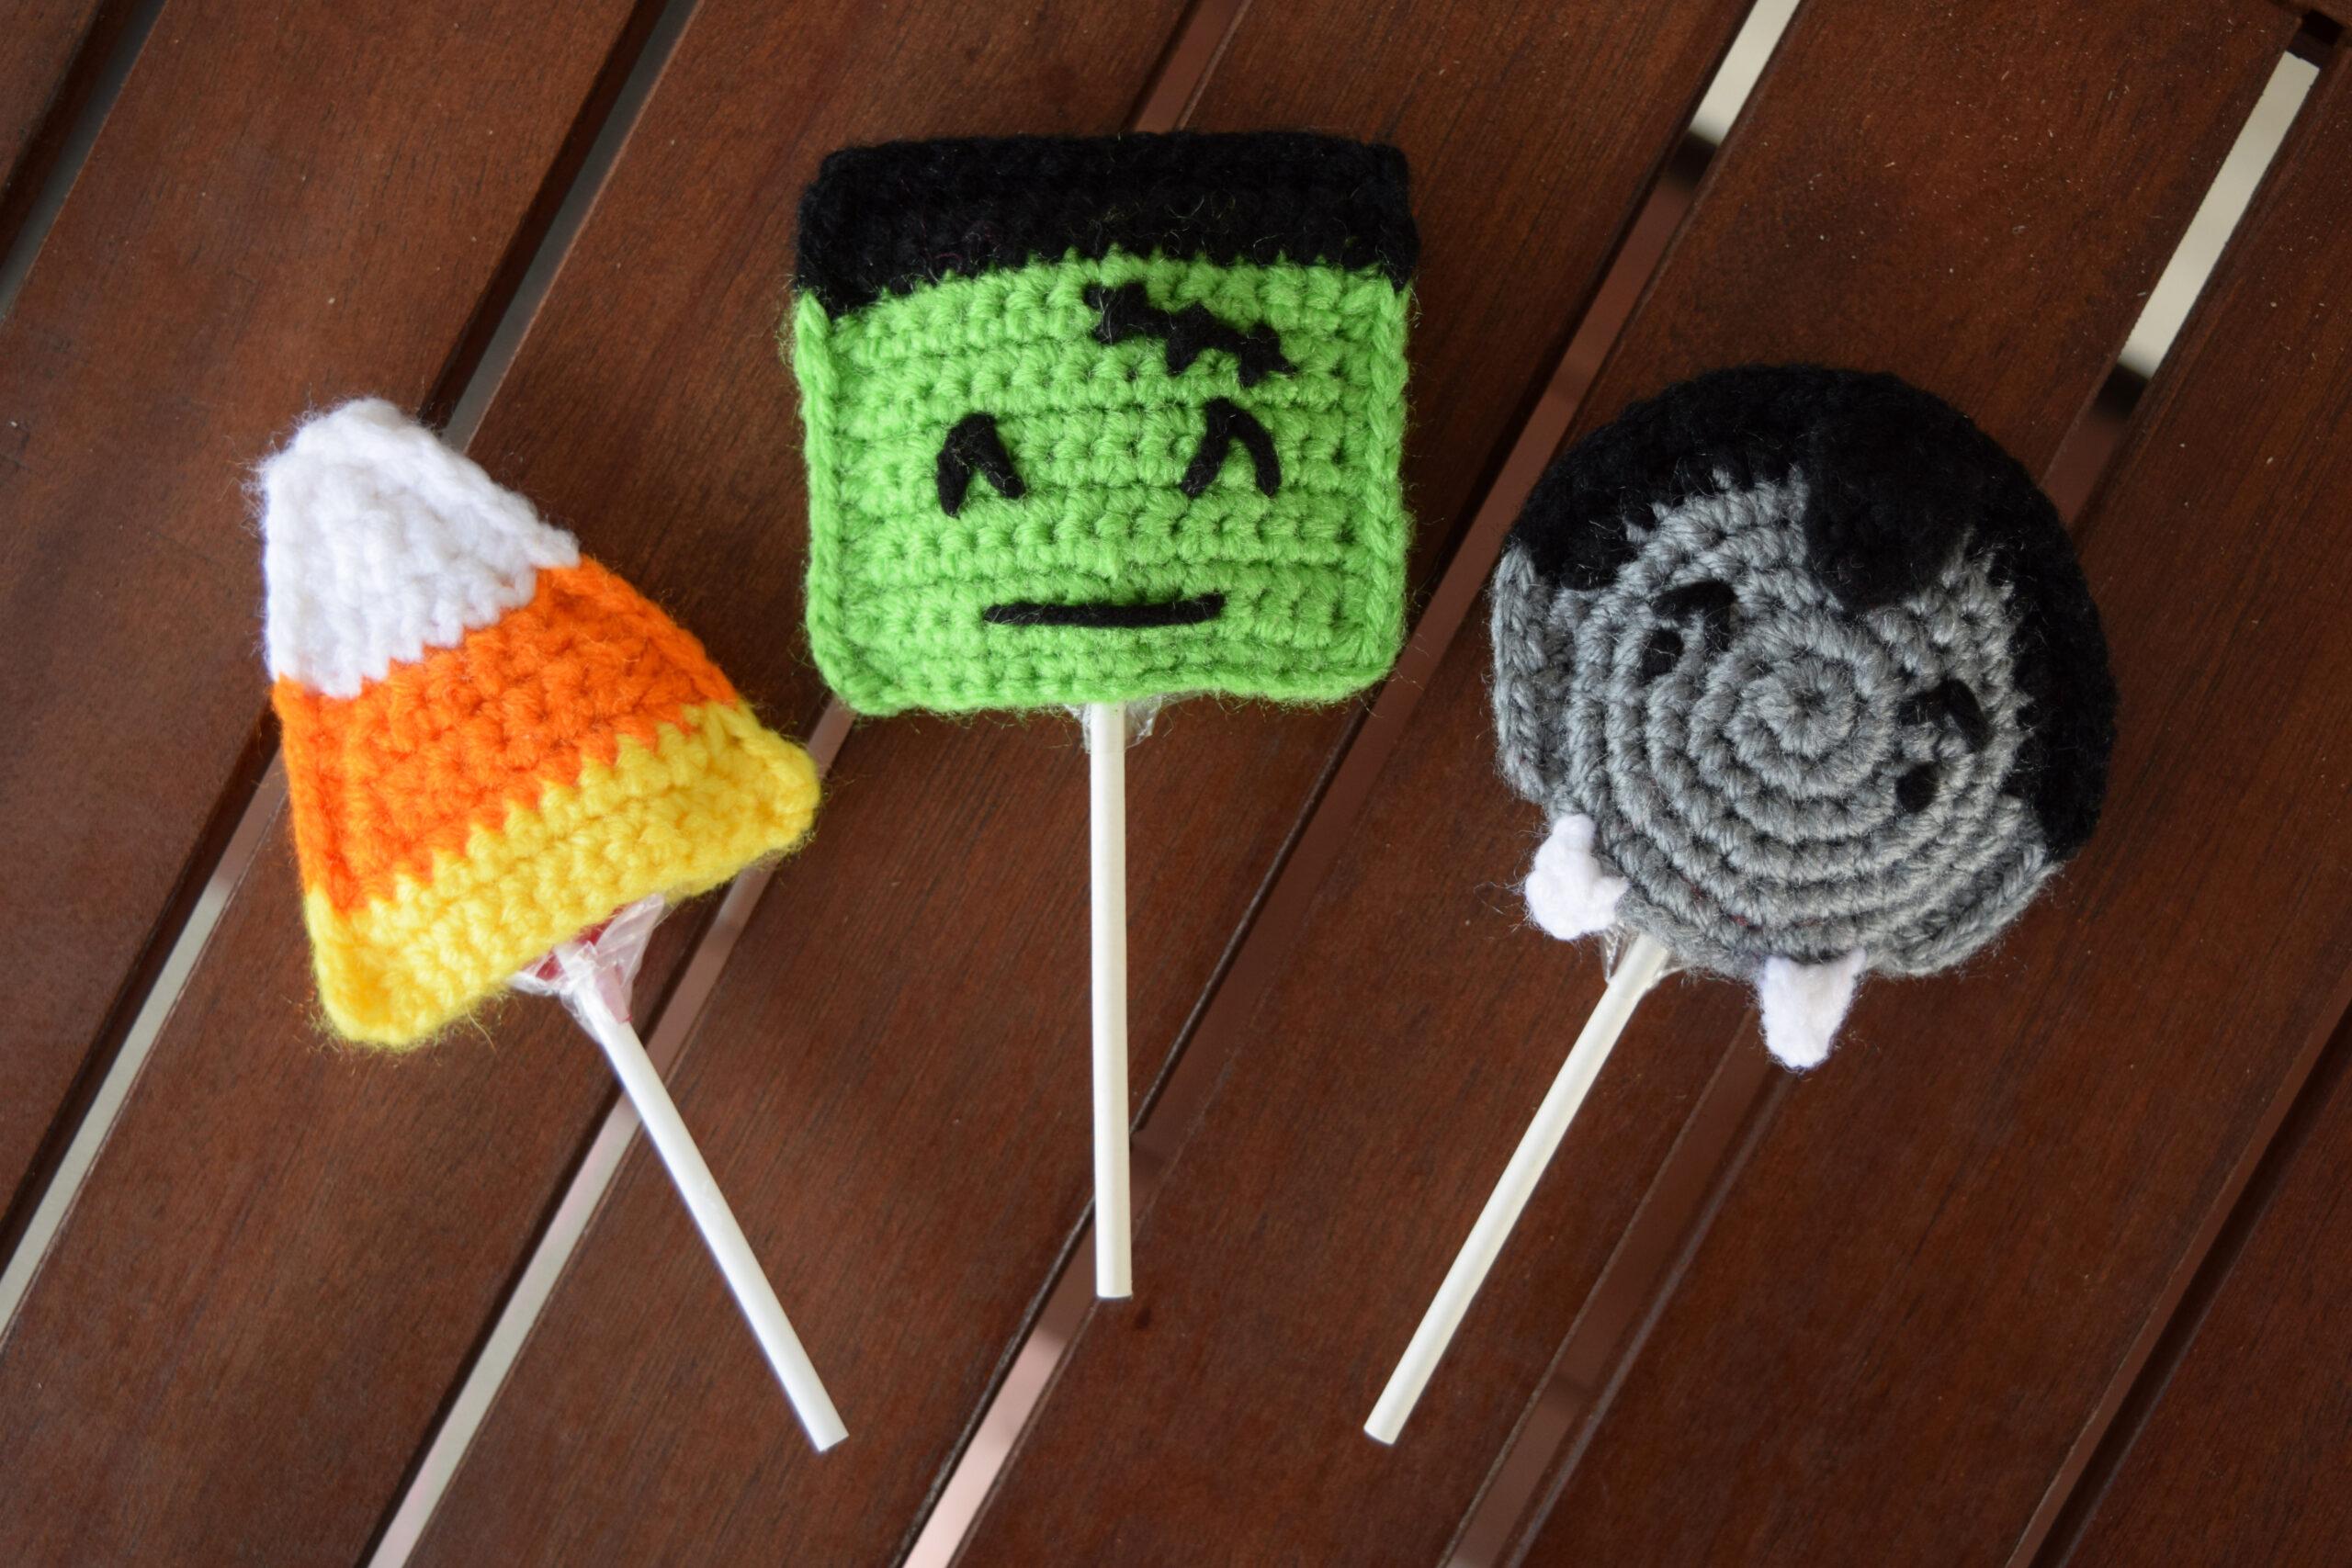
Halloween Sucker Saver
My kids never seem to be able to finish lollipops and like to save them for later. I made these cute Halloween “sucker savers” to cover their lollipops so they will be able to identify which lollipop is their own by the design of the holder. Just wrap the lollipop in plastic wrap or its original wrapper and stick it in the sucker saver! These would also be a cute way to gift lollipops at Halloween. If you are interested in making these fun projects, see below for the patterns.
Halloween Sucker Saver
These Halloween sucker savers are designed to fit standard lollipops. Flat lollipops work the best but they also fit sphere lollipops. It is a fun way to gift lollipops at Halloween. They can also be used to save a lollipop for later by wrapping the lollipop in plastic wrap and then inserting it in the sucker saver.
FINISHED MEASUREMENTS
Each sucker saver is about 2½ inches by 2½ inches.
MATERIALS
– Size 3.00 mm crochet hook
– Worsted weight (4) yarn in Yellow (I used Red Heart Super Saver in Bright Yellow.)
– Worsted weight (4) yarn in Orange (I used Red Heart Super Saver in Pumpkin.)
– Worsted weight (4) yarn in White (I used Red Heart Super Saver in White.)
– Worsted weight (4) yarn in Green (I used Red Heart Super Saver in Spring Green)
– Worsted weight (4) yarn in Black (I used Red Heart Super Saver in Black.)
– Worsted weight (4) yarn in Grey (I used Red Heart Soft yarn in Light Grey Heather.)
– Tapestry needle
– Scissors
Optional Items:
– Stitch markers (if needed for marking/counting stitches or rounds)
ABBREVIATIONS
– ch = chain
– chs = chains
– sc = single crochet
– sc2tog = single crochet 2 together (single crochet decrease)
– slst = slip stitch
– st = stitch
– sts = stitches
PDF version available in my Etsy Shop!
DIRECTIONS
CANDY CORN SUCKER SAVER
Candy Corn Piece (Make 2)
*Use your 3.00 hook and your yellow, orange, and white yarn.
*Leave tail loose from beginning slipknot for Row 1 to use as a starting point reference for trim.
*Start with yellow yarn. Rows 1 – 3 are done in yellow.
Row 1: With yellow yarn, ch 13, sc in 2nd ch from hook and in next 11 chi across. (12 sc)
Row 2: Ch 1, turn, sc2tog, sc in next 8 sts, sc2tog. (2 sc2tog, 8 sc; 10 total sts)
Row 3: Ch 1, turn, sc in each st across, pulling through orange yarn to complete final sc once you have two loops of yellow on your hook. (10 sc)
***You should now have orange yarn on your hook. Rows 4 – 8 are done in orange.
Row 4: Ch 1, turn, sc in each st across. (10 sc)
Row 5: Ch 1, turn, sc2tog, sc in next 6 sts, sc2tog. (2 sc2tog, 6 sc; 8 total sts)
Row 6: Ch 1, turn, sc in each st across. (8 sc)
Row 7: Ch 1, turn, sc2tog, sc in next 4 sts, sc2tog. (2 sc2tog, 4 sc; 6 total sts)
Row 8: Ch 1, turn, sc in each st across, pulling through white yarn to complete final sc once you have two loops of orange on your hook. (6 sc)
***You should now have white yarn on your hook. Rows 9 – 13 are done in white.
Row 9: Ch 1, turn, sc in each st across. (6 sc)
Row 10: Ch 1, turn, sc2tog, sc in next 2 sts, sc2tog. (2 sc2tog, 2 sc; 4 total sts)
Rows 11: Ch 1, turn, sc in each st across. (4 sc)
Row 12: Ch 1, turn, sc in each st across. (4 sc)
Row 13: Ch 1, turn, sc2tog, sc2tog, fasten off and weave in loose ends. (2 sc2tog)
ASSEMBLY
Place the two candy corn pieces on top of one another so the corresponding stitches match. You will single crochet the two pieces together along the sides to create one candy corn piece with an opening at the bottom for a lollipop.
Begin by holding the work so that the yellow section is at the bottom and the beginning slipknot for Row 1 is on the right side. Insert your crochet hook through both corresponding corners (where the slipknot tail is hanging) and draw through a loop of yellow yarn. Chain 1 and then begin to single crochet both pieces together evenly up the side toward the white tip and then down the other side until you reach the other yellow corner on the left, (changing color as you go to match by pulling through the new color to complete the last sc in the old color when you have two loops on your hook). Make sure you insert your hook through both candy corn pieces when starting every single crochet stitch around. On the first side, you should have 3 sc in yellow, then 6 sc in orange, then 5 sc in white. At the very top, you should work 2 single crochet stitches to help create more of a point. Working down the other side, you should have 5 sc in white, 6 sc in orange, and 3 sc in yellow. Once you reach the bottom right corner (after your 3rd sc in yellow), fasten off and weave in ends. DO NOT sc the pieces together across the bottom of the yellow section. You want to leave that open in order to slide in a lollipop.
Once you weave in all loose ends, your candy corn sucker saver is ready to use!
PDF version available in my Etsy Shop!
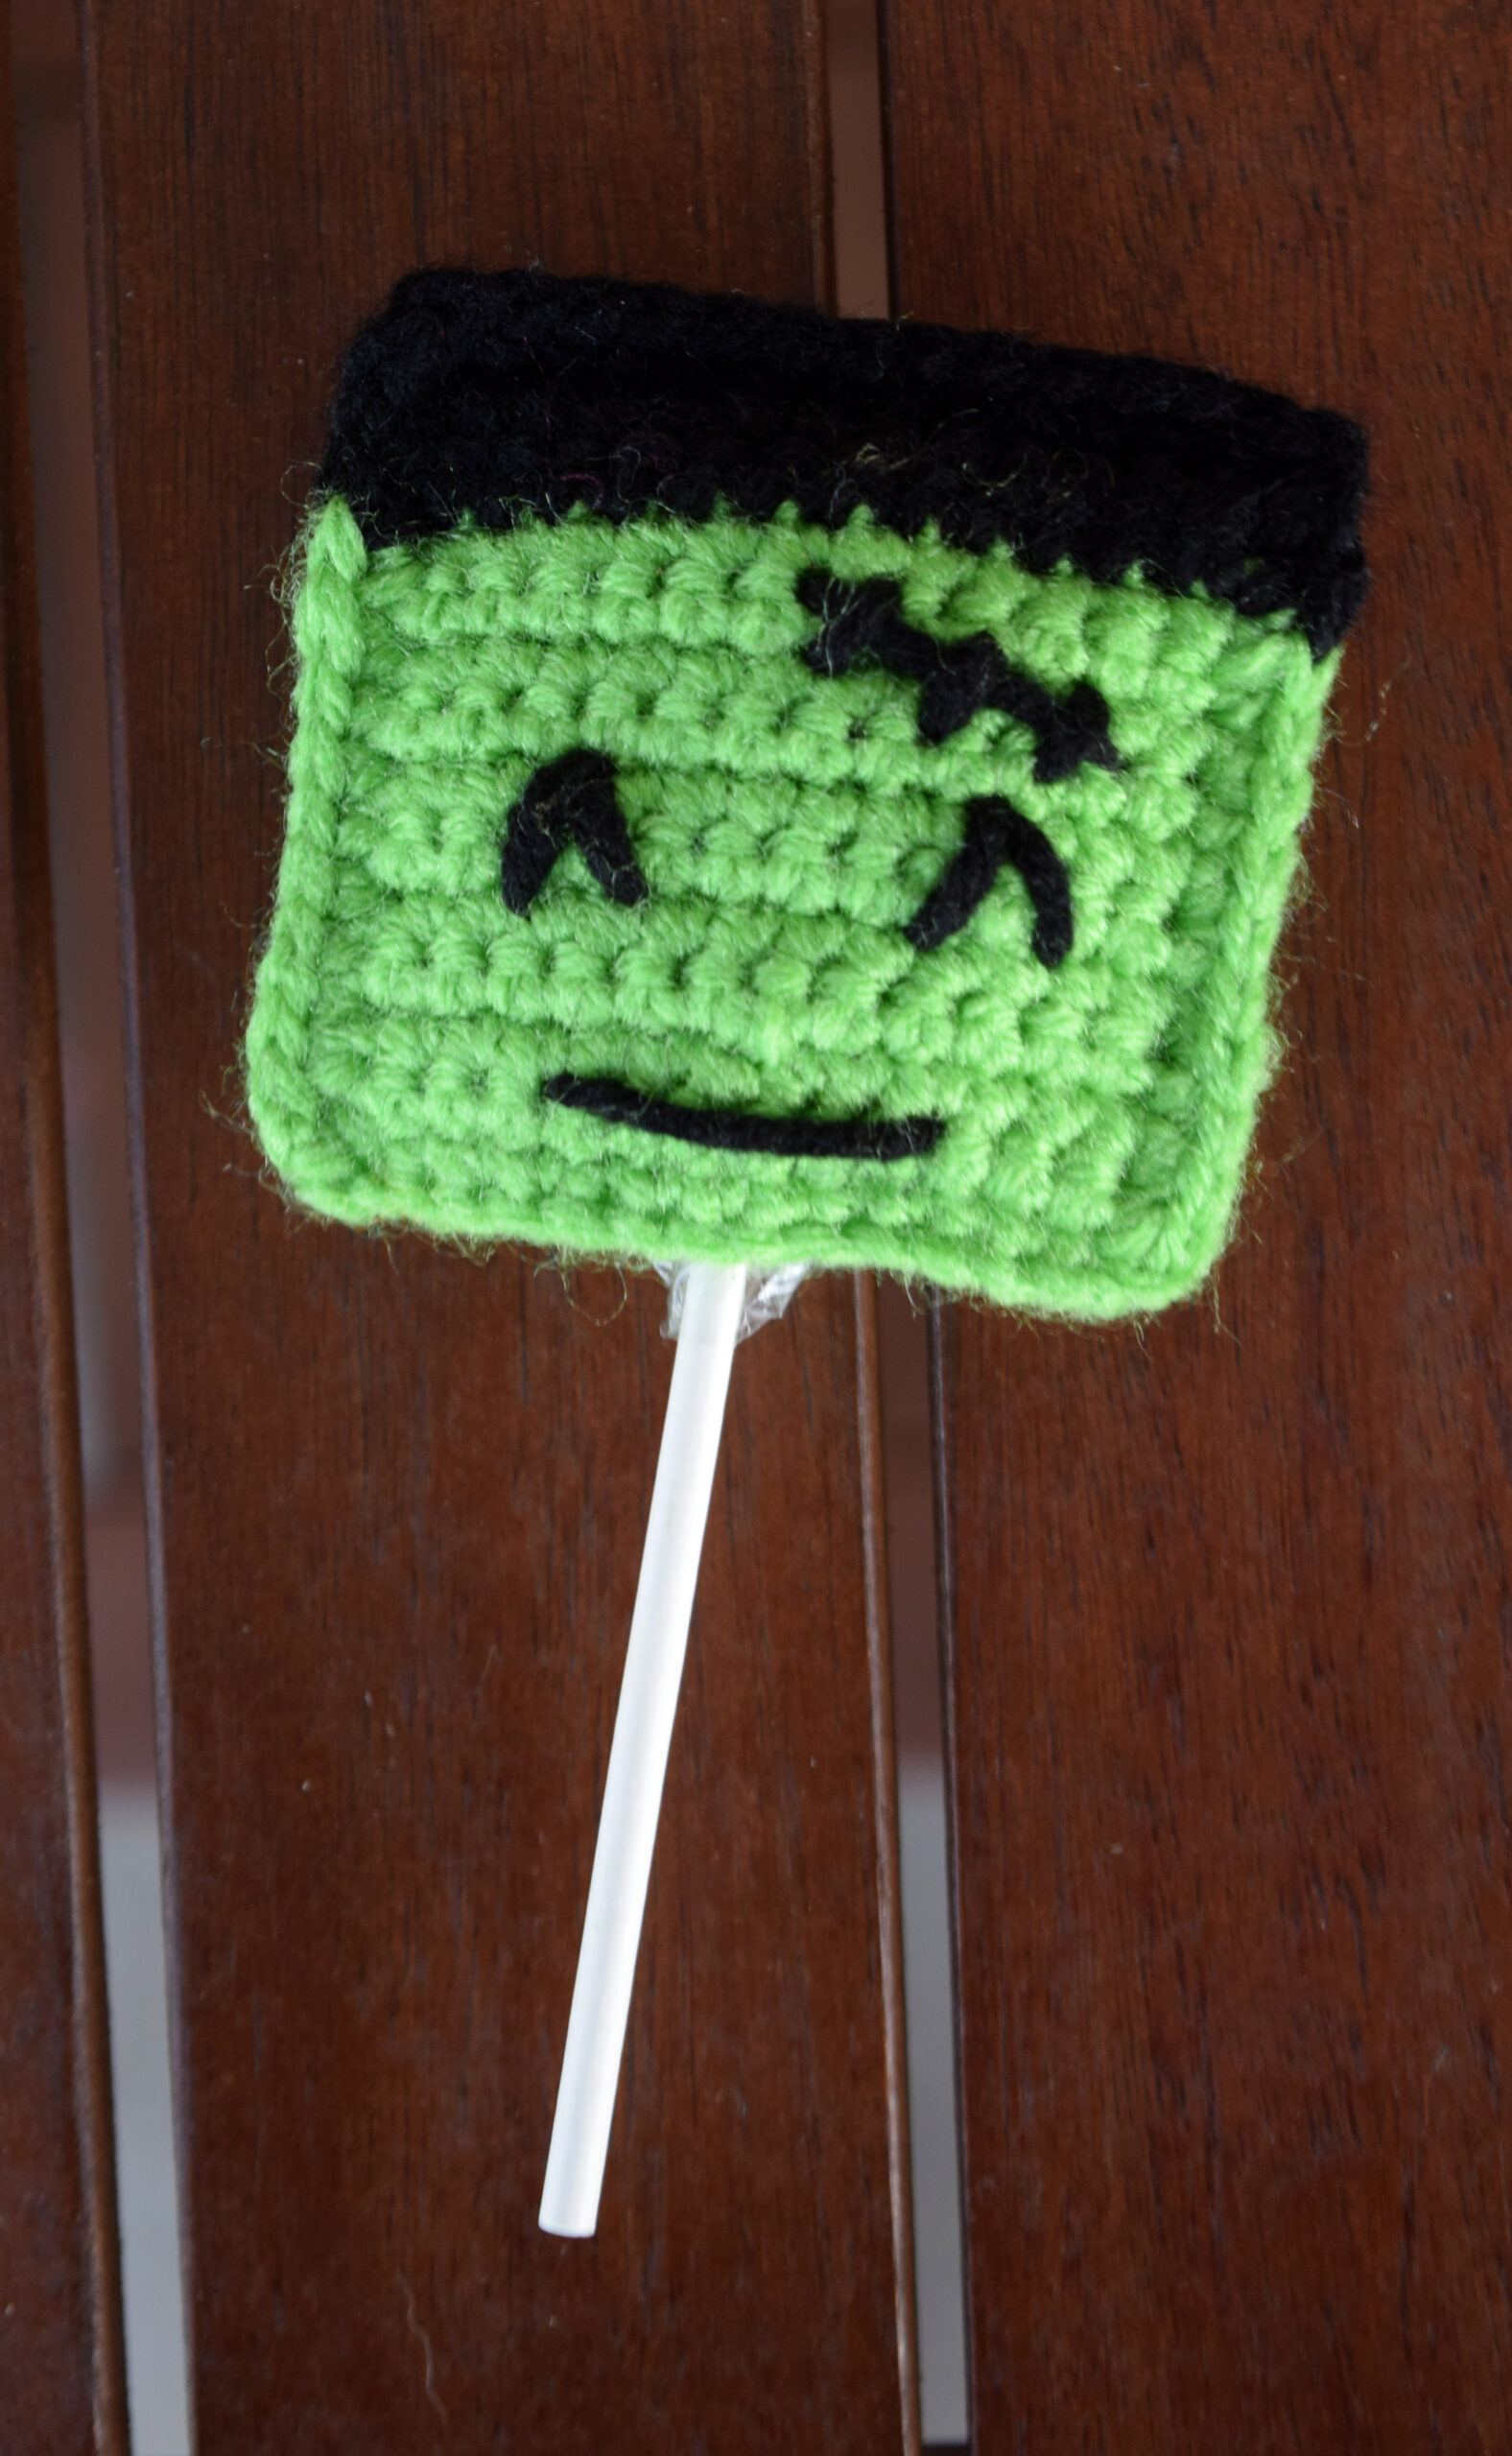
MONSTER HEAD SUCKER SAVER
Monster Head (Make 2)
*Use your 3.00 hook and your green and black yarn.
*Start with green yarn. Rows 1 – 11 are done in green.
Row 1: Ch 14, sc in 2nd ch from hook and in next 12 chs across. (13 sc)
Rows 2-10: Ch 1, turn, sc in each st across. (13 sc)
Row 11: Ch 1, turn, sc in each st across, begin sc in last st, pulling through black yarn to complete final sc once you have two loops of green on your hook. (13 sc)
***You should now have black yarn on your hook. Rows 12 – 13 are done in black.
Rows 12-13: Ch 1, turn, sc in each st across, fasten off and weave in ends. (13 sc)
Monster Face (Only need 1)
Take one of your monster head pieces and stitch on a face using a tapestry needle and black yarn.
- Stitch on the eyes first. Use a separate strand of black yarn for each eye. Once you are finished with each eye, weave in and secure your black yarn on the back of the head piece (you will not see this side so feel free to knot the yarn). ***I placed my eyes over Rows 6 and 7 of the monster head. I used two stitches for each eye to create an upside down V shape. I made the point at the top of each eye at the top of Row 7 of the head and about 3 stitches in from each respective side.
- Next, stitch on the mouth using another strand of black yarn. Make sure to secure your yarn on the back of the work. ***I only made one long horizontal stitch to make the mouth. I placed the mouth between Rows 2 and 3 of the monster head. I brought my needle up about 3 stitches in from the left side (directly under the point of the left eye) and then took it over to the right and back down through the work about 3 stitches in from the right side (directly under the point of the right eye).
- Finally, stitch on the scar at the top of the head. First make one long stitch and then make 3 shorter stitches spaced evenly over the long stitch so it resembles a scar/stitches. ***I made one long slanted stitch starting at the bottom of Row 11 of the head about 6 stitches over from the right side and ending at the bottom of Row 9 about 1 stitch in from the right side. Then I placed 3 shorter stitches over top the long stitch slanted in the opposite direction as the long stitch. I tried to make each of the 3 shorter stitches the same length.
***Once you have finished stitching the face on one side of one of the monster head pieces, you are ready to assemble the sucker saver.
ASSEMBLY
Place the two monster head pieces (one with face and one without) on top of one another so the corresponding stitches match and so the face is on the outside. You will single crochet the two pieces together along the sides and top to create one candy corn piece with an opening at the bottom for a lollipop.
Begin by holding the work so that the face is on top and the other head piece is on the bottom. Start at the bottom right corner of the face. Insert your crochet hook through that corner and through the corresponding corner of the bottom head piece. Pull through a loop of green yarn. Chain 1 and then begin to work single crochet stitches through both pieces evenly up the side toward the top of the head. Change to black yarn once you get to the black section (by pulling through black yarn once you have two loops of green yarn on your hook to complete the final green sc). Then work a single crochet stitch in each stitch across the top of the head. Next, work back down the other side of the head until you reach the bottom left corner, placing single crochet stitches evenly along the edge, changing back to green yarn once you get to the green section (by pulling through green yarn once you have two loops of black yarn on your hook to complete the final black sc). Make sure you insert your hook through both monster pieces when starting every single crochet stitch around. On the first (right) side, you should have 11 sc in green and then then 2 sc in black. Across the top, you should have 13 sc in black. Back down the other (left) side you should have 2 sc in black and 11 sc in green. Once you reach the bottom left corner, fasten off and weave in your yarn. Leave the bottom of the monster head open for a lollipop.
Once you weave in all loose ends, your monster head sucker saver is ready to use!
VAMPIRE “A SUCKER FOR YOUR SUCKER”
Vampire Head Piece (Make 2)
*Use your 3.00 hook and your grey, black, and white yarn.
*The vampire head is made in continuous rounds of single crochet stitches. Simply place the first stitch of each round in the first stitch of the previous round. You may need to use stitch markers to help you keep track of the beginning/end of each round.
*Make sure to pull the magic ring closed.
*Brackets [ ] indicate portions of the pattern to be repeated.
Round 1: With grey yarn, make a magic ring, work 8 sc in ring. (8 sc)
Round 2: 2 sc in each st around. (16 sc)
Round 3: Repeat [sc in next st, 2 sc in next st] 8 times. (24 sc)
Round 4: Repeat [sc in next 2 sts, 2 sc in next st] 8 times. (32 sc)
Round 5: Repeat [sc in next 3 sts, 2 sc in next st] 8 times. (40 sc)
Round 6: Sc in next st, 2 sc in next st, repeat [sc in next 4 sts, 2 sc in next st] 3 times, sc in next st, pulling through black yarn once you have two loops of grey on hook to complete sc, sc in next 3 sts, 2 sc in next st, repeat [sc in next 4 sts, 2 sc in next st] 3 times, sc in next st, pulling through grey yarn once you have two loops of black on hook to complete sc, sc in last 2 sts, fasten off and weave in ends. (48 sc)
Triangle Hair Piece (Only need 1)
Row 1: With black yarn, ch 5, sc in 2nd ch from hook and in next 3 chs. (4 sc)
Row 2: Ch 1, turn, sc2tog, sc2tog. (2 sc2tog)
Row 3: Ch 1, turn, sc2tog, fasten off, leaving a long tail for sewing onto head. (1 sc2tog)
Tooth (Make 2)
Row 1: With white yarn, ch 2, 2 sc in 2nd ch from hook, fasten off, leaving a long tail for sewing onto head. (2 sc)
Vampire Face (Only need 1)
Take one of your vampire head pieces and attach the triangle hair piece, stitch on the eyebrows and eyes, and attach the teeth.
- Use your tapestry needle and long tail you left on the triangle hair piece to attach the hairpiece to the center of the top of the head (in the center of the black stitches from Round 6 of the head). Once you are satisfied with the placement, secure your yarn on the back of the work.
- Next, use your tapestry needle and black yarn to stitch on the eyebrows. Once you are satisfied with the eyebrows, secure your yarn on the back of the work. **I placed the eyebrows over Rounds 3 and 4 of the head. I used two stitches for each eyebrow to create an upside down V shape. I made the point at the top of each eye in between Rounds 3 and 4 of the head and almost even with the bottom “point” of the hair triangle.
- Stitch on the eyes using your black yarn and tapestry needle. Secure your yarn when you are finished. **I made the eyes with two small stitches next to each other centered right underneath the eyebrows.
- Attach the two teeth next using your tapestry needle and the long tails you left on the teeth. The teeth should be attached to Round 6 of the head, underneath the eyes. Once you have attached the teeth, make sure to secure your yarn on the back of the work. **I attached the outer side of each tooth to the 8th grey stitch over from the last black stitch on each respective side of the head. (The outer side of the left tooth should be attached to the 6th stitch of Round 6 of the head and the outer side of the right tooth should be attached to the 15th stitch of Round 6 of the head.)
ASSEMBLY
Place the two vampire head pieces (one with face and one without) on top of one another so the corresponding stitches match and so the face is on the outside. You will single crochet the two pieces together along the sides and top of the head, leaving an opening at the bottom for a lollipop. Make sure to work your single crochet stitches through both head pieces.
Begin by holding the work so that the face is on top and the other head piece is on the bottom. Insert your crochet hook through the 17th stitch from Round 6 of both of the head pieces (make sure your hook is going through both head pieces). Pull through a loop of grey yarn. Chain 1 and then work a single crochet stitch in the same stitch and in the next 5 stitches (pulling through black yarn to complete the 5th single crochet stitch). With black yarn now on your hook, work a single crochet stitch in the next 24 stitches around (pulling through grey yarn to complete the 24th single crochet stitch). With grey yarn on your hook, single crochet in the next 6 stitches around (you should end at the 4th stitch of Round 6). Once you work a single crochet stitch in the 4th stitch from Round 6 of the head, work a slip stitch in the same stitch and then fasten off and weave in the loose ends. Leave the bottom of the vampire head open for a lollipop. It looks like the lollipop is inside the vampire’s mouth.
Once you weave in all loose ends, your vampire sucker saver is ready to use!

This pattern is property of TheCrafterLife.com
You may not sell my patterns or claim them as your own. You may make items to sell (i.e. on Etsy) from my patterns but I ask that you link back to my site (TheCrafterLife.com) and provide credit for the pattern. You are welcome to share my patterns on social media as long as you link back directly to my site by providing the link. No copying and pasting of any patterns will be allowed under any circumstances