Lucky Green Moss Stitch Scarf
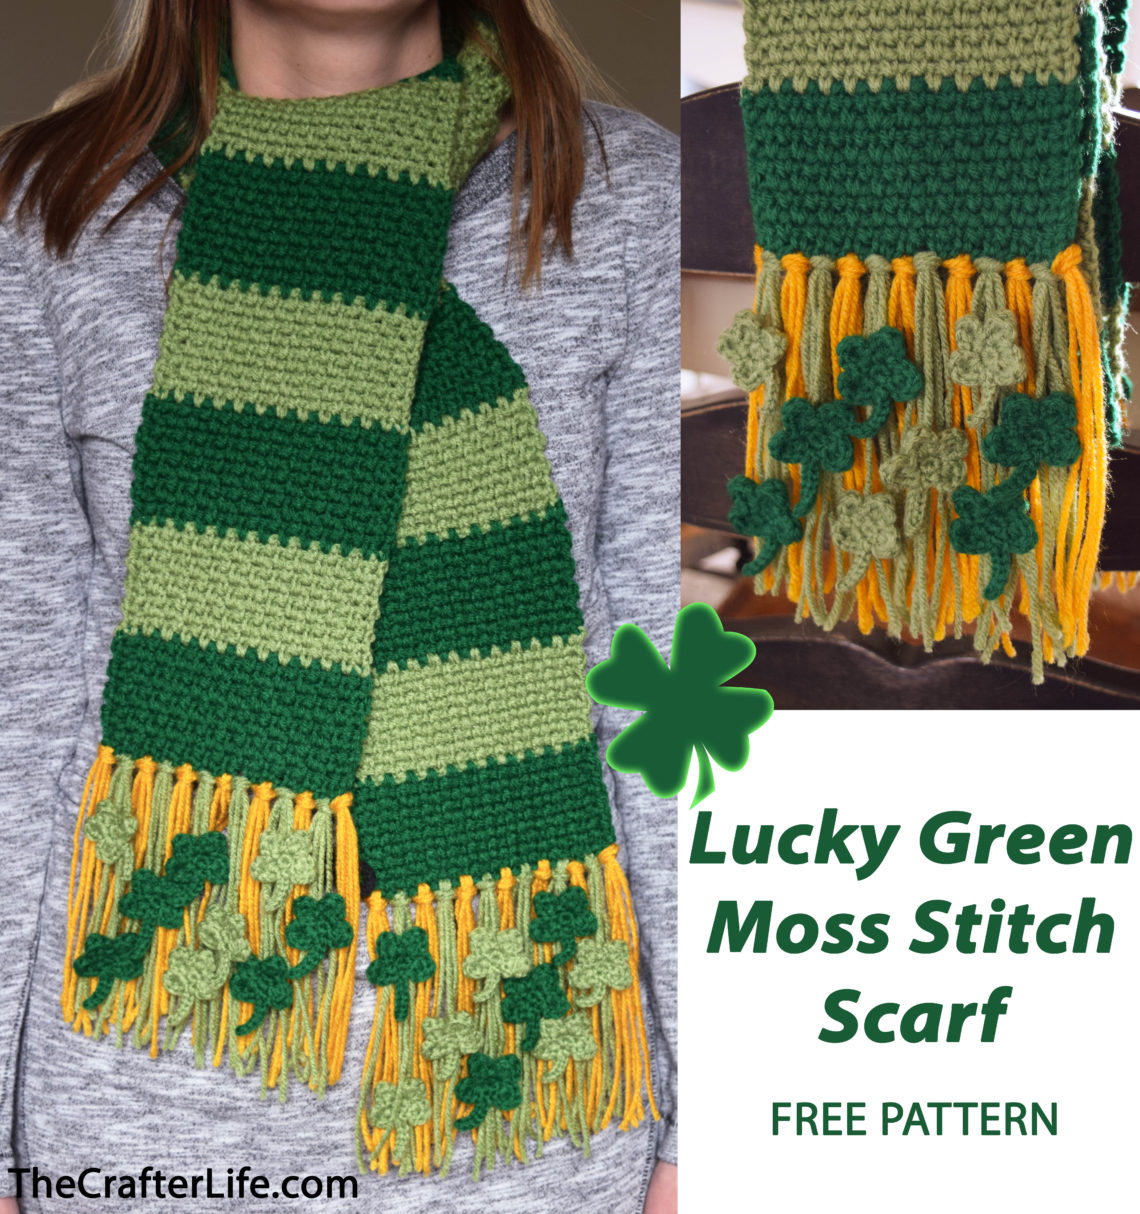
I just love the color green! Lucky enough, Saint Patrick’s Day is coming up and gives me the perfect reason to create and wear things in this color. I decided to make a green striped scarf with gold tassels which alludes to the upcoming holiday. I immediately knew that I wanted to use the moss stitch to create my green striped scarf because I love the look of the stitch and what stitch sounds greener than the moss stitch?! And, just in case the gold tassels weren’t enough, I decided to add a little extra luck to the scarf by attaching some of my lucky four-leaf clovers to the tassels. I hope this scarf brings you good luck when you wear it! See below for my pattern.
Ad-Free, large print PDF with detailed pattern and pictures now available on Etsy!
Lucky Green Scarf
This scarf pattern is written for an adult-size scarf meant to fit most adults (and older children/teens). The length can be adjusted by adding or subtracting rows/stripes from the body of the scarf.
FINISHED MEASUREMENTS
Striped Section: 5¼ inches wide x 60 inches long
Tassels: 6 inches long
Total Scarf Measurements: Approximately 5¼ inches wide x 72 inches long (from bottom of tassels to bottom of opposite tassels)
MATERIALS
– Size H/8/5.00mm crochet hook or size needed to obtain gauge
– Size B/1/2.5mm crochet hook or size needed to obtain appropriate size of 4-leaf clover
– Worsted weight (4) yarn in Light Green (I used Red Heart Super Saver yarn in Tea Leaf.)
– Worsted weight (4) yarn in Darker Green (I used Red Heart Super Saver yarn in Paddy Green.)
– Worsted weight (4) yarn in Gold (I used Red Heart Super Saver yarn in Gold.)
– Scissors
– Tapestry needle for weaving in ends
– Small tapestry/sewing needle for making/attaching 4-leaf clovers
– Stitch markers (if needed for counting stitches/rows)
– Measuring tape
Ad-Free, large print PDF with detailed pattern and pictures now available on Etsy!
ABBREVIATIONS
– ch = chain
– ch sp = chain space
– chs = chains
– dc = double crochet
– sc = single crochet
– sk = skip
– slst = slip stitch
– sp = space
– st = stitch
– sts = stitches
– tc = triple crochet
GAUGE
5 sts = 1 inch; 10 rows (1 stripe) = 2⅜ inches
Ad-Free, large print PDF with detailed pattern and pictures now available on Etsy!
PATTERN NOTES
- The scarf is made using the moss stitch (also known as the granite stitch or the linen stitch).
DIRECTIONS
Striped Body of Scarf
* Use a 5.00 mm hook to create the striped body of the scarf. Change/alternate colors after every ten rows. Weave in ends as you work.
Row 1: With your dark green worsted weight yarn, ch 25, sc in 2nd ch from hook, * ch 1, sk one ch, sc in next ch. Repeat from * until last ch. Sc in last ch.
Row 2: Ch 1, turn, sc in first st, * ch 1, sk next st, sc in ch sp. Repeat from * until last st. Sc in last st.
Rows 3–250: Repeat Row 2, changing colors at the end of every 10 rows. At the end of Row 250, fasten off.
***You should now have a scarf with 25 alternating stripes with both ends in dark green. Next, we need to attach the gold tassels to the ends of the scarf. Follow the directions below to create the tassels.
Ad-Free, large print PDF with detailed pattern and pictures now available on Etsy!
Tassels
Cut 42 strands of gold yarn that are 12” each. Cut 36 strands of light green yarn that are 14” each. Hold 3 of the gold strands together and fold them in half. Start at the corner of one of the ends of your scarf and use your hook to pull through a loop (the fold of strands). Pull the ends through the loop and secure tassel tightly to edge of scarf. You will repeat this across the end of the scarf to make your tassels while alternating colors (gold and light green). You should have 7 gold tassels and 6 light green tassels (13 total) on each end of the scarf when finished. There should be a gold tassel in each corner.
**We now need to make the 4-leaf clovers that will be attached to the tassels. Use a 2.5mm hook and follow the directions found here to make the clovers. Make 9 in light green and 9 in dark green.
Attaching the Clovers
Use a small tapestry/sewing needle to attach the clovers to the scarf tassels.
Arrange your clovers where you want them on the light green tassels on one end of your scarf. Thread a light green tassel strand on your scarf through the back of a clover. Slide the clover on the strand to the height you want. Knot the clover in place by either looping your needle up and under the same stitches in the back or another knotting method you like to use. Repeat this process for each clover, attaching and knotting them to individual tassel strands. Once you do this for both sides, trim all the tassels to the same length.
Ad-Free, large print PDF with detailed pattern and pictures now available on Etsy!
Weave in any remaining loose ends and your scarf is now finished and ready to wear! 🙂
The pattern and photos of this item are the property of TheCrafterLife. This pattern and design are subject to copyright, and are for personal, non-commercial use only. You may not distribute, sell this pattern, or claim it as your own under any circumstances.
You may not sell my patterns or claim them as your own. You may make items to sell (i.e. on Etsy) from my patterns but I ask that you link back to my site and provide credit for the pattern. You are welcome to share my patterns on social media as long as you link back directly to my site by providing the link. No copying and pasting of any patterns will be allowed under any circumstances.


