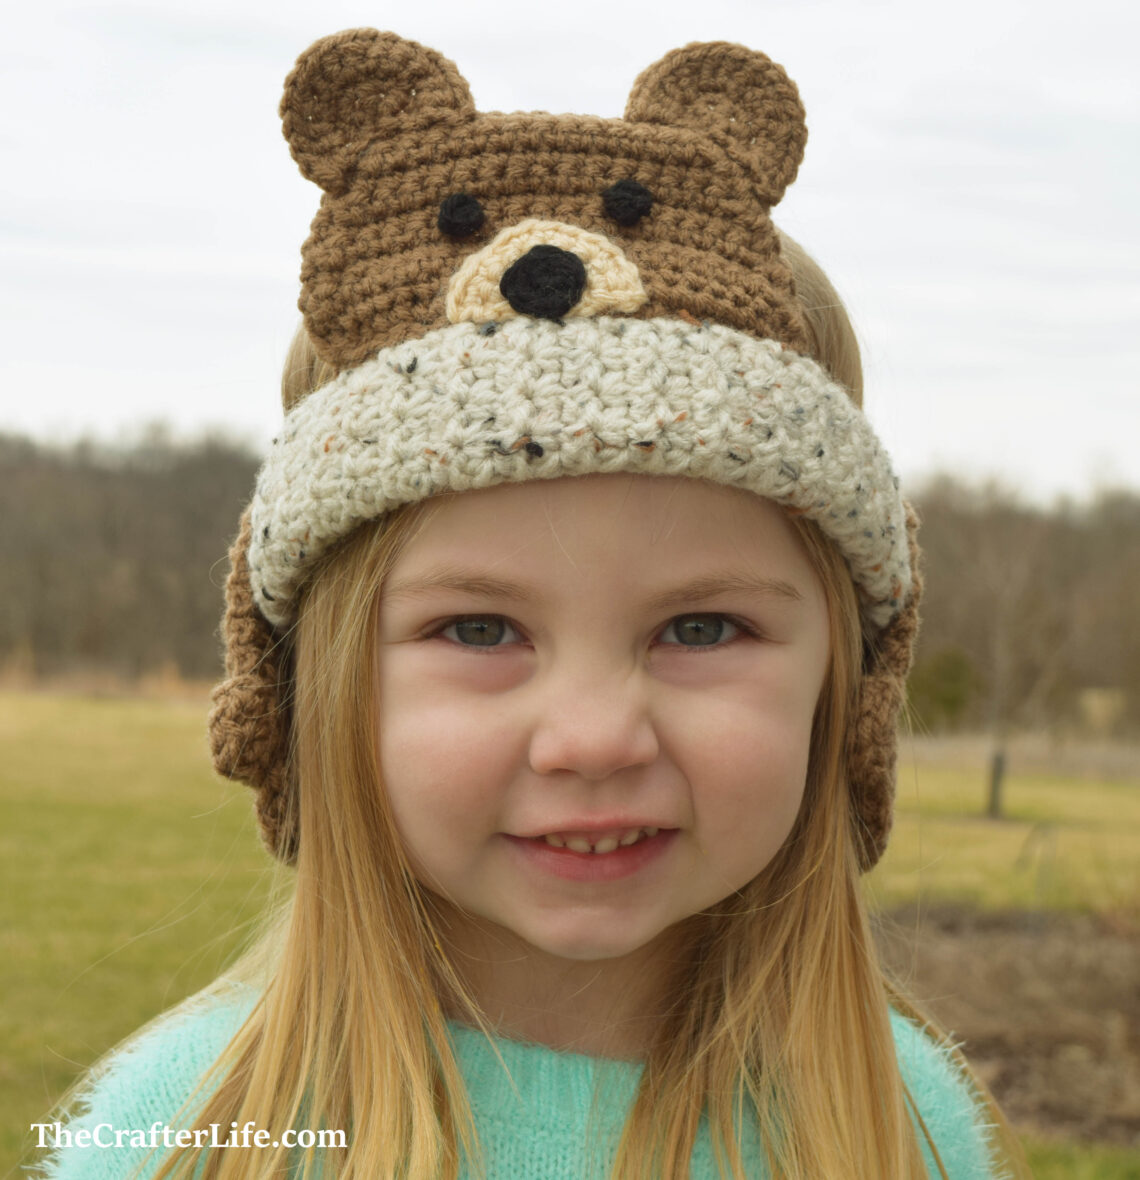
Peeking Bear Ear Warmer
I hope this post finds everyone well. I wanted to share my Peeking Bear Ear Warmer pattern before the weather officially warms up. I apologize for posting it so late. I have been meaning to share this project for a while, but it has been a busy winter season for my family so I just got a chance to type it up. Hopefully it provides you with a fun project to work on while you are at home during this time. I wrote the pattern with kids in mind, but it can easily be adjusted for adults to wear as well. I wanted it to appear as though the bear is peeking out from under the warmer and his arms come out to cover the ears of the child wearing it. I hope you think it’s as cute as I do! See below for the pattern if you are interested in making one.
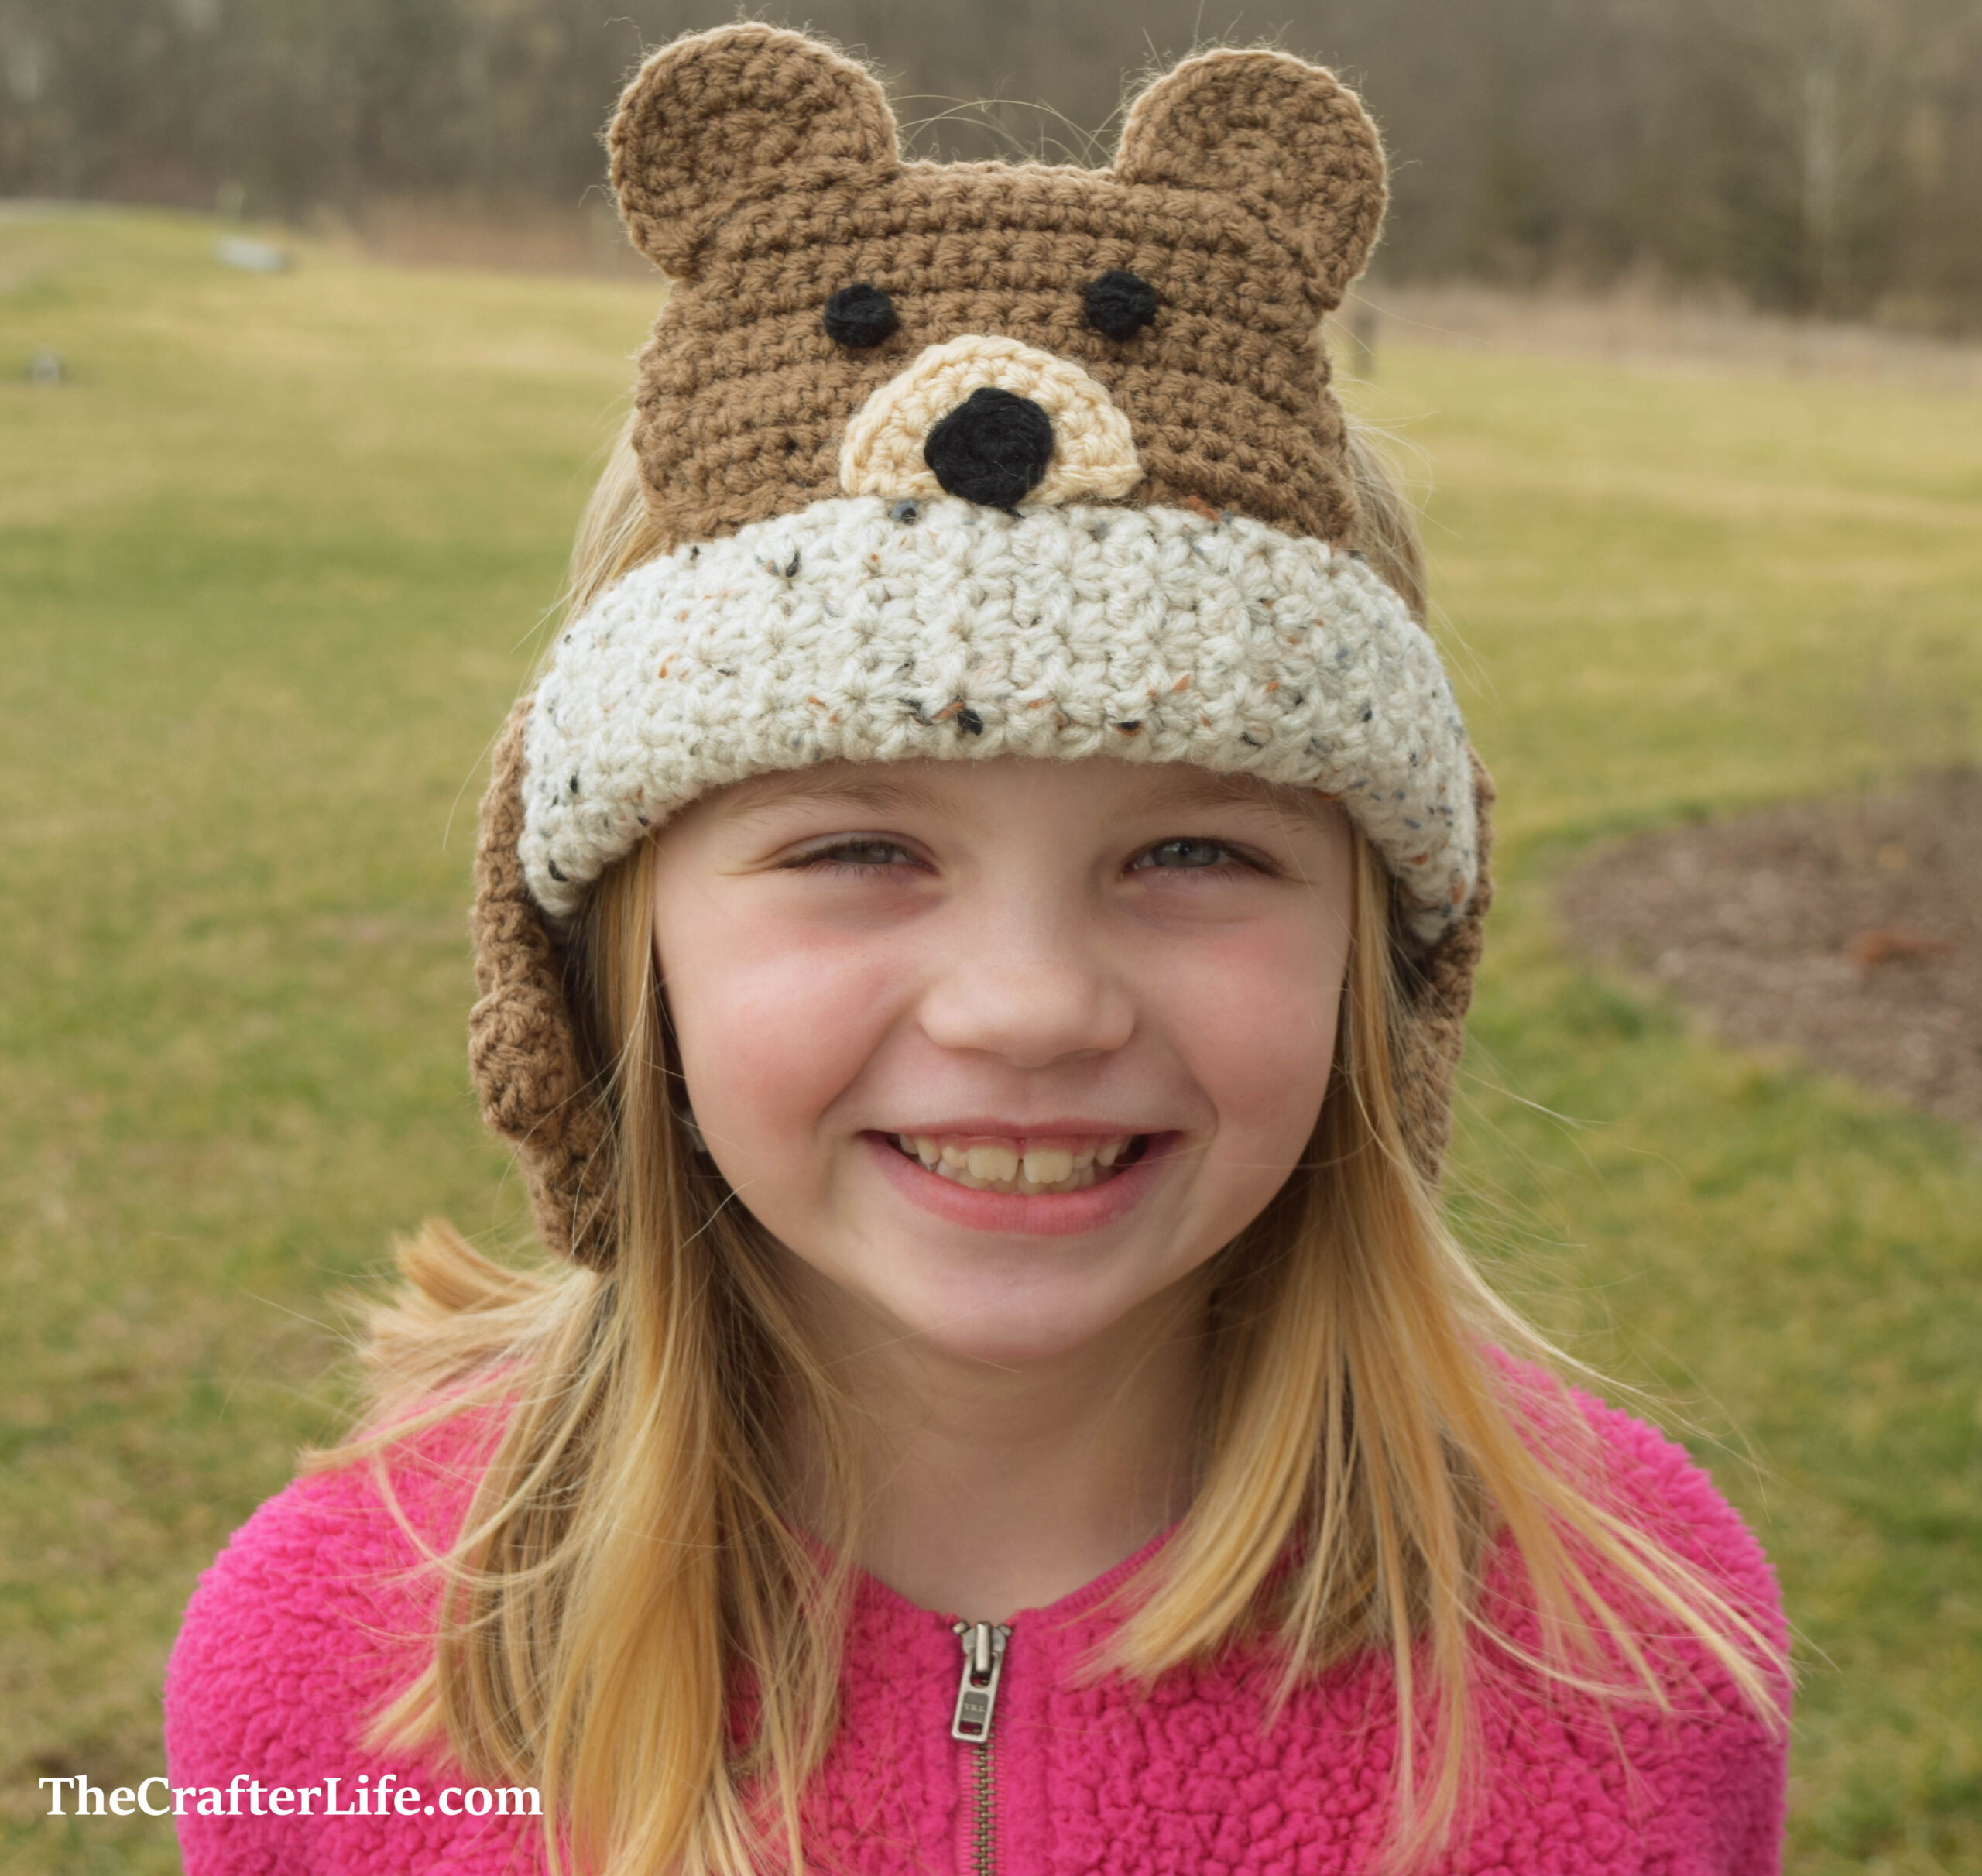

Bear Ear Warmer Head Wrap (Child Size)
This ear warmer pattern is written for a child size ear warmer meant to fit most children between the ages of 4 and 7 years. The size can be adjusted for older and younger children by adding or subtracting rows from the body of the warmer.
Ad-Free, large-print PDF digital pattern with several pictures available in TheCrafterLife Etsy Shop
FINISHED MEASUREMENTS
Main Body of Warmer: 21 inches around (this will vary depending on size needed) x 1¾ inches wide
Bear Head: 3½ inches tall (from top of one ear to bottom of head) and about 5½ inches wide (at the widest part)
Bear Arm: 4½ inches long by about 3 inches wide at the widest part (from side of hand to side of thumb)
Total Warmer Measurements: Approximately 21 inches around (will vary based on size needed) x about 7 inches tall (from top of one ear to bottom of one arm)
*It is about 5 inches tall from the top of one ear to the bottom of the main body of the warmer (not including the arm length)
MATERIALS
– Size 7/4.50mm crochet hook or size needed to obtain gauge
– Worsted weight (4) yarn in your color choice for main body of warmer (I used Red Heart Super Saver yarn in Aran Fleck.)
– Worsted weight (4) yarn in your bear color choice (I used Red Heart Super Saver in Café Latte.)
– Worsted weight (4) yarn in your snout color choice (I used Red Heart Super Saver in Buff.)
– Worsted weight (4) yarn in your nose/eye color choice (I used Red Heart Super Saver in Black.)
– Tapestry needle for weaving in ends
– Scissors
– Stitch markers (Optional – if needed for counting/marking stitches)
– Straight Pins (Optional – if needed for holding parts in place when sewing together)
– Measuring tape
Ad-Free, large-print PDF digital pattern with several pictures available in TheCrafterLife Etsy Shop
ABBREVIATIONS
– ch = chain
– chs = chains
– dc = double crochet
– hdc = half double crochet
– sc = single crochet
– sc2tog = single crochet 2 together (single crochet decrease)
– slst = slip stitch
– st = stitch
– sts = stitches
– tc = triple crochet
SPECIAL STITCHES
Trinity Cluster Stitch
- Insert the hook into the same space/stitch as the last stitch, yarn over, and pull the yarn through (you should have 2 loops on your hook).
- Insert the hook into the next stitch, yarn over, and pull the yarn through (you should have 3 loops on your hook). Then insert your hook into the next stitch, yarn over, and pull the yarn through (you should now have 4 loops on your hook).
- Yarn over and pull the yarn through all 4 loops.
GAUGE
Main Body Section:
7 Rows = 2 inches
2 Chain stitches and 2 Trinity Cluster stitches (ch 1, 1 trinity cluster + ch 1, 1 trinity cluster) = 1 inch
Bear Head/Arms:
9 sc = 2 inches
5 rows of hdc = 1 inch
PATTERN NOTES
- The main body of the warmer is made first in rows of trinity cluster stitches (see special stitches section above) and chain stitches. Each row starts and ends with a single crochet stitch. Make sure to work under the chain stitches/spaces (the chain stitches count as stitches) when working the cluster stitches.
- You can lengthen or shorten the warmer as needed by adding or deleting rows. You can check the fit as you go by wrapping it around the head of the person who will be wearing it. It will stretch a little, so don’t make it too loose.
- For all pieces (main body, head, ears, eyes, snout, nose, arms) the first stitch of each round/row is done in the same stitch as the turning chain (the turning chain does not count as a stitch).
- Brackets [ ] indicated potions of the pattern to be repeated.
DIRECTIONS
Main Body of Warmer
*Use your 4.50 mm hook and aran fleck (or your own main color choice) worsted weight yarn to make the main body of the warmer.
*Check the size as you go by wrapping it around the head of the person who will wear it. Stop once it reaches around the head (you may want to stop a little short since this should stretch). You don’t want it to be too long/loose.
Row 1: With your chosen main color, ch 16, sc in 2nd ch from hook, sc in each remaining ch across. (15 sc)
Row 2: Ch 1, turn, sc in first st, work 1 trinity cluster, repeat [ch 1, and work 1 trinity cluster (working 1st st of cluster in same st as previous st)] across row, work 1 sc in st of last trinity cluster (the last st of the row). (7 trinity cluster stitches, 6 chs, 2 sc; 15 sts total)
Rows 3–70: Repeat Row 2, at the end of Row 70 (or your final row), fasten off, but leave and extremely long tail to use for sewing the long and short edges together during assembly.
*Depending on the size of the person’s head who will be wearing this, you may need to stop before 70 rows (for a smaller head/younger child) or work additional rows (for a larger head or older child) to make a more custom fit.
Ad-Free, large-print PDF digital pattern with several pictures available in TheCrafterLife Etsy Shop
***You should now have the main body strip consisting of 70 rows (or however many rows required to properly fit the head of the person wearing it) that are 15 stitches wide. Mine ended up being about 20 – 21 inches long. During assembly, we will fold this strip in half (so the long edges meet) and sew the edges together. This will make the warmer thicker.
Head of Bear (Make 2)
*Use your 4.50 mm hook and brown/café latte (or your own bear color choice) worsted weight yarn to make the head of the bear.
Row 1: Ch 23, sc in 2nd ch from hook and in each ch across. (22 sc)
Row 2: Ch 1, turn, sc2tog, sc in next 18 sts, sc2tog. (20 sc)
Row 3: Ch 1, turn, sc in each st across. (20 sc)
Row 4: Ch 1, turn, sc2tog, sc in next 16 sts, sc2tog. (18 sc)
Row 5: Ch 1, turn, sc in each st across. (18 sc)
Row 6: Ch 1, turn, sc2tog, sc in next 14 sts, sc2tog. (16 sc)
Row 7: Ch 1, turn, sc in each st across. (16 sc)
Row 8: Ch 1, turn, sc2tog, sc in next 12 sts, sc2tog. (14 sc)
Row 9: Ch 1, turn, sc in each st across, leave your yarn on the hook (don’t fasten off). (14 sc)
After completing Row 9, sc evenly around the perimeter of the head (outside of the head) to give it a finished/polished look. To do this, simply place sc stitches evenly spaced apart around the head until you return to where you started (you will probably make about 54 sc stitches around). Place a slip stitch in the first sc you made and fasten off, leaving a long tail for sewing the two head pieces together during assembly.
***You should now have two head pieces that will be sewn together during assembly.
Ear (Make 2)
*Use your 4.50 mm hook and brown/café latte (or your own bear color choice) worsted weight yarn to make the ears of the bear.
Row 1: Make a magic ring, ch 1, work 4 sc in magic ring. (4 sc)
Row 2: Ch 1, turn, 2 sc in each st around. (8 sc)
Row 3: Ch 1, turn, sc in first st, 2 sc in next st, repeat [sc in next st, 2 sc in next st] around. (12 sc)
Row 4: Ch 1, turn, sc in first 2 sts, 2 sc in next st, repeat [sc in next 2 sts, 2 sc in next st] around, fasten off, leaving long tail for sewing onto head piece. (16 sc)
***You should now have two ears.
Snout
*Use your 4.50 mm hook and buff (or your own snout color choice) worsted weight yarn to make the snout of the bear.
Row 1: Make a magic ring, ch 1, work 3 sc in magic ring. (3 sc)
Row 2: Ch 1, turn, 2 sc in each st around. (6 sc)
Row 3: Ch 1, turn, sc in first st, 2 sc in next st, repeat [sc in next st, 2 sc in next st] around. (9 sc)
Row 4: Ch 1, turn, sc in first 2 sts, 2 sc in next st, repeat [sc in next 2 sts, 2 sc in next st] around, fasten off, leaving long tail for sewing onto head. (12 sc)
***You should now have one snout complete.
Ad-Free, large-print PDF digital pattern with several pictures available in TheCrafterLife Etsy Shop
Nose
*Use your 4.50 mm hook and black (or your own nose color choice) worsted weight yarn to make the nose of the bear.
*Make sure to pull the magic ring closed and weave in/secure end at closure at the beginning.
Round 1: Make a magic ring, ch 1, work 6 sc in magic ring, slst in first st of round. (6 sc)
Round 2: Ch 1, sc in first 3 sts, slst in next st, fasten off, leaving a long tail for sewing onto the snout and head. (3 sc)
***You should now have one nose complete.
Eye (Make 2)
*Use your 4.50 mm hook and black (or your own eye color choice) worsted weight yarn to make the eyes of the bear.
*Make sure to pull the magic ring closed and weave in/secure end at closure at the beginning. It may make it easier to not cut this tail off so you can use it to help secure the eye onto the head piece later. *See TIP in Step 3 of Bear Face Assembly.
Round 1: Make a magic ring, ch 1, work 2 sc in magic ring, slst in first st of round, fasten off, leaving long tail for sewing onto head. (2 sc)
***You should now have two eyes complete.
Arm (Make 4)
*Use your 4.50 mm hook and brown/café latte (or your own bear color choice) worsted weight yarn to make the arms of the bear.
Row 1: Ch 11, sc in 2nd ch from hook and in each ch across. (10 sc)
Rows 2–12: Ch 1, turn, sc in each st across. (10 sc)
Row 13: Ch 1, turn, sc2tog, hdc in next st, dc in next st, 2 tc in next st, 2 tc in next st, dc in next st, hdc in next st, sc2tog. (2 sc2tog, 2 hdc, 2 dc, 4 tc; 10 total sts)
Row 14: Ch 1, turn, sc in first st, hdc in next st, 2 dc in next st, 2 tc in next 4 sts, 2 dc in next st, hdc in next st, sc in last st. (2 sc, 2 hdc, 4 dc, 8 tc; 16 total sts)
Row 15: Ch 1, turn, work 1 sc and 1 hdc in first st, 2 dc in next st, work 1 hdc and 1 slst in next st, fasten off, leaving long tail for sewing two arm pieces together later.
***You should now have four arm pieces complete. We will sew two pieces together to make one arm during assembly.
ASSEMBLY
Bear Face
- We will attach the snout piece first. Center the snout piece on the bottom (longer edge) of one of the head pieces. The flat edge of the snout should be on the bottom. Have the snout go slightly below the bottom of the head piece so you won’t see any brown (head piece color) below the snout once it is sewn onto the head. Using the tail you left on your snout and your tapestry needle, sew the snout in place on the headpiece. Since we will be attaching the other head piece to the back side of the face, you can sew all the way through to the back of the headpiece with your needle. We will not see anything on the back side of this headpiece once the head is completely assembled. Once you are finished sewing the snout in place and are satisfied with its positioning, secure your yarn on the back of the head and fasten off.
- Next we will attach the nose piece. Position the nose on top of the snout so the narrower part of the nose is on the bottom and the nose is centered with the snout. Have the nose go slightly below the bottom of the snout so you won’t see the snout peeking out from under the nose after sewing it on top. Using the tail you left on the nose and your tapestry needle, sew the nose in place, going through all three layers (the nose, snout, and head). Once you are finished and satisfied with the positioning of the nose, securely knot/weave in your yarn on the back side of the head and fasten off.
- Now we will attach the eyes. You may want to use a pin to hold the eyes in place so they are evenly spaced/centered with the snout and nose. I placed my eyes about one row above the top of the snout and about 5 stitches apart from each other. Using the tails you left on the eye pieces and your tapestry needle, sew them in place onto the head piece. I would not secure them until you have sewn both in place and are satisfied with their positioning. Once completely happy with the eyes, secure them on the back of the head piece and fasten off.
TIP: One thing I did that made it easier to secure each eye (since they are so small) on the back of the head was sending the other tail on the eye left from the start of the magic circle through to the back of the head so that once I was done sewing, I could simply tie the two tails together in a knot on the back before weaving them under the stitches. You don’t have to do this, but I thought it made it easier.
Bear Head
***You will be sewing the two head pieces together to create one headpiece. This is so the headpiece is thicker and stands up easier/sturdier.
- Place the head piece with the face on top of the other head piece so they align. Use one of the long tails left on one of the head pieces and your tapestry needle to sew them together along the outside. Do this by matching up the corresponding sc stitches on their perimeters and sewing them together using only their outer loops. In other words, you should not be going under both loops of each stitch, but only the loop of each stitch that falls on the outer side of the head.
- Once you reach back to where you started and have sewn the perimeters together completely to make one bear head, you can either use the same tail still on your needle to weave through the center of both head pieces (so you don’t see it) down to one of the bottom corners for sewing onto the main warmer piece later, or you can secure and fasten off that tail and use the other long tail you left on the other head piece to weave through the center down to a bottom corner so you can use it for sewing onto the main warmer piece later. So, you should only have one tail left that hangs out of one of the bottom corners of the head. Make sure to secure and fasten off the other tail.
- You will sew the ears to the head next. Using the tail left on one of the ears and your tapestry needle, sew the ear to one of the top corners of the head. Tightly secure and weave in your yarn when finished. Sew the other ear to the other corner of the head and secure/fasten off your yarn when finished.
Arms
***You will be sewing two arm pieces together to create one thicker arm.
- Place one arm piece on top of another so they align. Use one of the tails you left on the arm and your tapestry needle to sew the pieces together around their outer perimeters. Do this by matching up their corresponding stitches/rows and sewing them together. Again, I used the outer loops of the corresponding stitches. When you have reached back around to where you started, you can either use that same tail to weave down through the center of the two arm pieces (so you can’t see it) to one of the bottom corners of the arm to use for attaching to the warmer, or secure and fasten off that tail and use the other tail from the other arm piece to weave down through the center to one of the bottom corners and use it for attaching to the warmer piece later. Basically, make sure you have one of the tails positioned at a bottom corner of the flat end of the arm so you can use it to attach to the warmer. The other tail needs to be secured and fastened off.
- Repeat Step 1 for the other pair of arm pieces.
- You should now have two thick arms, each with a tail at a bottom corner that you will use to sew the arm to the warmer.
Ad-Free, large-print PDF digital pattern with several pictures available in TheCrafterLife Etsy Shop
Main Body of Warmer
- Fold the main body of the wrap in half “hot dog” style so the longer edges meet.
- Use your tapestry needle and the really long tail you left on the body to sew the long edges together (making sure to match up the corresponding rows so it stays flush). Do not fasten off.
- Bring the two short ends together so they meet and use your tapestry needle and the same tail to sew them together (making sure to match up the corresponding stitches so it stays flush). Since you are closing the open ends at the same time, make sure you are going through 4 layers (the 2 corresponding stitches of one short end and then the matching 2 corresponding stitches of the other short end). Secure your yarn well and fasten off.
- Flip the head wrap inside out so the seam you created in Step 3 is hidden on the underside.
The main body of the warmer is now complete. Follow the instructions below to attach the head piece and arm pieces to the warmer.
- Position the head piece so that it is on top of the warmer and centered on the front across from the seam. The seam should be the back of the warmer since you won’t want to see it when wearing. Make sure the face of the bear faces the outside of the warmer. Use the tail left on your head piece and your tapestry needle to sew the bear head (along its bottom) in place onto the warmer. You want to make sure it looks like the bear is peeking out from the bottom of the warmer. You might want to wait to fasten off your yarn until you have the arms in place.
- Next, position your arms in place on the warmer so that they will cover the ears of whoever will be wearing it. To be certain, you should do this by placing the warmer onto the head of the person who will wear it and make sure the paws will cover his or her ears. You may want to position one arm at a time or use pins to hold them both in place at the same time. Sew each arm to the warmer by first sewing across the top of the warmer along its straight edge, then down its side, then across the bottom of the warmer, and then back up the other side to where you started. This is so it will be held more firmly in place to the warmer and be less “floppy”. Once you have done this for both arms and you are satisfied with their placement, make sure to secure and fasten off the yarn on the inside of the warmer.
Your warmer should now be complete and ready to wear!


Granny's Revenge Reindeer Coaster