
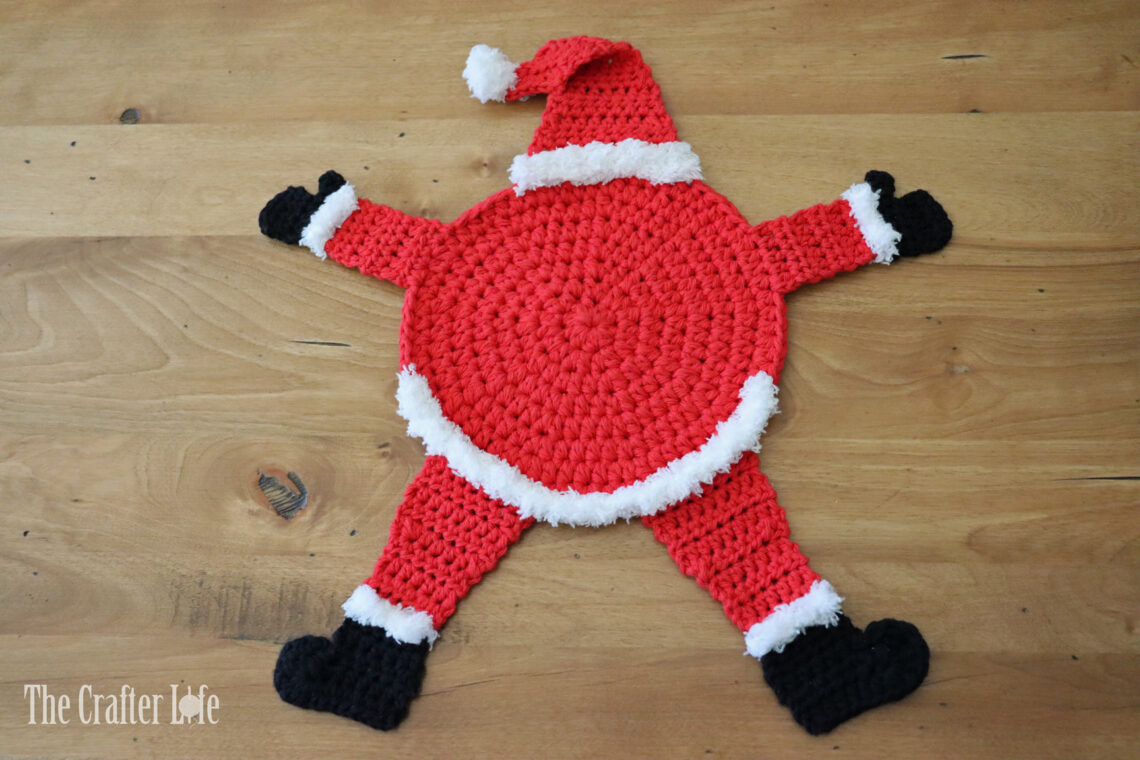
Flattened Santa Hot Pad
Uh Oh! It looks like Santa fell down the chimney! Since making my Flattened Witch Pot Holder and Granny’s Revenge Reindeer Hot Pad, I have had requests for a Santa! I finally got a chance to make it! This pot holder would be a great decorative and functional accent for your table/counter during the Christmas season. A perfect accessory for any Christmas party! Sit a candy dish, bowl, pot, or plate of warm cookies right on top for a totally cute and festive look! Baking will be extra jolly with this Flattened Santa Pot Holder! If you are interested in making one, follow my crochet pattern below.
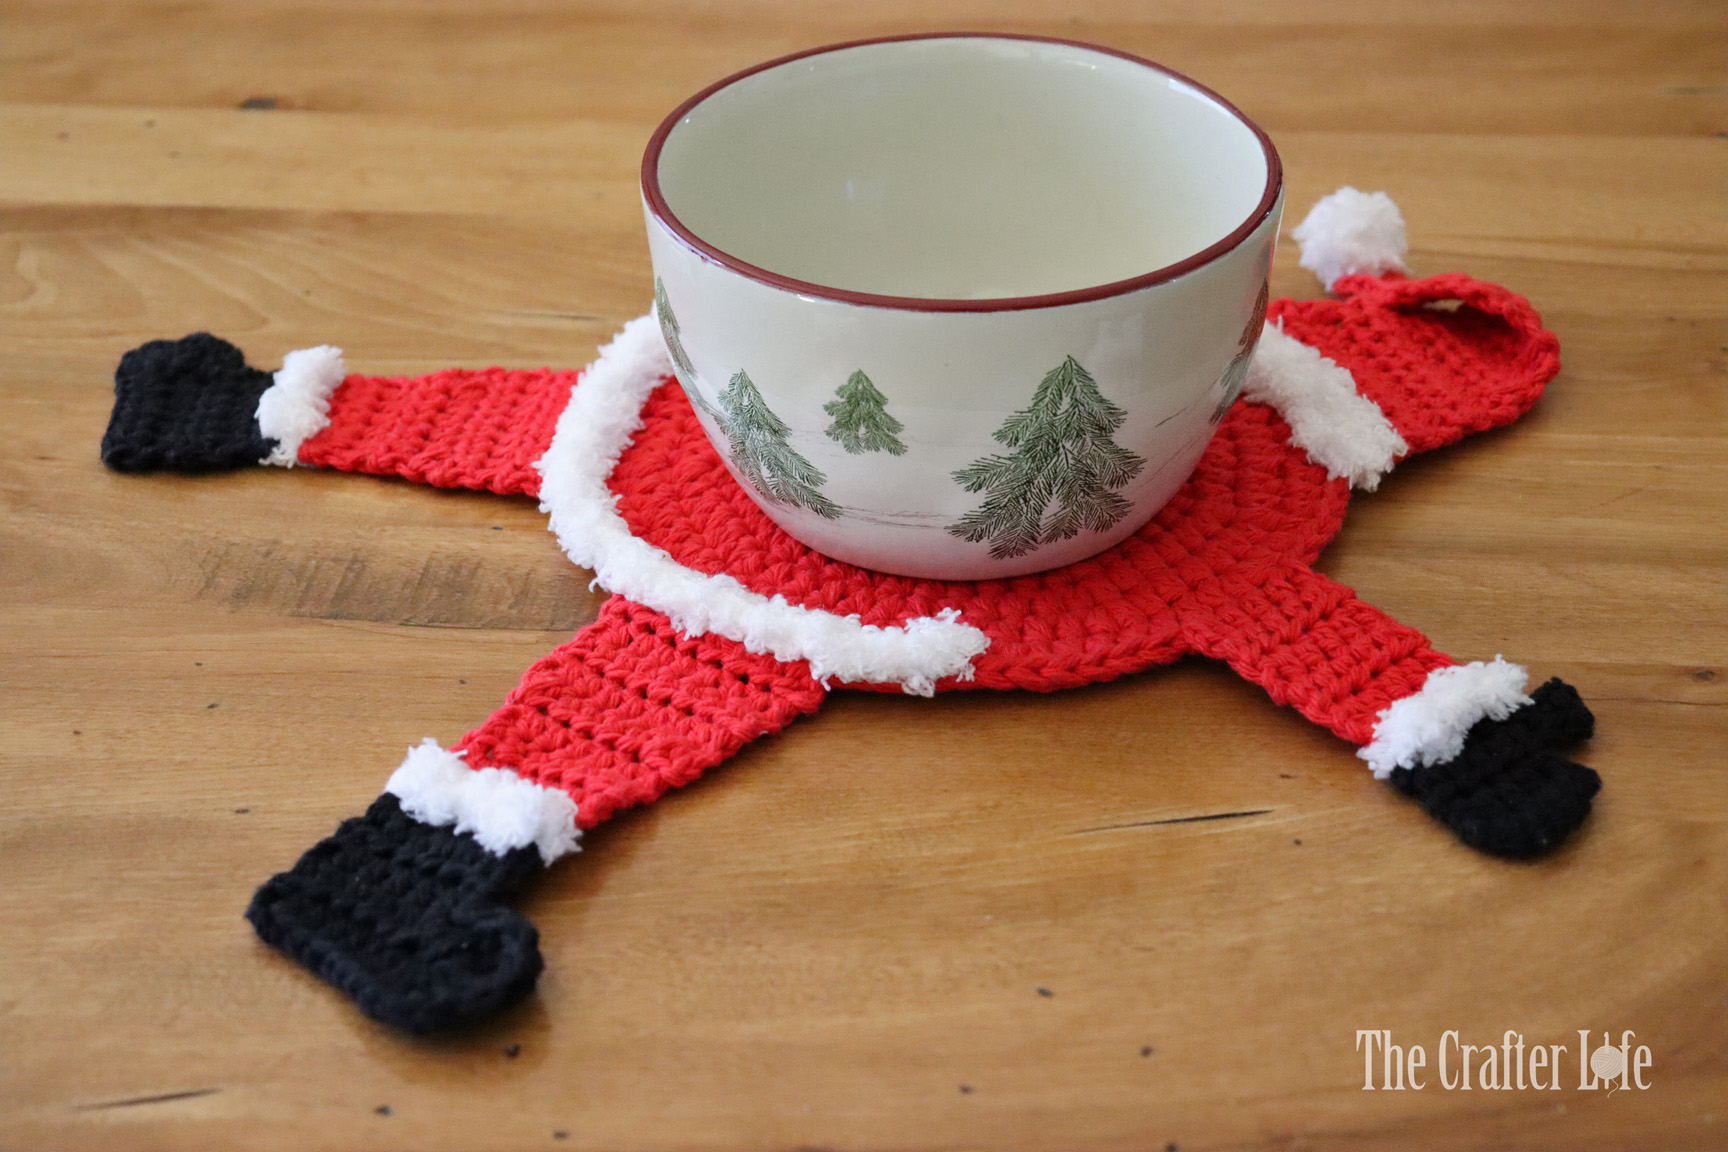
***This pot holder pattern is written to be used as a festive pot holder for your table. It is meant for most standard-size pots/bowls/dishes.
FINISHED MEASUREMENTS
The main circle body is about 7 inches in diameter.
Each arm is about 3½ inches long and 1¼ inches wide.
Each leg is about 4½ inches long and 2 inches wide (at top of leg).
The assembled hat is about 3 inches tall and about 2 inches wide in the middle.
*The total height is about 14 inches. The total width (from hand to hand is about 12½ inches.*
MATERIALS
– Size H/8/5.00mm crochet hook (used for main circle body of pot holder)
– Size 4.50 mm crochet hook (used for legs, arms, hat, and trim)
– 2 skeins cotton worsted weight (4) yarn in red (I used Lily Sugar ‘n Cream yarn in Red)
– Cotton worsted weight (4) yarn in black (I used Lily Sugar ‘n Cream yarn in Black)
– Bulky weight (5) fuzzy yarn in white (I used Bernat Pipsqueak yarn in Whitey White)
– Tapestry Needle
– Scissors
– Stitch Markers
ABBREVIATIONS
– ch = chain
– chs = chains
– dc = double crochet
– hdc = half double crochet
– hdc2tog = half double crochet 2 together (half double crochet decrease)
– sc = single crochet
– slst = slip stitch
– st = stitch
– sts = stitches
– tc = triple crochet
SPECIAL STITCHES
– hdc2tog (hdc decrease): Yarn over, insert your hook under the first stitch, yarn over and pull up a loop (you should now have 3 loops on your hook). Then, yarn over and insert your hook under the next stitch, yarn over, and pull up a loop (you should now have 5 loops on your hook). With five loops now on your hook, yarn over and pull through all five loops.
GAUGE
3 hdc rounds of main body has a diameter of approximately 2½ inches
5 rows of hdc = 2 inches; 4 hdc = 1 inch
I offer an Ad-Free PDF version in My Etsy Shop!
PATTERN NOTES
- The main circle is made first with TWO red strands of yarn held together. Hold two separate strands of red yarn together and crochet like you would with one strand. This is to make it thicker and more durable.
- The main circle is worked in continuous rounds. Start the first stitch of each round in the first st of the previous round without any joins or chains. You might want to use stitch markers to mark the beginning/end of rounds.
- The legs, arms, and hat are made next with ONE strand of yarn in rows of half double crochet stitches. The first half double crochet stitch is always done in the same stitch as the chain-2 unless otherwise stated (the chain-2 does not count as a stitch, so don’t skip the first stitch of the row).
- When changing color, change the color by completing the final stitch in each row with the new color (pull through new color during final step of last stitch).
- Brackets [ ] indicate portions of the pattern to be repeated.
DIRECTIONS
Main Circle Body
*Work circle in continuous rounds using two strands of yarn. See pattern notes.
*Use your 5.00 mm hook and red cotton yarn to complete the circle body.
*Make sure to pull the magic ring closed and weave in/secure end at closure at the beginning.
HINT: I used a stitch marker to mark the first stitch of each round.
Round 1: Holding two strands of red yarn together, form a magic ring, ch 2, 9 hdc in ring. (9 hdc)
Round 2: 2 hdc in each st around. (18 hdc)
***Remember to close the magic ring and weave in end on back of work.
Round 3: Repeat [hdc in next st, 2 hdc in next st] around. (27 hdc)
Round 4: Repeat [hdc in next 2 sts, 2 hdc in next st] around. (36 hdc)
Round 5: Repeat [hdc in next 3 sts, 2 hdc in next st] around. (45 hdc)
Round 6: Repeat [hdc in next 4 sts, 2 hdc in next st] around. (54 hdc)
Round 7: Repeat [hdc in next 5 sts, 2 hdc in next st] around. (63 hdc)
Round 8: Hdc in next 3 sts, 2 hdc in next st, repeat [hdc in next 6 sts, 2 hdc in next st] 8 times, then hdc in next 2 sts, sc in last st, join to first st of round with slst, fasten off, weave in loose ends. (71 hdc, 1 sc; 72 total sts)
***Leave a stitch marker in the first stitch of Round 8 to help you count the stitches around when you attach the legs and arms.
LEGS
*Use your 4.50 mm hook and your red cotton yarn to begin the legs.
*Use 1 strand of yarn when making the legs.
*When changing the colors for the boot, change by completing the last st of each row with the new color. See pattern notes
*Row 10 starts the shoe so all remaining rows will be done in black.
1st Leg
Hold the main circle body so that the right side (front side) is facing. Attach red yarn to the BACK LOOP ONLY of the 27th st of Round 8 of the main circle body. Then begin Row 1. Row 1 is worked in the back loops only.
Row 1: Ch 2, hdc in back loop only of same st as your join/ch-2, hdc in back loop only of next 7 sts. (8 hdc)
Rows 2-4: Ch 2, turn, hdc in each st across. (8 hdc)
Row 5: Ch 2, turn, hdc2tog, hdc in next 4 sts, hdc2tog. (2 hdc2tog, 4 hdc; 6 total sts)
Rows 6-8: Ch 2, turn, hdc in each st across. (6 hdc)
Row 9: Ch 2, turn, hdc in each st across, change to black yarn when completing the last hdc (see pattern notes). (6 hdc)
***You should now have black yarn on your hook. Row 10 starts the boot and is worked in front loops only.***
Row 10: Ch 2, turn, hdc in front loop only of each st across. (6 hdc)
Rows 11-12: Ch 2, turn, hdc in each st across. (6 hdc)
Row 13: Ch 2, turn, 2 hdc in first st, hdc in next 5 sts across. (7 hdc)
***The last st of Row 14 forms the toe of boot.
Row 14: Ch 2, turn, hdc in next 6 sts, work 2 hdc, 3 dc, 3 tc in last st, slst in last st of Row 12, fasten off, weave in ends on back of work. (8 hdc, 3 dc, 3 tc, 1 slst; 15 total sts)
I offer an Ad-Free PDF version in My Etsy Shop!
2nd Leg
Hold the main circle body so that the wrong side (back side) is facing. Attach purple yarn to the FRONT LOOP ONLY of the 47th st of Round 8 of the main circle body (this should be the 20th stitch over on the main circle from the starting stitch of the 1st leg). Then begin Row 1. Row 1 is worked in the front loops only.
Row 1: Ch 2, hdc in front loop only of same st as your join/ch-2, hdc in front loop only of next 7 sts. (8 hdc)
Rows 2-4: Ch 2, turn, hdc in each st across. (8 hdc)
Row 5: Ch 2, turn, hdc2tog, hdc in next 4 sts, hdc2tog. (2 hdc2tog, 4 hdc; 6 total sts)
Rows 6-8: Ch 2, turn, hdc in each st across. (6 hdc)
Row 9: Ch 2, turn, hdc in each st across, change to black yarn when completing the last hdc (see pattern notes). (6 hdc)
***You should now have black yarn on your hook. Row 10 starts the boot and is worked in back loops only.***
Row 10: Ch 2, turn, hdc in back loop only of each st across. (6 hdc)
Rows 11-12: Ch 2, turn, hdc in each st across. (6 hdc)
Row 13: Ch 2, turn, 2 hdc in first st, hdc in next 5 sts across. (7 hdc)
***The last st of Row 14 forms the toe of boot.
Row 14: Ch 2, turn, hdc in next 6 sts, work 2 hdc, 3 dc, 3 tc in last st, slst in last st of Row 12, fasten off, weave in ends on back of work. (8 hdc, 3 dc, 3 tc, 1 slst; 15 total sts)
***Both legs should now be complete. Follow the directions below to make the arms.
ARMS
*Use your 4.50 mm hook and your red cotton yarn to complete the arms.
*Use 1 strand of yarn when making the arms.
1st Arm
*The arm is made up of 6 rows with 5 hdc in each row.
Hold the main circle body so that the wrong (back) side is facing. Attach red yarn to the 16th st of Round 8 of the main circle body (this should be 11 stitches away from where you attached your red yarn for the 1st leg). Then begin Row 1.
Row 1: Ch 2, hdc in the 16th st of Round 8 of the main circle body (same st as your join/ch 2), hdc in next 4 sts. (5 hdc)
Rows 2-6: Ch 2, turn, hdc in each st across. (5 hdc)
At the end of Row 6, attach black yarn by completing the last hdc by pulling through black.
***Row 7 starts the glove so all remaining rows will be done in black. Row 7 is worked in the front loops only.***
Row 7: With black yarn, ch 2, turn, hdc in front loop only of each st across. (5 hdc)
***The beginning of Row 8 forms the thumb of the glove.***
Row 8: Ch 4, hdc in 3rd ch from hook and in next ch, turn, slst in first st of Row 7, ch 1, hdc in next 4 sts. (6 hdc, 1 slst; 7 total sts)
Row 9: Ch 2, turn, hdc in next 4 sts. (4 hdc)
Row 10: Ch 1, turn, sc in first st, 2 sc in next 2 sts, slst in last st, fasten off and weave in ends. (5 sc, 1 slst; 6 total sts)
2nd Arm
*The arm is made up of 6 rows with 5 hdc in each row.
Hold the main circle body so that the right side is facing. Attach red yarn to the 58th st of Round 8 of the main circle body (this should be 11 stitches away from where you attached your red yarn for the 2nd leg). Then begin Row 1.
Row 1: Ch 2, hdc in the 58th st of Round 8 of the main circle body (same st as your join/ch 2), hdc in next 4 sts. (5 hdc)
Rows 2-6: Ch 2, turn, hdc in each st across. (5 hdc)
At the end of Row 6, attach black yarn by completing the last hdc by pulling through green.
***Row 7 starts the glove so all remaining rows will be done in black. Row 7 is worked in the back loops only.***
Row 7: With black yarn, ch 2, turn, hdc in back loop only of each st across. (5 hdc)
***The beginning of Row 8 forms the thumb of the glove.***
Row 8: Ch 4, hdc in 3rd ch from hook and in next ch, turn, slst in first st of Row 7, ch 1, hdc in next 4 sts. (6 hdc, 1 slst; 7 total sts)
Row 9: Ch 2, turn, hdc in next 4 sts. (4 hdc)
Row 10: Ch 1, turn, sc in first st, 2 sc in next 2 sts, slst in last st, fasten off and weave in ends. (5 sc, 1 slst; 6 total sts)
I offer an Ad-Free PDF version in My Etsy Shop!
Hat (Main Body)
*Use your 4.50 mm hook, your white fuzzy yarn, and red cotton yarn to complete the hat.
*Use 1 strand of yarn when making the hat.
Row 1 of the hat is made with white fuzzy yarn. At the end of Row 1, change to red yarn by completing the last hdc of Row 1 by pulling through red yarn.
Row 1: Ch 14, hdc in the 3rd ch from the hook and in each ch across. (12 hdc)
At the end of Row 1, attach red yarn by completing the last hdc by pulling through red.
***Rows 2 through 13 of the hat are made with red cotton yarn.***
Row 2: Ch 2, hdc2tog, hdc in next 8 sts, hdc2tog. (2 hdc2tog, 8 hdc; 10 total sts)
Row 3: Ch 2, turn, hdc in each st across. (10 hdc)
Row 4: Ch 2, turn, hdc2tog, hdc in next 6 sts, hdc2tog. (2 hdc2tog, 6 hdc; 8 total sts)
Rows 5-6: Ch 2, turn, hdc in each st across. (8 hdc)
Row 7: Ch 2, turn, hdc in next 6 sts, hdc2tog. (6 hdc, 1 hdc2tog; 7 total sts)
Row 8: Ch 2, turn, hdc in each st across. (7 hdc)
Row 9: Ch 2, turn, hdc in next 5 sts, hdc2tog. (5 hdc, 1 hdc2tog; 6 total sts)
Row 10: Ch 2, turn, hdc in each st across. (6 hdc)
Row 11: Ch 2, turn, hdc in next 2 sts, hdc2tog, hdc2tog. (2 hdc, 2 hdc2tog; 4 total sts)
Row 12: Ch 2, turn, hdc2tog, hdc in next st, 3 hdc in last st. (1 hdc2tog, 4 hdc; 5 total sts)
Row 13: Ch 4, turn, work 1 tc, 1 dc, and 1 hdc in first st, hdc in next st, hdc2tog, slst to last st, fasten off, leaving a long tail to use for sewing hat. (1 tc, 1 dc, 2 hdc, 1 hdc2tog, 1 slst; 6 total sts)
After completing Row 13 of the hat, turn work so the front side of the hat is facing up. The tip at the top of the hat should point to the left when the front side is facing. When you fold down and sew the top of the hat, you will start with the front facing.
***The main body of the hat is now complete. Follow the directions below to fold and sew down the top of the hat.
Sewing the Top of Hat
Using a tapestry needle and the long tail you left at the end of Row 13 of the hat, fold and sew the top of the hat down so the end of Row 13 (the final slst of Row 13) touches the left side of the hat at the top of Row 5 Use your needle to draw the long tail down through to the back of the hat. Bring it back up through and then down again once or twice more around the same point so that this part of the top of the hat is securely tacked down to the left side of the hat. Leave a gap where the hat is folded to create a three-dimensional effect (don’t sew the top of the hat completely down so that it is flat). Weave in/secure your yarn on the back of the hat when finished.
***Once the top of the hat folded and sewn, follow the directions below to make and attach the pom-pom for the tip of the hat.
Pop-Pom for Hat
*Use your 4.50 mm hook and your white fuzzy yarn to complete the pom-pom for the hat.
*Leave a longer tail on the slip knot at the beginning ch-3 to help with attaching the pom-pom to the hat.
Ch 3, slst in first ch to form a ring.
TIP: Use a stitch marker to mark the first sc of Round 1 so you can find it when you join with a slst at the end of Round 1.
Round 1: Ch 1, work 6 sc in ring, slst in first st, fasten off, leaving a long tail for sewing on hat. (6 sc)
Attaching the Pom-Pom
Tie the long tail and the tail at the beginning slip knot together in a knot to secure them against the pom-pom. Next, use a tapestry needle to draw both tails through from the front of the tip of the hat to the back (Make sure the tails go down through in two different spaces and not the same space so you can easily secure them with a knot on the back). When you are satisfied with the position of the pom-pom on the tip of the hat, knot the tails together on the back of the hat to secure them. Then weave in the tails before cutting them so they are extra secure.
**The hat is now complete. Follow the directions below to attach it to the main circle body.
Attaching the Hat
Sew the hat to the top of the main circle body using a tapestry needle and the tail left from the white fuzzy brim of the hat. Center the hat with the first stitch of Round 8 on the main circle body (the ends of the hat should each be sewn about 6 stitches over on each side of the first stitch of Round 8). It should be centered between the two arms. Use your tapestry needle to sew the stitches of the hat from Row 1 to the top center stitches of the circle body. Once you are satisfied with the hat placement and have made sure it is securely attached to the top of the circle, weave in/secure your yarn on the back of the work.
***After attaching the hat, follow the directions below to add the trim embellishment to the main body, boots and gloves.
Main Body Trim Embellishment
*Use your 4.50 mm hook and your white fuzzy yarn to make the trim of the coat.
*The trim of the coat is made using single crochet stitches in the front loops only around the bottom (Round 8) of the main circle body.
Hold the work so that the right (front) side is facing. Attach white fuzzy yarn to the front loop only of the 23rd st of Round 8 of the main circle body (this should be 4 stitches back from the where you started the first leg and 7 stitches away from the end of the first arm). Then begin Row 1. Row 1 is worked in the front loops only.
Row 1: Ch 1, sc in the front loop only of the 23rd st of Round 8 of the main circle body (same st as your join/ch 1), sc in front loop only of next 28 sts, fasten off, weave in ends on back of work. (29 sc)
***The trim of the “coat” (bottom of the main circle body) should run from the 23rd stitch to the 51st stitch of Round 8 of the main circle body.
Boots Trim Embellishment
*Use your 4.50 mm hook and your white fuzzy yarn to make the trim of the boots.
*The trim of the boots is made using slip stitches in the front loops only above the boot (at Row 9) of the legs.
1st Boot
Hold the work so that the right (front) side is facing. Attach white fuzzy yarn to the front loop only of the last st (the 6th hdc which is the st on the right side) of Row 9 of the 1st leg. Then begin Row 1. Row 1 is worked in the front loops only.
Row 1: Ch 1, slst in the front loop only of the 6th st of Row 9 of the first leg (same st as your join/ch 1), slst in front loop only of next 5 sts, fasten off, weave in ends underneath the stitches. (6 slst)
2nd Boot
Hold the work so that the right (front) side is facing. Attach white fuzzy yarn to the front loop only of the first st (st on right side) of Row 9 of the 2nd leg. Then begin Row 1. Row 1 is worked in the front loops only.
Row 1: Ch 1, slst in the front loop only of the first st of Row 9 of the 2nd leg (same st as your join/ch 1), slst in front loop only of next 5 sts, fasten off, weave in ends underneath the stitches. (6 slst)
Gloves Trim Embellishment
*Use your 4.50 mm hook and your white fuzzy yarn to make the trim of the gloves.
*The trim of the gloves is made using slip stitches in the front loops only below the glove (at Row 6) of the arms.
1st Glove
Hold the work so that the right (front) side is facing. Attach white fuzzy yarn to the front loop only of the first st (st on the right side) of Row 6 of the 1st arm. Then begin Row 1. Row 1 is worked in the front loops only.
Row 1: Ch 1, slst in the front loop only of the first st of Row 6 of the first arm (same st as your join/ch 1), slst in front loop only of next 4 sts, fasten off, weave in ends on back of work. (5 slst)
2nd Glove
Hold the work so that the right (front) side is facing. Attach white fuzzy yarn to the front loop only of the last st (the 5th hdc which is the st on the right side) of Row 6 of the 2nd arm. Then begin Row 1. Row 1 is worked in the front loops only.
Row 1: Ch 1, slst in the front loop only of the 5th st of Row 6 of the 2nd arm (same st as your join/ch 1), slst in front loop only of next 4 sts, fasten off, weave in ends on back of work. (5 slst)
***Once you weave in/secure and cut all the loose ends, your pot holder is finished!
Questions? Concerns? Please contact me at email TheCrafterLifeBlog@gmail.com


BASEBALL DIAMOND LOVEY


One Comment
Pingback: