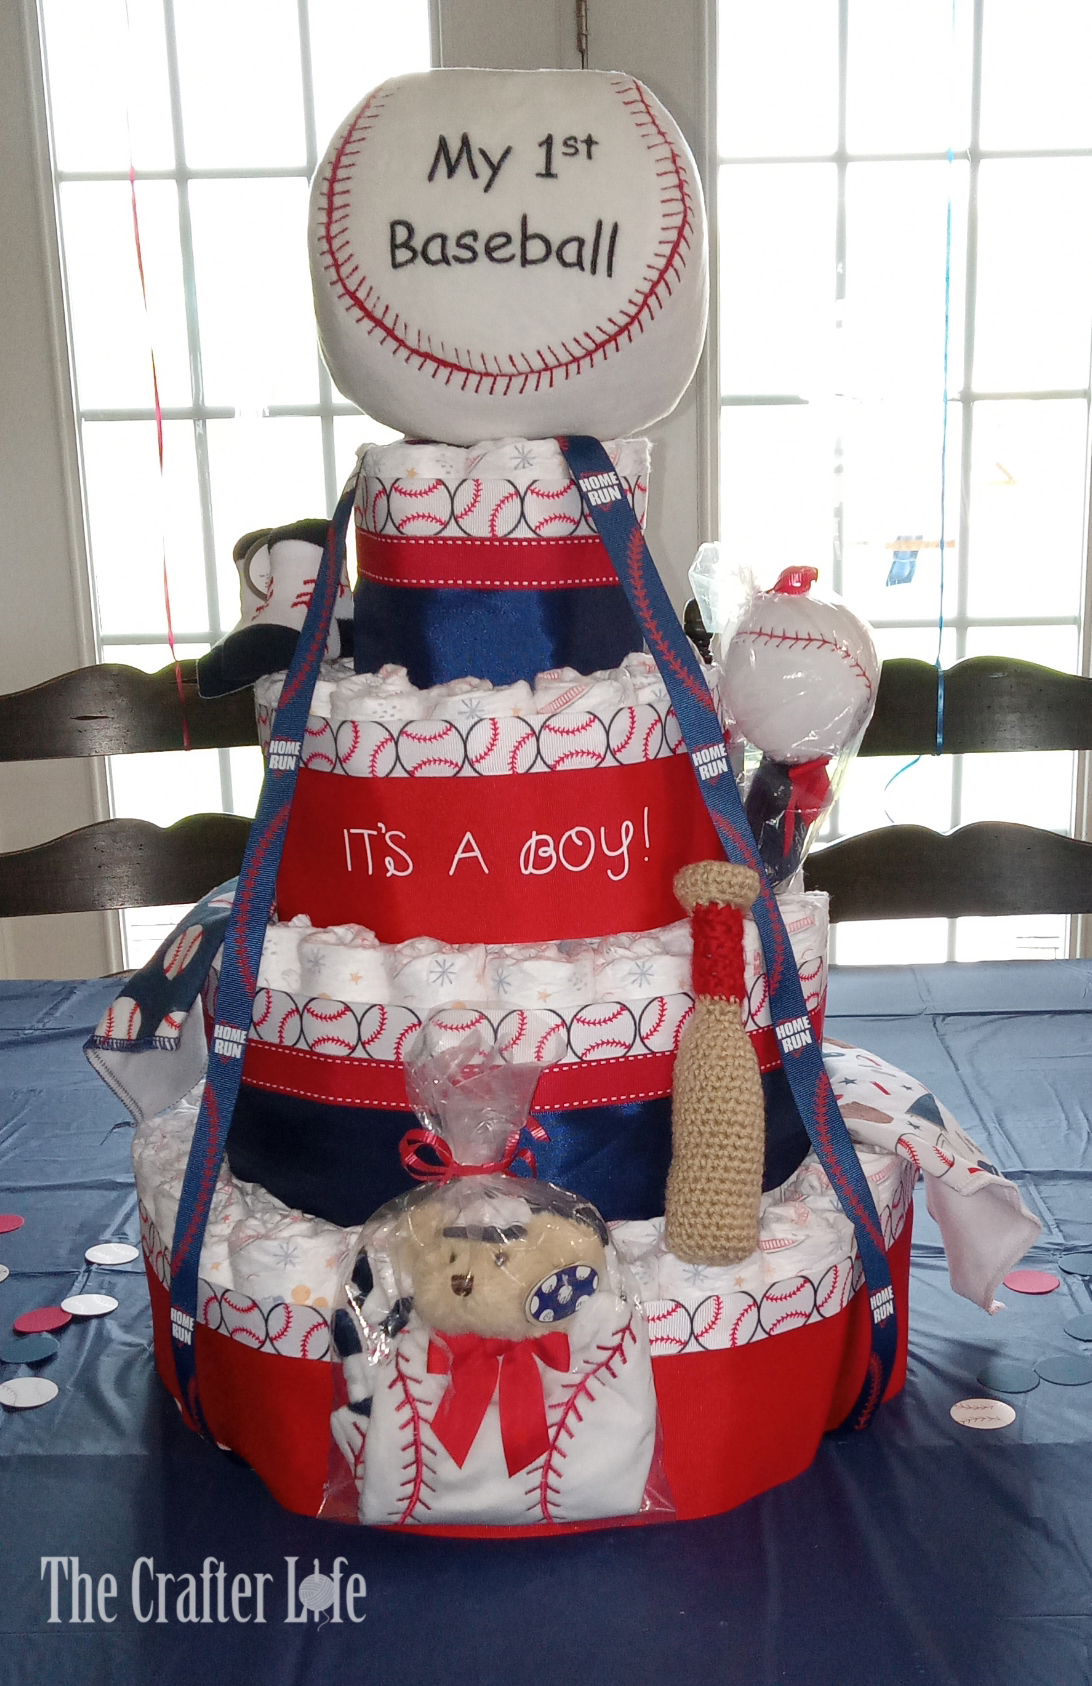
Baseball Diaper Cake
My mother and I recently hosted a baby shower for my sister-in-law, who is expecting a baby boy. The nursery is going to have a baseball theme, so we decided to have a baseball theme for the baby shower. I wanted to make a diaper cake as my main gift. Since I made a baseball-themed diaper cake, it served a dual purpose as the centerpiece of the table at the shower. I think it turned out really cute, so I wanted to share how I made it in case you would like to make one for yourself. See below for instructions on how I made my baseball-themed diaper cake.
MATERIALS
*I have more details on the materials I used in the directions*
- Diapers (I used 127 diapers in size 2)
- Rubber Bands
- Gift Ribbon
- Tray/Cardboard for the very bottom (I used a 14” cardboard cake circle)
- Decorative Ribbon/Decorations/Gifts for the outside of the cake
- Glue Dots (removable – non-permanent)
- Hot Glue Gun/Hot Glue
DIRECTIONS
- The first thing I had to do was make the main structure/layers of the cake with diapers. I found this awesome tutorial https://www.shawnmosch.com/diaper-cake-getting-started/ by Shawn Mosch and made a 4-layer diaper cake exactly as she explains in her tutorial. I used rubber bands for the smaller clusters of diapers and used red gift ribbon around the outside of each larger layer to hold the smaller clusters together (this is also explained in the tutorial). Shawn’s tutorial is broken into three parts, so make sure you read all three steps. I happened to have a 14” cardboard cake circle that I saved from my own diaper cake that I used at the bottom of the cake to help support and transport it. The cake circle was slightly smaller than the bottom layer of my cake, so I may have been able to use a 16” cake circle, but I liked the fact that you couldn’t see the cake circle sticking out underneath the cake. I found a great deal at the time on Amazon through their “Subscribe-and-Save” program for these diapers Huggies Diapers . At the time I purchased them, there was an extra coupon in addition to the savings through the subscription program. Since I needed 127 diapers, I had to order 2 boxes and gave my sister-in-law the extra diapers separately. These diapers have Mickey Mouse print all over both sides, so if you prefer to have plain diapers as Shawn explains in her tutorial, these wouldn’t work for you.
- Once my diapers were together and stacked in their layers to form the cake structure, the next thing I did was wrap the decorative ribbon around each layer to hide the rubber bands and red gift ribbon I used to hold the diapers together. Since I hadn’t accounted for the Mickey Mouse print on the diapers, I knew I wanted my ribbon to be wider so it covered more of the diapers (since I wanted my theme to be baseball and not Mickey). I wrapped the bottom layer of the cake in ribbon first. I decided to use a roll of this 3” red ribbon I found at my local Wal-Mart.

- I wrapped the red ribbon around the bottom of the bottom layer of the cake and then cut the ribbon to the length I needed for it to wrap the entire way around (with a little extra overlap), and then used a hot glue gun to glue one end of the ribbon on top the other end so that their edges were straight. Make sure to only apply hot glue to the ribbon and not any diapers.I made the seam where I glued the ends together the back of the cake. I decided to add decorative baseball ribbon to the top of the wide red ribbon for this layer. I bought two rolls of this ⅞” baseball ribbon I found at my local Wal-Mart.
- After cutting the ribbon to the length I needed to wrap it entirely around the layer, I used my hot glue gun to glue the ends together in the same manner and place on the back of the cake as the red ribbon. I added some glue dots to a few places on the inside of the ribbon to help hold it in place around the cake. I repeated this ribbon pattern (wide red ribbon with baseball ribbon on top) for the second layer down on the cake, making sure to keep the seams lined up on the back of the cake, so the glue lines wouldn’t be visible from the front. For the remaining two layers (the top layer and layer second from the bottom), I decided to use three different ribbons including a 2¼” navy blue ribbon, an embellished ⅞” red ribbon I happened to have already had in my ribbon stash, along with the baseball ribbon. Here is the navy blue ribbon I used.
- I think this is the same red ribbon I used that I already had on hand. I wrapped and glued the navy blue ribbon along the base of those two remaining layers. I then wrapped and glued the red ribbon with the white stitching on top the navy ribbon. Finally, I wrapped and glued the baseball ribbon on top the red ribbon. I made sure to glue all the seams at the same place on the back of the cake. I had originally ordered a roll of this baseball ribbon from Amazon Baseball Ribbon. However, when the ribbon was delivered, I realized that if I wrapped it around the layers of the cake, the “Home Run” print on the ribbon would read horizontally instead of vertically. I really wanted to use the ribbon, so I had the idea to run it vertically from the top of the cake to the bottom in four places evenly spaced around the cake. I think this effect finished off the cake nicely. In order to attach this ribbon, instead of hot glue, I used glue dots since each strand of the ribbon had to be attached directly to the diapers on the top of the cake and glue dots can be removed from the diapers. Hot glue would have ruined the diapers. Just make sure to tell whoever gets the cake to remove the glue dots when disassembling it to use the diapers. I cut four equal-length strands of the ribbon (each cut to the length I needed to run each strand from the center of the top layer of the cake all the way down to the bottom cake circle). Then I used glue dots at the top of each strand to attach the strands to the center of the top layer and at the bottom of each strand to attach it to the cardboard cake circle you couldn’t see underneath the cake. I made sure I didn’t run a strand down the very front of the cake since I knew I wanted to add my sticker letters for the “IT’S A BOY!” Message on the cake. Instead, I ran the two front strands of ribbon on either side of the front center of the cake so I had room for the message.

- I happened to have white sticker letters that someone who no longer needed them had given me years ago as everyone in my family knows to give me any leftover craft supplies. 😉 I thought it would be awesome to use them to spell out a message on the cake. At first I was going to spell out something with “Lil’ Slugger” in the message, but I didn’t have enough “L” sticker letters, so I changed to the “IT’S A BOY!” message since I had all the letters I needed for that. I made sure to center the letters/message as best I could on the front of the cake, on top the red ribbon of the second layer. I can’t find the letters I used anywhere online so I’m guessing they are no longer sold. They have a lot of white sticker letters out there, so it should be no problem to find some that work for this project. I even saw some cute 3-D foam ones called “thickers” that have a puffy appearance. The letter stickers I used are approximately ⅝” wide by ¾” high.
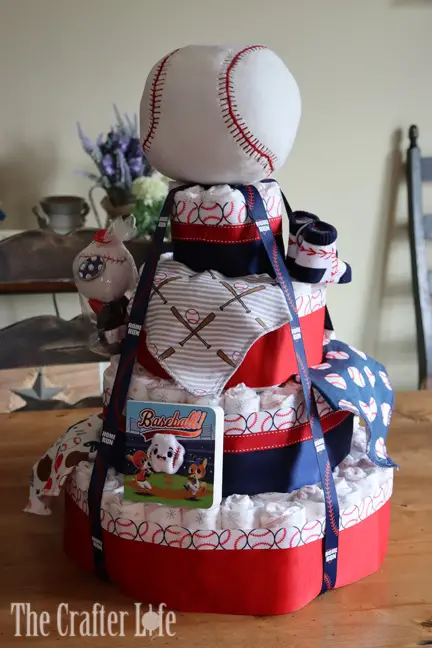
- The final step of arranging and attaching the gifts to the diaper cake was the most fun part (but also a little frustrating). I used glue dots to attach all of the items except for the crochet bat (I didn’t want the glue dot to pull and fray the yarn) and the book (because the book could just lean on the back of the cake). Since I made the cake about a week ahead of the shower, some of the items fell off before the week was up so I had to keep reattaching them with the glue dots (that was the frustrating part). You can see how I arranged the items from the pictures. I made sure to attach them to different layers to spread them out. I used the large baseball rattle as the cake topper. I found the Kellytoy K Luxe large baseball rattle on eBay. Below is a list of Amazon links to the rest of the gifts I used on the cake (some of them I bought elsewhere):
Lil’ Slugger Baseball Rattle:
Baseball Socks:
Mini Teddy Bear Baseball Lovie:
Baseball Puppet Book:
Baseball Bibs:
*I made the crochet bat the morning of the shower (nothing like waiting until the last minute), so I didn’t have a chance to write out the pattern for it yet. As soon as I do, I will post it and place the link to my pattern here!
*I hope you have fun creating a diaper cake of your own!