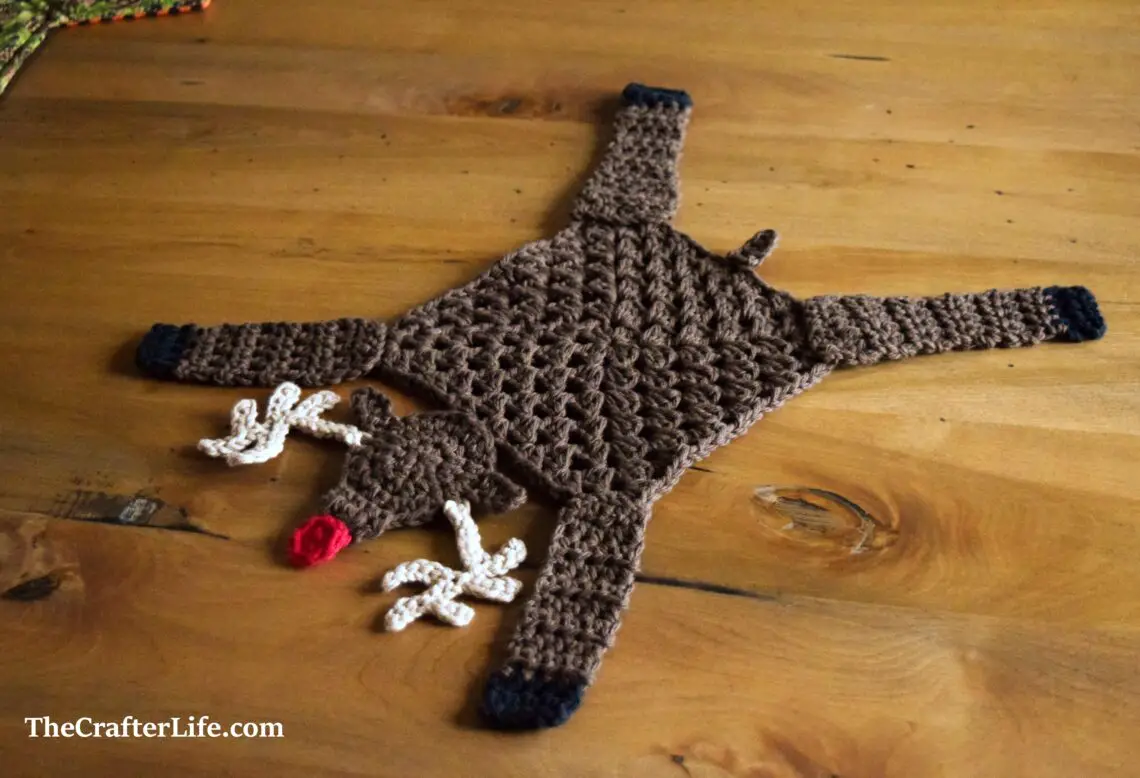
Granny’s Revenge Reindeer Hot Pad
Reindeer got run over by a granny square! After doing my flattened witch hot pad, I wanted to do a similar Christmas hot pad. I thought a reindeer would be cute and instead of making the main body shape a circle, I thought a granny square would be the perfect twist, bringing to mind that silly Christmas song, “Grandma Got Run Over by a Reindeer”. This time, a reindeer got run over by Granny – a granny square, at least. This cute reindeer hot pad with its red nose would is a festive way to decorate your table this holiday season. It is a great last-minute gift to make or a fun project to make for yourself if you find some free time this holiday. See below for my pattern if you are interested in making one! Keep an eye out for a matching coaster pattern coming soon!
Granny’s Revenge Hot Pad
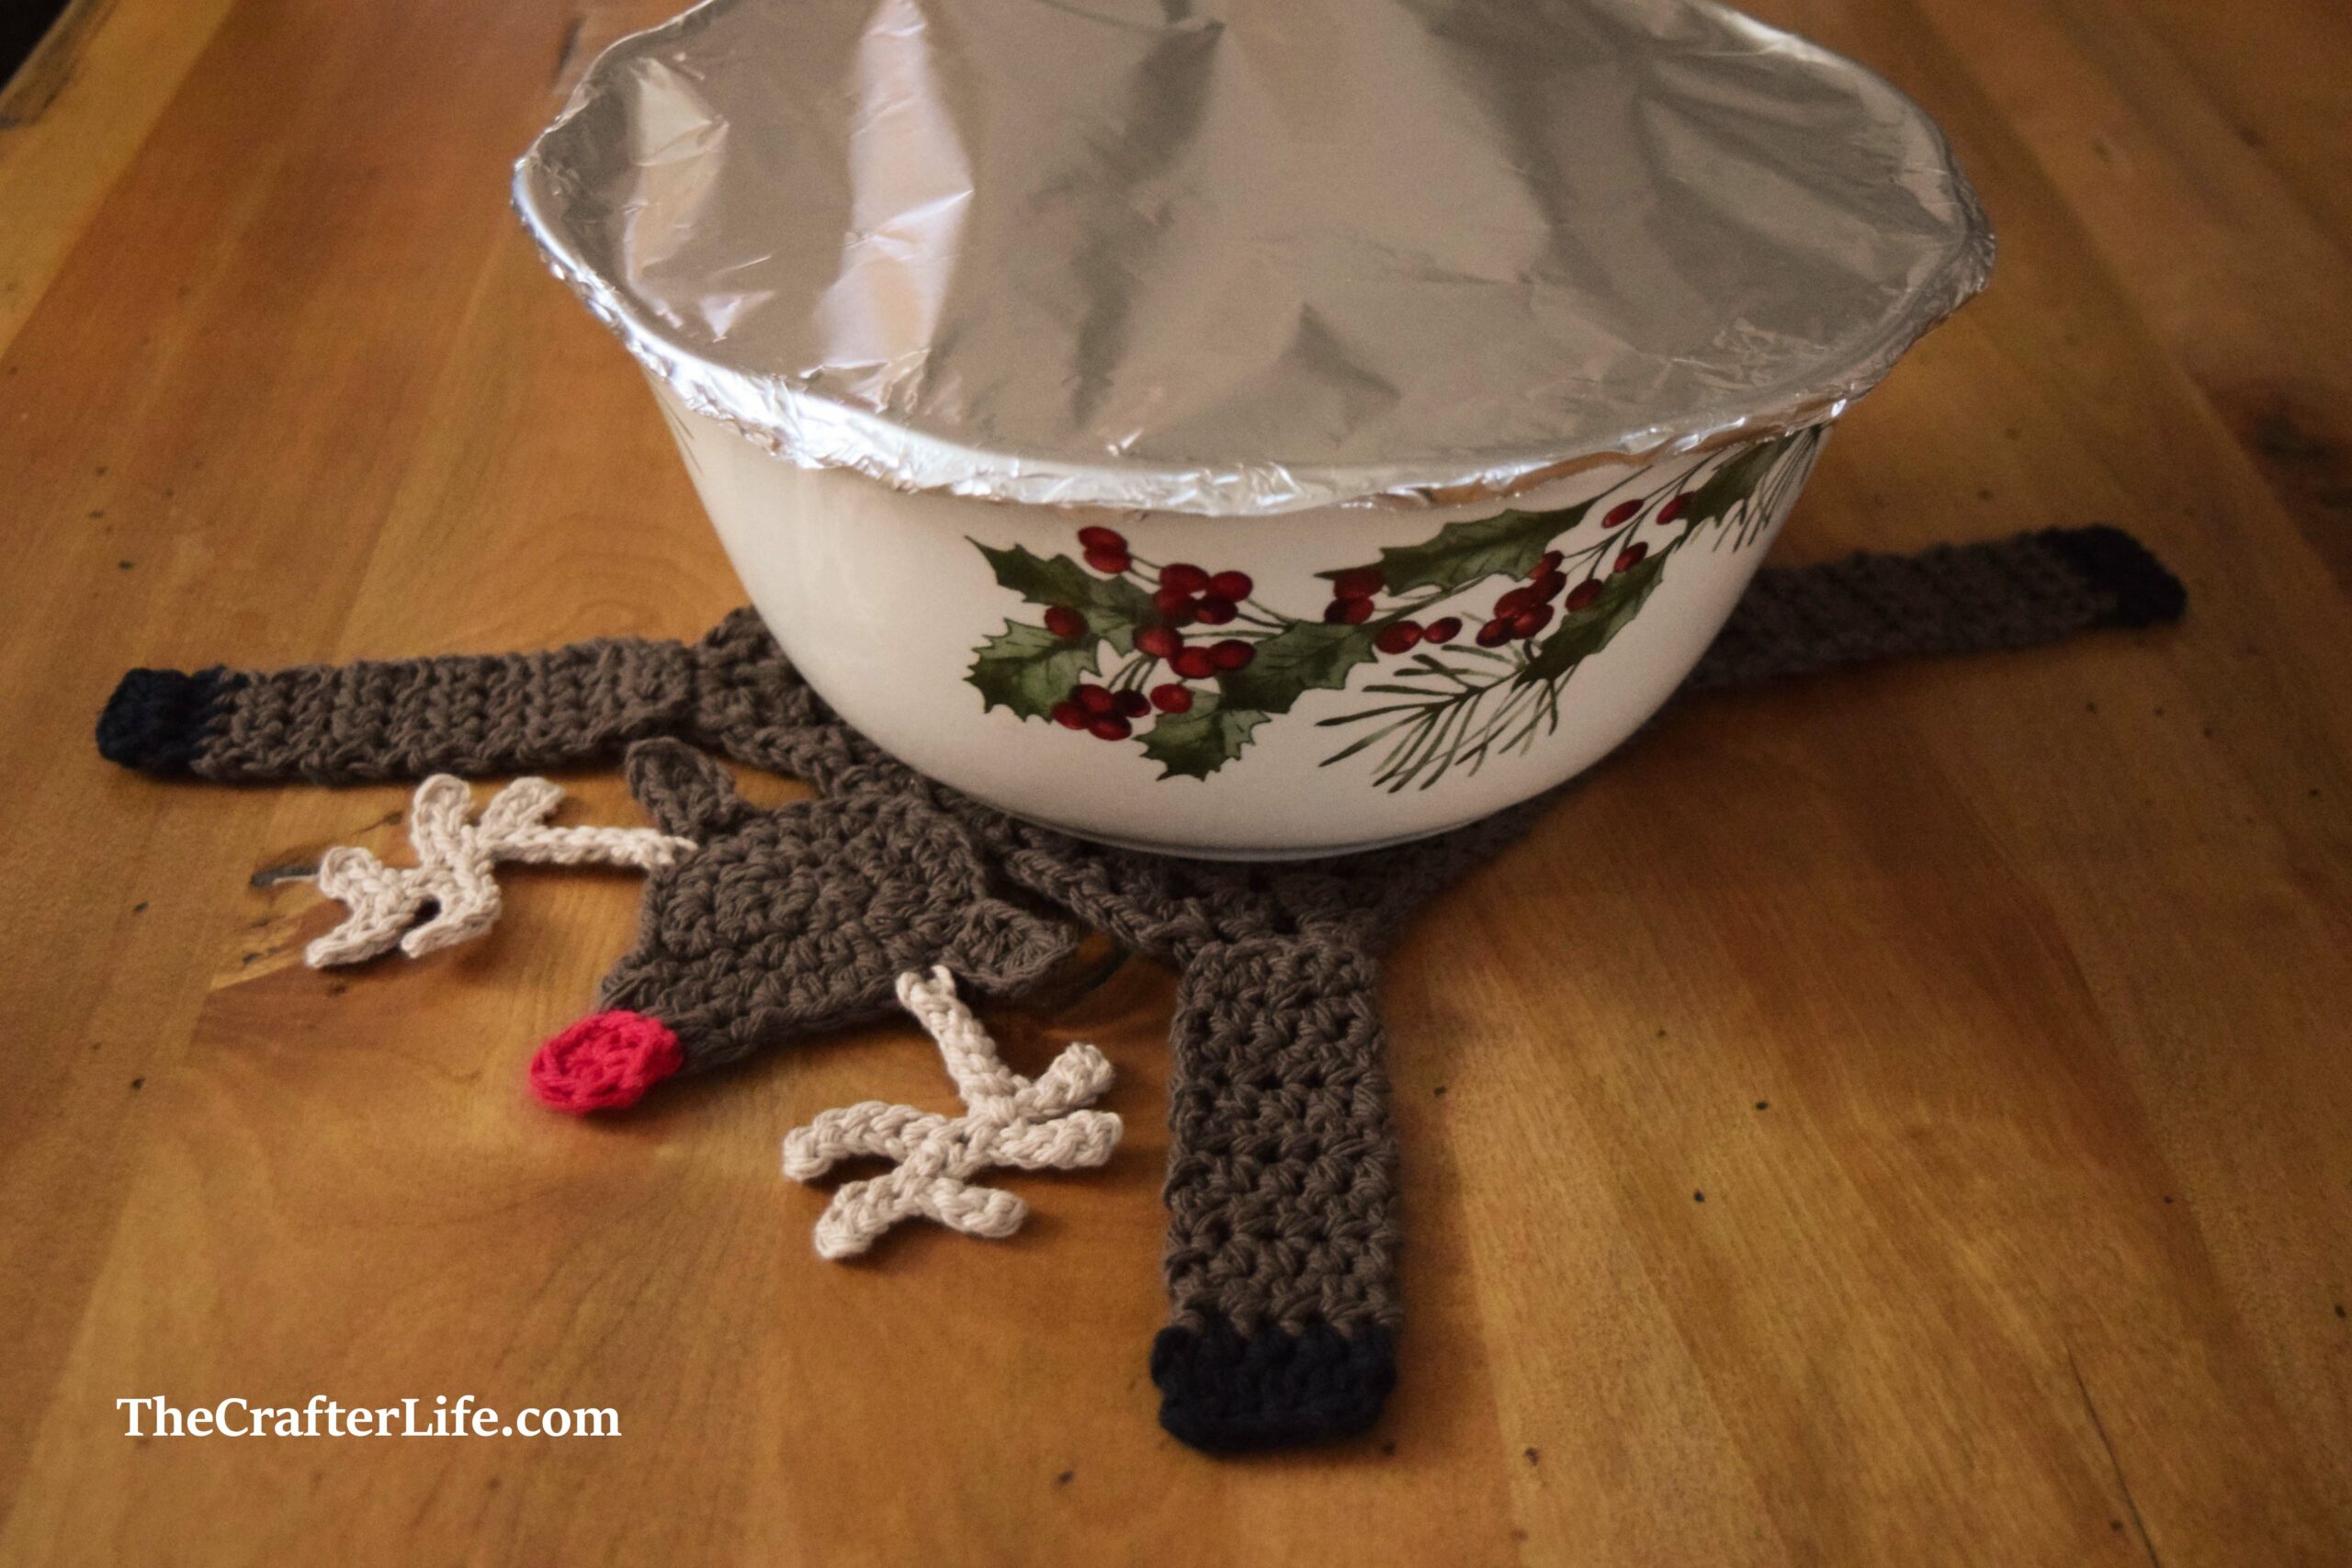
This hot pad pattern is written to be used as a festive hot pad for your table. It is meant for most standard-size bowls/dishes.
FINISHED MEASUREMENTS
Granny Square: 6 inches wide x 6 inches long
Total Assembled Hot Pad Measurements: Approximately 11½ inches wide (from furthest point on left legs straight across to furthest point on right legs) x 15 inches long (from tip of nose straight down to about the bottom of the leg)
Ad-Free 21-page PDF with pictures, additional tips, and stitch-by-stitch instructions now available on Etsy
MATERIALS
– Size H/8/5.00mm crochet hook or size needed to obtain gauge
– Cotton worsted weight (4) yarn in Brown (I used Lily Sugar ‘n Cream yarn in Warm Brown.)
– Cotton worsted weight (4) yarn in Black (I used Lily Sugar ‘n Cream yarn in Black.)
– Cotton worsted weight (4) yarn in Tan/Light Brown (I used Lily Sugar ‘n Cream yarn in Jute.)
– Cotton worsted weight (4) yarn in Red (I used Lily Sugar ‘n Cream yarn in Red.)
– Scissors
– Tapestry needle for weaving in ends
– Stitch markers (Optional – if needed for counting/marking stitches)
– Straight Pins (Optional – if needed for holding parts in place when sewing together)
– Measuring tape
ABBREVIATIONS
– ch = chain
– chs = chains
– hdc = half double crochet
– hdc = half double crochet
– hdc2tog = half double crochet 2 together (half double crochet decrease)
– slst = slip stitch
– sp = space
– sps = spaces
– st = stitch
– sts = stitches
GAUGE
Granny Square (Main Body) Section:
1½ Rounds = 2 inches
2 Clusters (3 hdc, ch 1 + 3 hdc, ch 1) = 1½ inches
Legs:
4 hdc = 1 inch
3 rows of hdc = 1 inch
Head:
2 rounds of hdc = 1½ inches
Ad-Free 21-page PDF with pictures, additional tips, and stitch-by-stitch instructions now available on Etsy
PATTERN NOTES
- The granny square (main body) of the hot pad is made first. It is made with clusters of half double crochet (hdc) stitches that are worked into the chain spaces. Do not work into the hdc stitches themselves. The ch-2 at the beginning of each round counts as the first hdc of the round. Each round ends with a slip stitch (slst) to the top of the ch-2 (the 2nd ch in the ch-2).
- The legs are made next in rows of half double crochet stitches. The first half double crochet stitch of each row is always done in the same stitch as the chain 2 unless otherwise stated (the chain-2 does not count as a stitch, so don’t skip the first stitch of the row).
- The head is made in joined rounds of half double crochet stitches. Each round is completed with a slip stitch to the first stitch of the round (do not count the slip stitch used to join each round as a stitch). The first half double crochet stitch of each round is made in the very first stitch of the previous round, which is the same stitch as the slst and chain 2 was made (chain-2 does not count as a stitch).
DIRECTIONS
Granny Square Body of Hot Pad
*Use your 5.00 mm hook and brown cotton yarn to complete the granny square.
*Remember that beginning ch-2 made in the first ch-2 space of each round counts as first hdc stitch of round.
*Brackets [ ] indicate a section of the pattern to be repeated.
*The corner ch-2 spaces of each round consist of (3 hdc, ch 2, 3 hdc), followed by a ch-1. This will be denoted a Corner Cluster, or CC.
*The side ch-1 spaces of each round consist of (3 hdc), followed by a ch-1. This will be denoted an Edge Cluster, or EC.
* Corner Cluster (CC) = 3 hdc, ch 2, 3 hdc, ch 1
* Edge Cluster (EC) = 3 hdc, ch 1
Round 1: Make a magic ring, ch 2, work 2 hdc in magic ring, ch 2, work 3 hdc in magic ring, ch 2, work 3 hdc in magic ring, ch 2, work 3 hdc in magic ring, ch 2, pull ring closed, join to top of beginning ch-2 with a slst (the second ch in the beginning ch-2).
Round 2: Slst in next 2 hdc, slst in first ch-2 sp, (ch 2, 2 hdc, ch 2, 3 hdc) in ch-2 sp, ch 1, CC in next 3 ch-2 sps, join to top of beginning ch-2 with a slst.
Round 3: Slst in next 2 hdc, slst in first ch-2 sp, (ch 2, 2 hdc, ch 2, 3 hdc) in ch-2 sp, ch 1, EC in next ch-1 sp, repeat [CC in next ch-2 sp, EC in next ch-1 sp] around, join to top of beginning ch-2 with a slst.
Round 4: Slst in next 2 hdc, slst in first ch-2 sp, (ch 2, 2 hdc, ch 2, 3 hdc) in ch-2 sp, ch 1, EC in next 2 ch-1 sps, repeat [CC in next ch-2 sp, EC in next 2 ch-1 sps] around, join to top of beginning ch-2 with a slst.
Round 5: Slst in next 2 hdc, slst in first ch-2 sp, (ch 2, 2 hdc, ch 2, 3 hdc) in ch-2 sp, ch 1, EC in next 3 ch-1 sps, repeat [CC in next ch-2 sp, EC in next 3 ch-1 sps] around, join to top of beginning ch-2 with a slst.
Round 6: Slst in next 2 hdc, slst in first ch-2 sp, (ch 2, 2 hdc, ch 2, 3 hdc) in ch-2 sp, ch 1, EC in next 4 ch-1 sps, repeat [CC in next ch-2 sp, EC in next 4 ch-1 sps] around, join to top of beginning ch-2 with a slst.
Round 7: Slst in next 2 hdc, slst in first ch-2 sp, (ch 2, 2 hdc, ch 2, 3 hdc) in ch-2 sp, ch 1, EC in next 5 ch-1 sps, repeat [CC in next ch-2 sp, EC in next 5 ch-1 sps] around, join to top of beginning ch-2 with a slst, fasten off, weave in and secure loose ends.
*You should now have the granny square main body complete. See the directions below to make the reindeer legs.
Ad-Free 21-page PDF with pictures, additional tips, and stitch-by-stitch instructions now available on Etsy
Back Leg (Make 2)
* Use your 5.00mm hook and brown cotton worsted weight yarn to begin the legs.
HINT: Leave a long tail on your beginning slip knot when you start Row 1 so you can use it to sew the leg onto the granny square body later.
Row 1: Ch 8, hdc in third ch from the hook and in the next 5 chs across. (6 hdc)
Row 2: Ch 2, turn, hdc in each st across. (6 hdc)
Row 3: Ch 2, turn, hdc in next 2 sts, hdc2tog, hdc in next 2 sts. (5 hdc)
Row 4: Ch 2, turn, hdc in each st across. (5 hdc)
Row 5: Ch 2, turn, hdc2tog, hdc in next 3 sts. (4 hdc)
Rows 6–11: Ch 2, turn, hdc in each st across, change to black yarn at the end of Row 11. (4 hdc)
Rows 12–13 should be done in black yarn.
Rows 12–13: Ch 2, turn, hdc in each st across; at the end of Row 13, fasten off and weave in/secure loose ends, except for one you can use later to sew the leg to the body. (4 hdc)
*You should now have two back legs complete. Follow the directions below for the front legs.
Front Leg (Make 2)
* Use your 5.00mm hook and brown cotton worsted weight yarn to begin the legs.
Row 1: Ch 6, hdc in third ch from the hook and in the next 3 chs across. (4 hdc)
Rows 2–9: Ch 2, turn, hdc in each st across, change to black yarn at the end of Row 9. (4 hdc)
Rows 10–11 should be done in black yarn.
Rows 10–11: Ch 2, turn, hdc in each st across; at the end of Row 11, fasten off and weave in/secure loose ends, except for one you can use later to sew the leg to the body. (4 hdc)
*You should now have two front legs complete. Follow the directions below for the head.
Ad-Free 21-page PDF with pictures, additional tips, and stitch-by-stitch instructions now available on Etsy
Head
*Use your 5.00mm hook and brown cotton yarn to complete the head.
*The head is made in joined rounds. The ch-2 at the beginning of the round does not count as a stitch (make your first hdc stitch of the round in the same stitch as the ch-2, which is the first stitch of the previous round).
*Brackets [ ] indicate sections of the pattern to be repeated.
*Rounds 4 and 5 make up the snout/nose section of the head and are not worked the entire way around the circle.
Round 1: Make a magic ring, ch 2, work 8 hdc in magic ring, join to first hdc of round with a slst, pull magic ring closed. (8 hdc)
Round 2: Ch 2, 2 hdc in each st around, join to first hdc with a slst. (16 hdc)
Round 3: Ch 2, hdc in first st, 2 hdc in next st, repeat [hdc in next st, 2 hdc in next st] around, join to first hdc with a slst. (24 hdc)
Round 4: Ch 2, hdc in first 4 sts. (4 hdc)
Round 5: Ch 2, turn, hdc2tog, hdc2tog, fasten off, weave in all loose ends except for one you can use later to sew the head to the body. (2 hdc)
*You should now have the head complete. Follow the directions below for the ears and tail.
Ears and Tail (Make 3 total)
*Use your 5.00mm hook and brown cotton yarn.
Row 1: Ch 5, hdc in 3rd ch from hook and in next 2 chs across, fasten off, leaving a long tail to use for sewing onto the head/body later. (3 hdc)
*You should now have two ears and one tail complete. Follow the directions below for the nose.
Nose
*Use your 5.00mm hook and red cotton yarn for the nose.
Round 1: Make a magic ring, ch 2, work 6 hdc in magic ring, pull magic ring closed, join to first hdc of round with a slst, fasten off, leaving a long tail for sewing onto the head. (6 hdc)
*You should now have the nose complete. Follow the directions below for the antlers.
Ad-Free 21-page PDF with pictures, additional tips, and stitch-by-stitch instructions now available on Etsy
Antler (Make 2)
*Use your 5.00mm hook and tan/light brown cotton yarn.
*The antler is made of a series of chains and slip stitches. I split the pattern up into rows to break it down and make it a little easier to follow. It may help to use stitch markers to mark specific indicated chains in the pattern since you will need to find them in later rows.
Row 1: *Ch 10, slst in 2nd ch from hook and in next 3 chs.
Row 2: *Ch 5, slst in 2nd ch from hook and in next 3 chs.
Row 3: *Ch 6, slst in 2nd ch from hook and in next 2 chs.
*HINT: You may want to mark the first 2 chs of the ch-6 since you will slst in these chs at the end of Row 4. You will slst in the very first ch of the ch-6 again in Row 5.
Row 4: Ch 4, slst in 2nd ch from hook and in next 2 chs, slst in first 2 chs of Row 3 (these should be the next 2 chs down).
Row 5: Ch 6, slst in 2nd ch from hook and in next 4 chs, slst in the first ch of Row 3, slst in the first ch of Row 2, slst in the 6th ch of Row 1 and in the rest of the chs of Row 1 (chs 1–5 of Row 1), fasten off, leaving a long tail for sewing onto the head.
**You should now have two antlers complete. Follow the directions below to assemble the hot pad.
ASSEMBLY
*You will need your tapestry needle and the long tails you left on your pieces to assemble the hot pad. You may wish to use straight pins to help you position and hold the pieces in place before sewing.
- Position the legs on the corners of the granny square so that the back legs are on the bottom corners of the square and the front legs are on the top corners of the square. They should be angled outwards. Before you sew them onto the square, make sure there will be room for the head and antlers between the front (top) two legs. Use your tapestry needle and long tails you left on your legs (or use your brown yarn) to sew/attach the legs to the corners of the granny square. Make sure to weave in/secure your tail end on the back of the project when finished.
- Position the antlers on each side of the head piece where you want them. Place the head in between the two front (top) legs and make sure the antlers fit between them before you sew them to the head. You may also wish to position the ears to make sure they fit before sewing the antlers. The snout/nose of the head should be in the middle of the two antlers. When you have your antlers in position, use your tapestry needle and long tails you left on the antlers to sew them in place. Make sure to secure your tail ends under the project when finished.
*I placed my antlers 3 stitches away on each side of the snout.
- Position the two ears directly under the antlers and use your tapestry needle and long tails on the ears to sew them in place on the side of the head. Make sure to secure your tail ends when finished.
- Position the nose on the center of the snout of the head piece. It can overlap the snout a little so that you sew the nose slightly on top of the snout. Sew in place using your tapestry needle and long red tail you left on the nose piece. Secure your tail end when finished.
- Position the head in the center of the top edge of the granny square and in between the two front (top) legs. If you left a long tail of brown yarn on your head piece, make sure you wove it under the stitches on the back all the way to the bottom edge of the head. You can use that tail (or, if you didn’t leave a long tail, another piece of brown yarn) and your tapestry needle to sew the head to the top edge of the granny square. Make sure to secure your yarn tail when finished.
- Position the tail piece in the center of the bottom edge of the granny square and in between the two back (bottom) legs. Use the long tail you left on the tail piece and your tapestry needle to sew the tail to the bottom edge of the granny square. Make sure to secure your yarn end when finished.
Once you have securely tucked in all loose ends, your reindeer hot pat is completely assembled and ready to use!
Ad-Free 21-page PDF with pictures, additional tips, and stitch-by-stitch instructions now available on Etsy

The pattern and photos of this item are the property of TheCrafterLife. This pattern and design are subject to copyright, and are for personal, non-commercial use only. You may not distribute, sell this pattern, or claim it as your own under any circumstances.
You may not sell my patterns or claim them as your own. You may make items to sell (i.e. on Etsy) from my patterns but I ask that you link back to my site and provide credit for the pattern. You are welcome to share my patterns on social media as long as you link back directly to my site by providing the link. No copying and pasting of any patterns will be allowed under any circumstances.