Candy Cane Lip Balm & Gift Holder
Ad-Free PDF with pictures and additional tips now available on Etsy
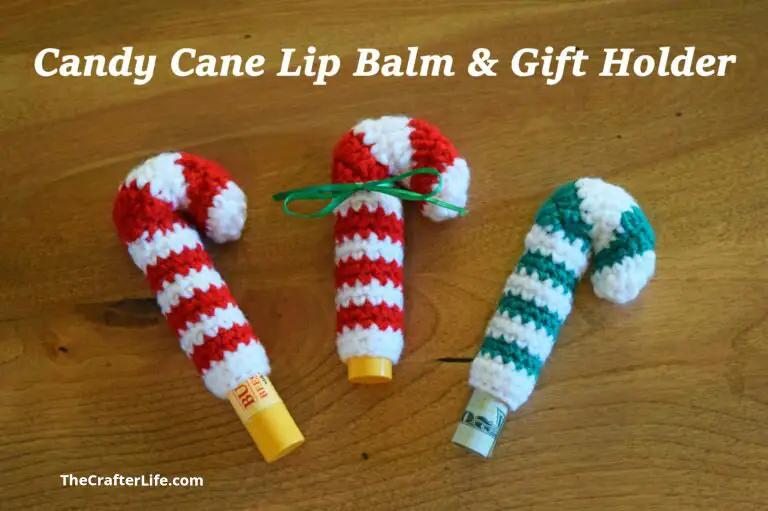
Dress up a standard lip balm stick with my festive crochet candy cane holder! It can also be used as a cheerful money gift holder. In our family, sticks of lip balm (we call it all “Chapstick”) are traditional stocking stuffers at Christmas, so this year I thought I would make them a little more fun. I’m sure these cute holders will make a stick of lip balm a lot easier to find in a purse or drawer. Little ones are sure to love these holders since they are easy to grip. If you are interested in making my candy cane lip balm/money holder, see below for the basic pattern, or purchase my ad-free, large print pattern with pictures and extra hints HERE.
Perfect stocking stuffers or money gift holders!
PATTERN
FINISHED MEASUREMENTS
The candy cane is approximately 3¾ inches tall.
MATERIALS
– Size C/2/3.00mm crochet hook or size needed to obtain gauge
– Worsted weight (4) yarn in your Main Color (MC) choice (I have previously used Red Heart Super Saver yarn in Cherry Red and Paddy Green).
– Worsted weight (4) yarn in White (I used Red Heart Super Saver yarn in White).
-Tapestry Needle for weaving in ends and closing final round.
– Scissors
– Stitch Markers (only if you need them to keep track of rounds)
– OPTIONAL: Thin ribbon to put around neck of candy cane
ABBREVIATIONS
– ch = chain
– chs = chains
– dc = double crochet
– dc2tog = double crochet 2 together (double crochet decrease)
– sc = single crochet
– sc2tog = single crochet 2 together (single crochet decrease)
– sk = skip
– slst = slip stitch
– st = stitch
– sts = stitches
– MC = Main Color
PATTERN NOTES
- The candy cane is made with joined rounds.
- The first stitch of each round is made in the very first stitch of the previous round (the same stitch as the join/slip stitch.
- Never put a stitch in a slip stitch from the previous round (always skip/do not count the slip stitches as stitches).
- The yarn of the opposite color is only carried behind the first stitch of each round (no need to carry it around the entire round).
- Weave in any loose ends as you work.
- When changing color on the stripes, join the new color while completing the last sc (single crochet) of the previous color (by pulling through the new color when you have two loops on the hook in the previous color to complete the final sc).
Ad-Free PDF with pictures and additional tips now available on Etsy
GAUGE
4 sc = 1 inches; 6 rounds = 1 inch
DIRECTIONS
Candy Cane
*The candy cane holder is made starting with the bottom open end and worked up in rounds to the closed end/tip of the cane.
Rnd 1: With white yarn, ch 12, slst to first ch to make circle, sc in first ch and in each ch around, slst to first sc. (12 sc)
Rnd 2: Sc in each st around, change color to MC (see pattern notes), slst to first st of round. (12 sc)
Rnd 3: Sc in each st around, slst to first st of round. (12 sc)
Rnd 4: Sc in each st around, change color to white, slst to first st of round. (12 sc)
Rnd 5: Sc in each st around, slst to first st of round. (12 sc)
Rnd 6: Sc in each st around, change color to MC, slst to first st of round. (12 sc)
Rnd 7: Sc in each st around, slst to first st of round. (12 sc)
Rnd 8: Sc in each st around, change color to white, slst to first st of round. (12 sc)
Rnds 9-12: Repeat Rounds 5-8.
Rnd 13: Repeat Round 5.
Ad-Free PDF with pictures and additional tips now available on Etsy
Rnd 14: Ch 2, dc in first three sts, slst to next st, sc in same st and in next 8 sts (change color back to MC to complete last sc), slst to first st of round. (3 dc, 9 sc)
Rnd 15: Ch 2, 2 dc in first three sts, slst to next st (sk slst of last round), sc in same st, sc in next st, dc2tog, dc2tog, dc2tog, slst to first st of round. (6 dc, 2 sc, 3 dc2tog)
Rnd 16: Ch 2, dc in first st, 2 dc in next st, dc in next st, 2 dc in next st, dc in next st, 2 dc in next st, slst to next st (sk slst of last round), sc2tog (make sure to start decrease in same st as slst), sc2tog, sc2tog (change color back to white as you complete sc2tog), slst to first st of round. (9 dc, 3 sc2tog)
Rnd 17: Ch 2, dc in first st, dc2tog, dc in next st, dc2tog, dc in next st, dc2tog, slst to next st (sk slst of last round), 2 sc in same st, 2 sc in next 2 sts, slst to first st of round. (3 dc, 3 dc2tog, 6 sc)
Rnd 18: Ch 2, dc in first 2 sts, dc2tog, dc in next 2 sts, slst to next st (sk slst of last round), sc2tog, sc in next st, 2 sc in next 2 sts, sc in last st (change color back to MC as you complete sc), slst to first st of round. (4 dc, 1 dc2tog, 1sc2tog, 6 sc)
Rnd 19: Ch 2, dc2tog, dc in next st, dc2tog, slst to next st (sk slst of last round), sc in same st, sc in next st, 2 sc in next st, sc in next st, 2 sc in next st, sc in next 2 sts, slst to first st of round. (2 dc2tog, 1 dc, 9 sc)
Ad-Free PDF with pictures and additional tips now available on Etsy
Rnd 20: Ch 2, dc2tog, dc2tog (make sure you sk slst from last round in decrease), slst to next st, sc2tog (make sure to start decrease in same st as slst), sc in next st, 2 sc in next 3 sts, sc in next 2 sts (change color back to white to complete last sc), slst to first st of round. (2 dc2tog, 1 sc2tog, 9 sc)
Rnd 21: Ch 2, dc in first 2 sts, slst to next st (sk slst of last round), sc in same st and in next 9 sts, slst to first st of round. (2 dc, 10 sc)
Rnd 22: Sc in first st, sc2tog, sc in next st, sc2tog, sc in next st, sc2tog, sc in next st, sc2tog, slst to first st of round, fasten off, leaving long tail for closing the opening. (4 sc, 4 sc2tog)
Closing the Circle Opening
Thread your tapestry needle with the tail you left from Round 22 and close the circle by weaving in and out of the front loops only of the stitches of Round 22. Once you have completely gone around, pull tight and weave in your tail before cutting the yarn.
Optional Ribbon
You can tie a ribbon around the top of the neck of the candy cane for an added touch.
Using The Holder
For Lip Balm:
Simply insert a standard stick of lip balm in the holder (bottom first). You can then pull the cap off and use the lip balm while it is inside the holder.
For Money:
Simply roll the dollar bill(s) and insert into the opening of the holder.

The pattern and photos of this item are the property of TheCrafterLife. This pattern and design are subject to copyright, and are for personal, non-commercial use only. You may not distribute, sell this pattern, or claim it as your own under any circumstances.
You may not sell my patterns or claim them as your own. You may make items to sell (i.e. on Etsy) from my patterns but I ask that you link back to my site and provide credit for the pattern. You are welcome to share my patterns on social media as long as you link back directly to my site by providing the link. No copying and pasting of any patterns will be allowed under any circumstances.