Striped Easter Egg
Striped Easter Egg
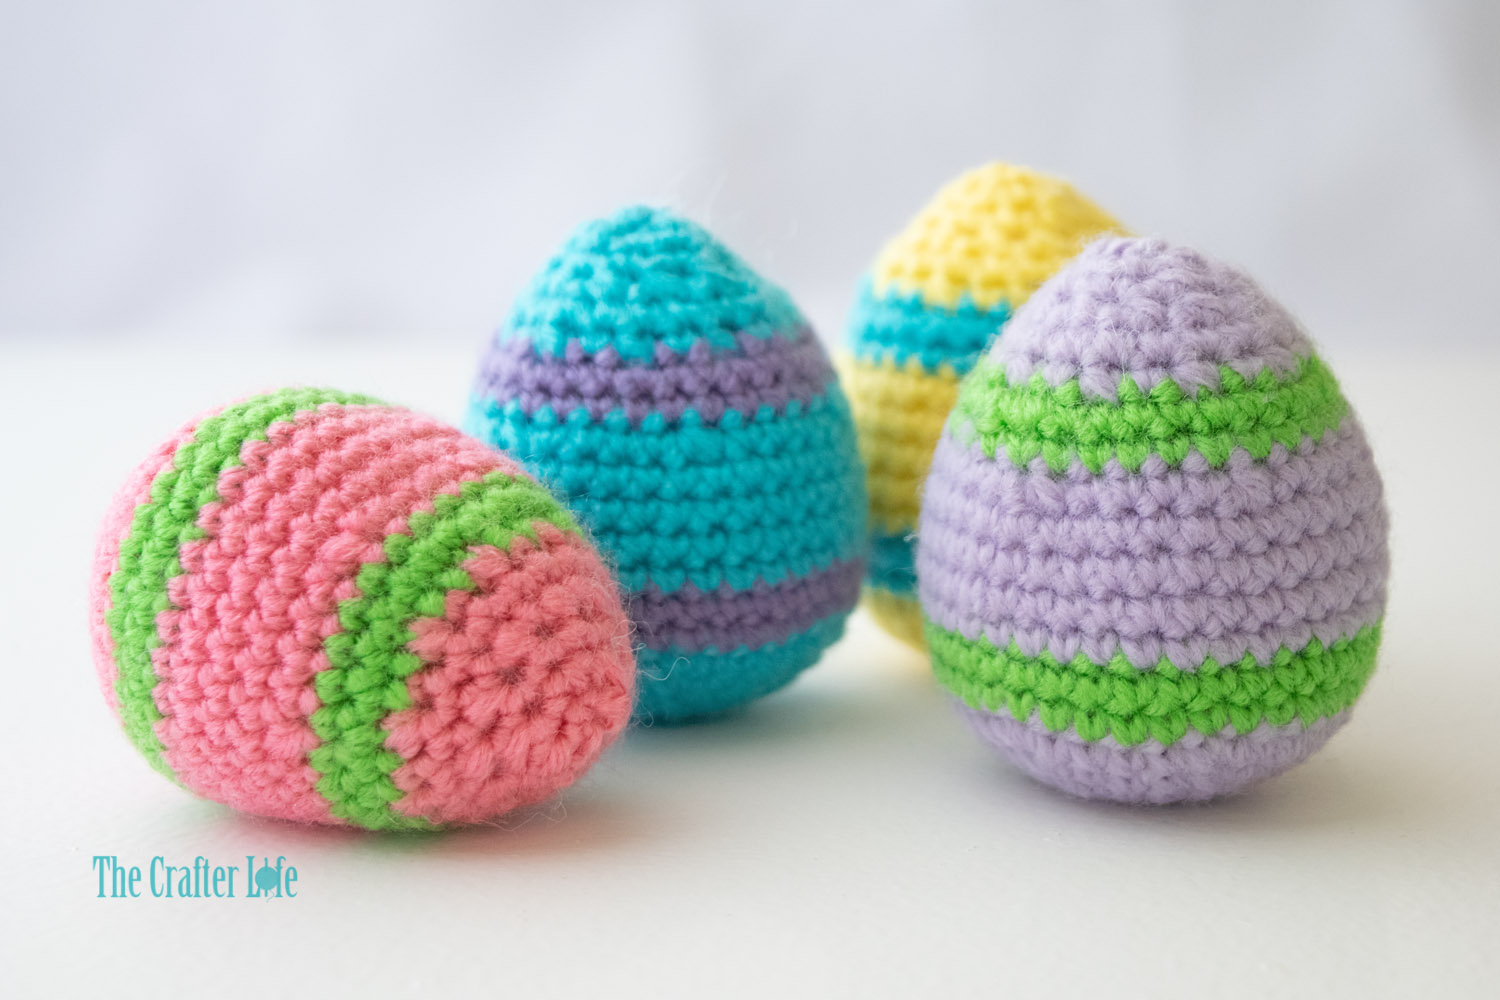
I made a striped Easter egg to go along with my baby girl’s Easter Basket Playset I’m giving her this year for the holiday. It’s a perfect sized plush for little hands to hold. It is about the size of a standard plastic egg so it would look great in any Easter display. I hope you like my pattern and decide to make a Striped Easter Egg for yourself. Have fun by making several eggs in different colors! They are quick to whip up so it shouldn’t take long to have a collection of these fun eggs!
FINISHED MEASUREMENTS
The egg is about 3 inches tall and 7 inches around at the widest point.
MATERIALS
– Size 4.00 mm crochet hook or size needed to obtain gauge
– Worsted weight (4) acrylic yarn in Main Color Choice
– Worsted weight (4) acrylic yarn in Stripe Color Choice
– Fiberfill
– Scissors
– Tapestry needle for weaving in ends
– Stitch markers
– Measuring tape
ABBREVIATIONS
– ch = chain
– chs = chains
– sc = single crochet
– sc2tog = single crochet 2 together (single crochet decrease)
– slst = slip stitch
– st = stitch
– sts = stitches
GAUGE
5 sc = 1 inch
5 rounds of sc = 1 inch
PATTERN NOTES
- The egg is made with joined rounds of single crochet stitches. Each round is completed with a slip stitch to the first stitch of the round (do not count the slip stitch used to join each round as a stitch).
- The first stitch of each round is made in the very first stitch of the previous round (the same stitch in which the join/slip stitch and ch-1 was made).
- When changing color on the stripes, join the new color while completing the last sc (single crochet) of the previous color (by pulling through the new color when you have two loops on the hook in the previous color to complete the final sc).
- The yarn is cut after each color change. When you cut the yarn after changing color, leave a long enough tail to weave in the ends as you work.
- Brackets [ ] indicate portions of the pattern to be repeated.
DIRECTIONS
Egg
*Use your 4.00 mm hook and main color worsted weight yarn to begin Round 1 of the egg.
*Make sure to pull the magic ring closed and weave in/secure end at closure at the beginning. Weave in other loose ends as your work. This is because it will be harder to do later once the egg gets larger/narrower.
Round 1: Make a magic ring, ch 1, work 6 sc in the ring, slst in first sc of round, pull ring closed. (6 sc)
Round 2: Ch 1, 2 sc in each st around, slst in first st of round. (12 sc)
Round 3: Ch 1, repeat [sc in next st, 2 sc in next st] around, slst in first st of round. (18 sc)
Round 4: Ch 1, repeat [sc in next 2 sts, 2 sc in next st] around, slst in first st of round. (24 sc)
Round 5: Ch 1, repeat [sc in next 3 sts, 2 sc in next st] around, slst in first st of round. (30 sc)
Round 6: Ch 1, repeat [sc in next 4 sts, 2 sc in next st] around, pull through stripe color yarn to complete the last sc of the round (see pattern notes), slst in first st of round. (36 sc)
HINT: If you haven’t done so already, make sure you weave in/secure the loose tail from the beginning magic ring. You should now have stripe color yarn on your hook to begin Round 7. Rounds 7 and 8 are done in the stripe color.
Round 7: Ch 1, sc in each st around, slst to first st of round. (36 sc)
Round 8: Ch 1, sc in each st around, pull through main color yarn to complete last sc of the round, slst in first st of round. (36 sc)
*You should now have main color yarn on your hook.
Rounds 9-12: Ch 1, sc in each st around, slst in first st of round. (36 sc)
Round 13: Ch 1, repeat [sc in next 4 sts, sc2tog] around, pull through stripe color yarn to complete last sc2tog (when you have three loops of main color on your hook), slst in first st of round. (24 sc, 6 sc2tog; 30 total sts)
*You should now have stripe color yarn on your hook. Rounds 14 and 15 are done in the stripe color.
Round 14: Ch 1, sc in each st around, slst in first st of round. (30 sc)
Round 15: Sc in each st around, pull through main color yarn to complete last sc of the round, slst in first st of round. (30 sc)
*You should now have main color yarn on your hook.
Round 16: Ch 1, repeat [sc in next st, sc2tog] around, slst in first st of round. (10 sc, 10 sc2tog; 20 total sts)
Round 17: Ch 1, sc in each st around, slst in first st of round. (20 sc)
***Before moving to Round 18, make sure your loose ends are secured inside the egg and use fiberfill to stuff the egg to your desired amount of fullness. It will be more difficult to stuff once the opening gets smaller. You can always add a tiny amount more of stuffing once you complete the final rounds.
Round 18: Ch 1, repeat [sc2tog] around, slst in first st of round. (10 sc2tog)
Round 19: Ch 1, repeat [sc in next 3 sts, sc2tog] around, slst in first st of round. (6sc, 2 sc2tog; 8 total sts)
*Make sure to have all your fiberfill stuffing in the egg at this point. It will be difficult to stuff after the next round since the opening will be so small.
Round 20: Ch 1, repeat [sc in next 2 sts, sc2tog] around, slst in first st of round, fasten off, leaving long tail for closing top opening. (4 sc, 2 sc2tog; 6 total sts)
Close the opening: Use your tapestry needle and the long tail you left at the end of Round 20 to weave the tail through the front loops of each consecutive stitch from Round 20, making sure to take the needle in the direction from the inside of the opening to the the outside. Once you have woven the thread through the front loop of each stitch, pull the thread (but not extremely tight) so that the top opening of the egg closes. Next, take your needle and thread through the middle of the closed opening and bring it out somewhere else on the body of the egg. Pull the thread so that the top bulge at the closed opening disappears. Then take the needle and thread back inside the egg one stitch from where you came out and bring it back out at a different place on the egg. Continue this a few times until you feel the yarn is secure and then cut the yarn as close to the egg as possible and push any remaining tail on the outside of the egg to the inside so it isn’t visible.
***Your striped Easter egg is finished! Have fun using it in your Easter displays!

The pattern and photos of this item are the property of TheCrafterLife. This pattern and design are subject to copyright, and are for personal, non-commercial use only. You may not distribute, sell this pattern, or claim it as your own under any circumstances.
You may not sell my patterns or claim them as your own. You may make items to sell (i.e. on Etsy) from my patterns but I ask that you link back to my site and provide credit for the pattern. You are welcome to share my patterns on social media as long as you link back directly to my site by providing the link. No copying and pasting of any patterns will be allowed under any circumstances.

Spring Basket