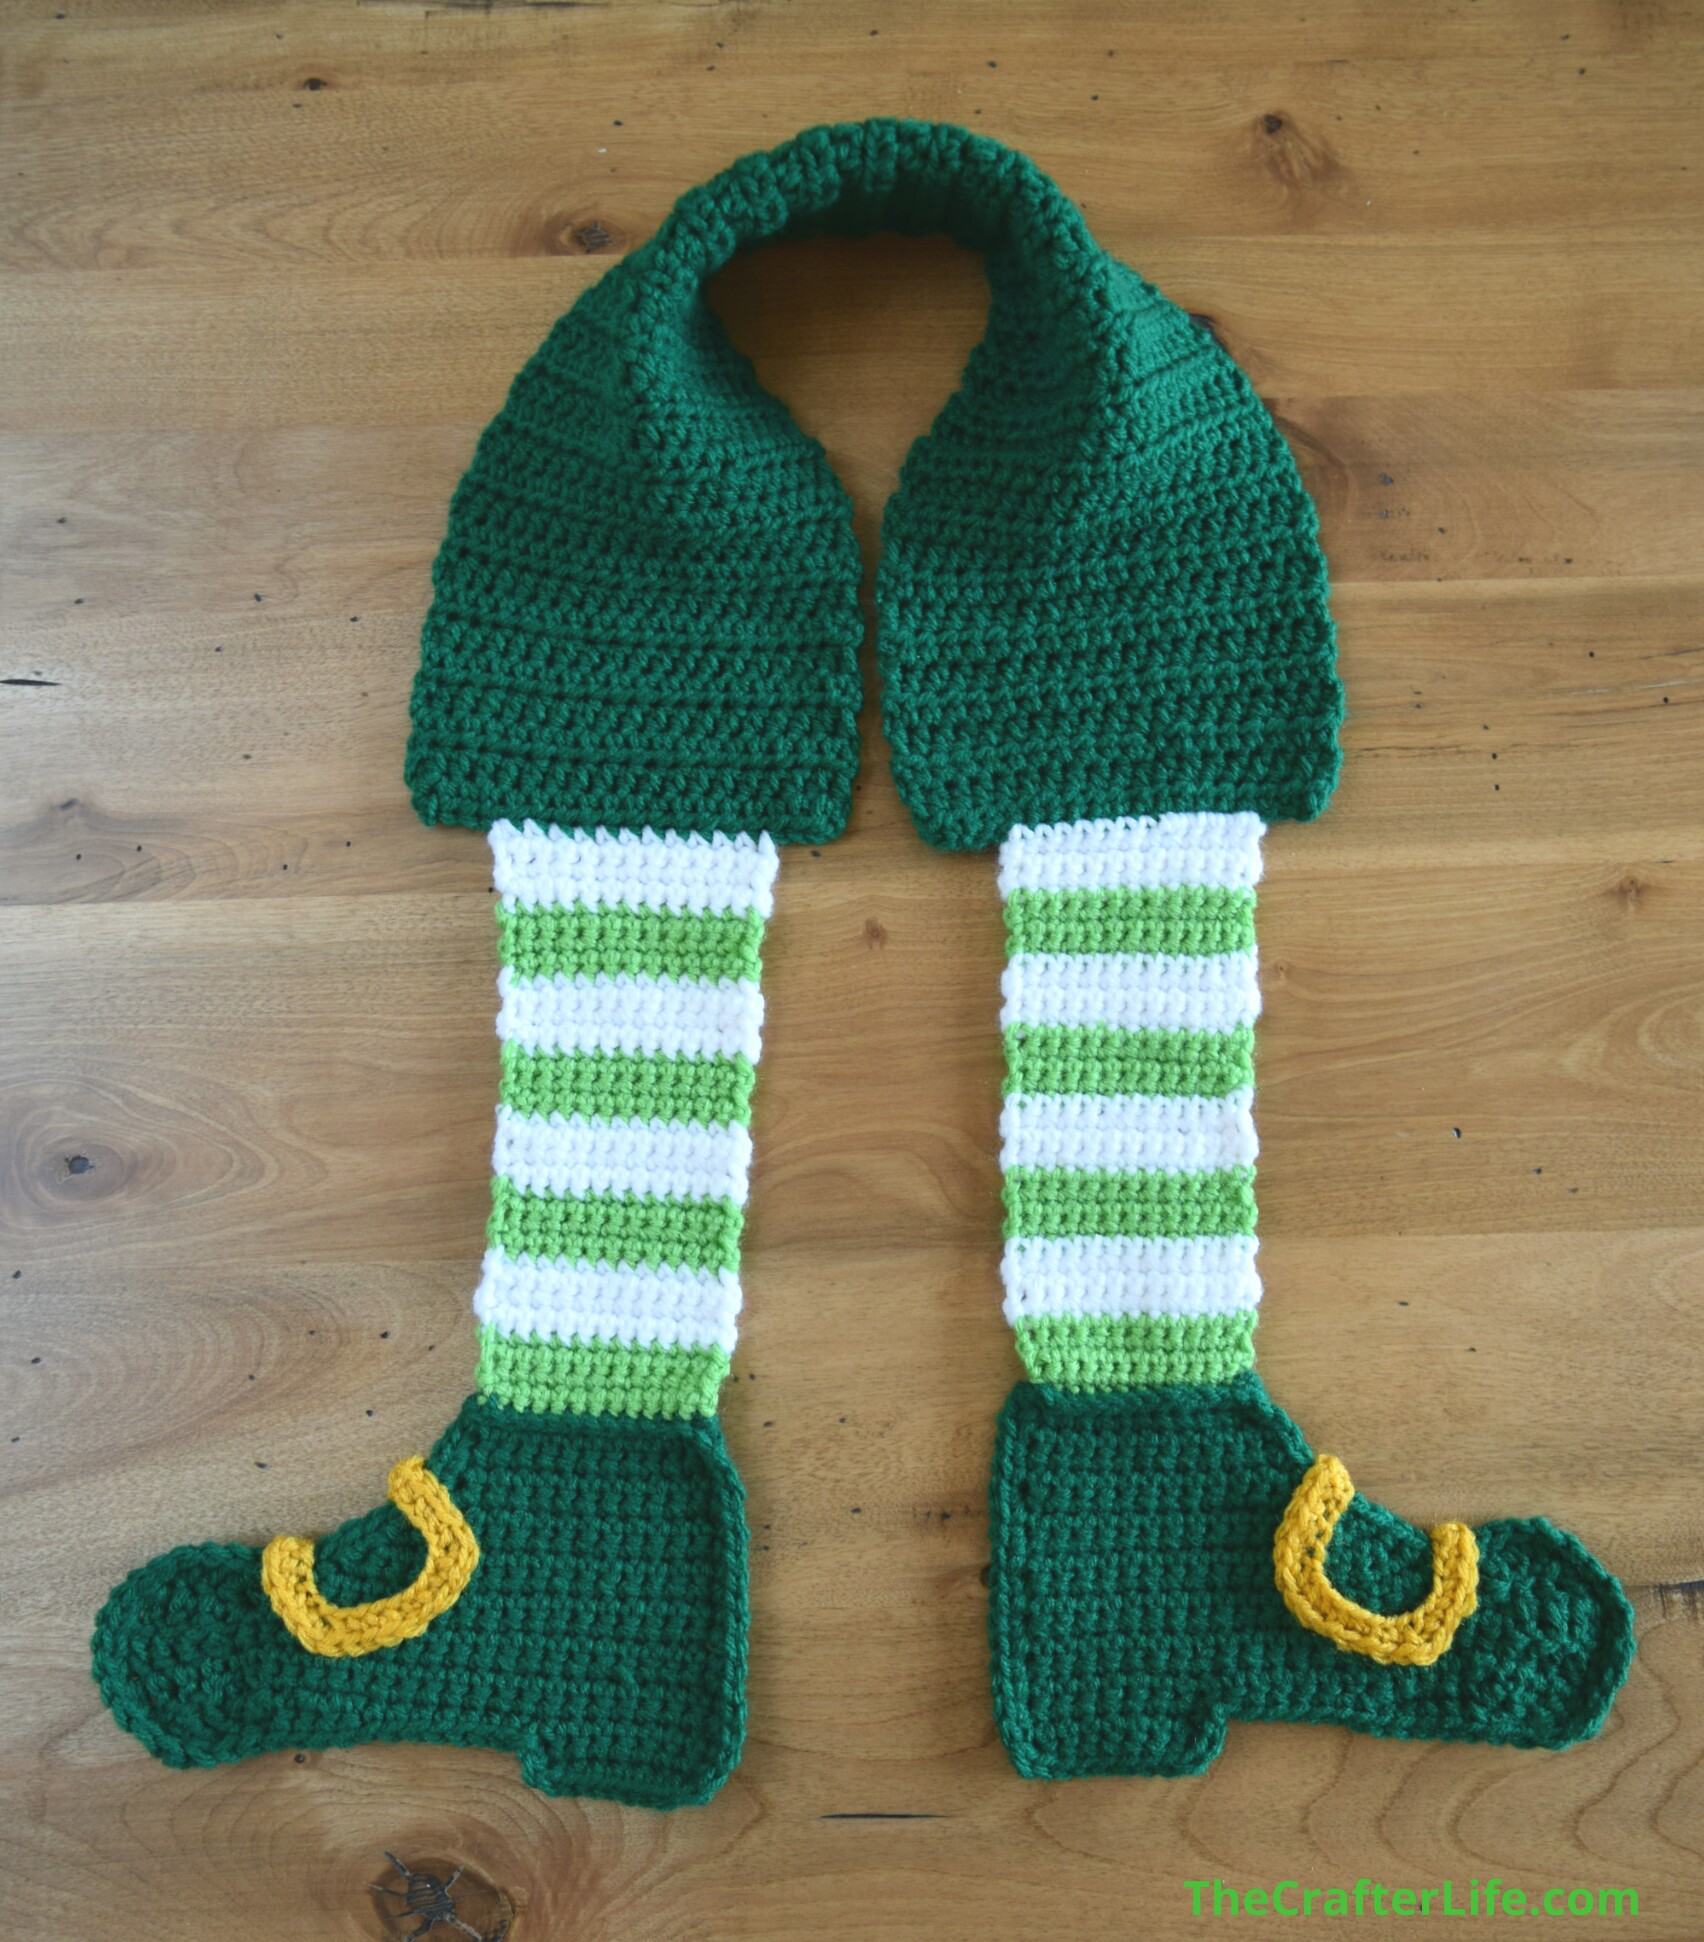
Leprechaun Legs Scarf
I have been meaning to make a Leprechaun Legs scarf for St. Patrick’s Day to go along with my other holiday “leg scarves” and I finally got the chance to churn one out. It works up pretty quickly so if you are in need of a last-minute St. Patrick’s Day crochet project, this is it! I would love to see how they look in different color combinations. See below for the pattern. I also have a PDF version available on Etsy that is ad-free, and includes several pictures and hints/tips.
Ad-Free, large-print PDF with detailed pattern instructions that includes pictures and additional tips now available on Etsy
Leprechaun Legs Scarf
This scarf pattern is written for an adult-size scarf meant to fit most adults (and older children/teens). The length can be adjusted by adding or subtracting rows to/from the dark green (pants) section of the scarf.
FINISHED MEASUREMENTS
Dark Green (Pants) Section: 5¼ inches wide x 20 inches long
Striped Section: 3 inches wide x 7 inches long
Shoes: 7¼ inches wide at the widest part (from heel side to toe) x 4 inches tall (from top of shoe to bottom of heel)
Total Scarf Measurements: Approximately 5¼ inches wide (dark green pants section) x 42 inches long (from bottom of shoe heel to bottom of opposite shoe heel)
Ad-Free, large-print PDF with detailed pattern instructions that includes pictures and additional tips now available on Etsy
MATERIALS
– Size H/8/5.00mm crochet hook or size needed to obtain gauge
– Worsted weight (4) yarn in Dark Green (I used Red Heart Super Saver yarn in Paddy Green.)
– Worsted weight (4) yarn in White (I used Red Heart Super Saver yarn in Whitey White.)
– Worsted weight (4) yarn in Lighter Green (I used Red Heart Super Saver yarn in Spring Green.)
– Worsted weight (4) yarn in Gold (I used Red Heart Super Saver yarn in Gold.)
– Scissors
– Tapestry needle for weaving in ends/sewing cuff and buckle to shoe
– Stitch markers
– Measuring tape
ABBREVIATIONS
– ch = chain
– chs = chains
– dc = double crochet
– dc2tog = double crochet 2 together (double crochet decrease)
– hdc = half double crochet
– sc = single crochet
– sc2tog = single crochet 2 together (single crochet decrease)
– slst = slip stitch
– sp = space
– st = stitch
– sts = stitches
GAUGE
Dark Green (Pants) Section: 7 hdc = 2 inches; 8 rows = 3 inches
Leg/Shoe Section: 4 sc = 1 inch; 4 rows = 1 inch
PATTERN NOTES
- The dark green (leprechaun pants) section of the scarf is made first in rows of hdc (half double crochet). Leave the green tail from your beginning slip knot and the tail from fastening off at the end hang loose so you can use them as reference points when attaching the shoes.
- The yarn is cut after each color change for the striped (leg) section of the scarf. When you cut the yarn after changing color, leave a long enough tail to weave in the ends as you work.
- You can lengthen or shorten the scarf as needed by adding or deleting rows from the darker green (pants) section and/or the striped (leg) sections. Make sure to have an odd number of rows for the darker green (pants) section.
- The first stitch of each row/round is always done in the same stitch as the turning chain unless otherwise stated (the turning chain does not count as a stitch).
DIRECTIONS
Dark Green Body of Scarf (Middle Pants Section)
Leave the very first end/tail from the beginning of your starting chain loose (don’t weave it in) so you can use it as a reference point when attaching the legs of the scarf. It would also help to mark the 4th chain made in the starting chain with a stitch marker, because you will be attaching your second leg to that chain.
Row 1: With your dark green worsted weight yarn, ch 20, hdc in 3rd ch from hook, hdc in each ch across.
Rows 2–53: Ch 2, turn, hdc in each st across; at the end of Row 53, fasten off and leave end hang loose for reference (wait to weave in ends).
*You now have the middle section of the scarf complete. You can always add or delete rows if you need it to be longer or shorter. Make sure to have an odd number of rows (add or delete rows 2 at a time) so your shoes will point the right way when following the directions below for attaching the legs.
First Leg
Turn your work as you would for a new row (as if you were making Row 54) and attach your white yarn to the 4th stitch over from the tail/end of yarn you let hang loose for reference at the end of Row 53. Your loose end from Row 53 should be on the right and your white yarn should be attached to the 15th hdc made in Row 53. We will pick up from here to start the first leg of the scarf. The next row will be called “Row 1” since it starts the top of the leg.
Ad-Free, large-print PDF with detailed pattern instructions that includes pictures and additional tips now available on Etsy
Row 1: Ch 1, sc in same st and in next 11 sts across.
Row 2: Ch 1, turn, sc in each sc across.
Rows 3–32: Repeat Row 2. Change color (alternating from white to light green) after every 4 rows. At the end of Row 32, join dark green yarn (same color used for pants section) to begin Row 33, which starts the first shoe.
Row 37: Ch 1, turn, 2 sc in first st, sc in remaining sts across.
Row 38: Ch 1, turn, sc in each st across to 2nd-to-last st, 2 sc in last st.
Row 39: Repeat Row 37.
Row 40: Repeat Row 38.
Row 41: Repeat Row 37.
Row 42: Repeat Row 38.
Row 43: Ch 7, dc in 3rd ch from hook, dc in next 2 chs, sc in next 2 chs, sc in each st across (each st from Row 42).
Row 44: Ch 1, turn, sc in each st across to 5th-from-last st, 2 sc in next st, dc in next 2 sts, 2 dc in last st.
Row 45: Ch 2, turn, dc in next 4 sts, sc in remaining sts across.
Row 46: Ch 1, turn, sc in each st across to 5th-from-last st, dc in remaining 4 sts.
**Rows 48 and 49 form the heel of the shoe.**
Row 48: Ch 1, turn, sc in next 8 sts. (8 sc)
Row 49: Ch 1, turn, sc in next 8 sts, fasten off and weave in loose end. (8 sc)
**In order to flatten the bottom of the shoe at the toe area, there is a second part to Row 48. Turn your work so the heel of the shoe is on the right. Attach your dark green yarn to the 9th st of Row 47 (this stitch is the 7th stitch over from the heel of the shoe).
Row 48 (Part 2): Ch 1, sc in same st and in next 3 sts, sc2tog, slst to next st, fasten off, weave in loose ends.
Shoe Finishing/Edging (First Shoe)
*In order to finish the shoe, you will need to sc evenly around its perimeter.
Use your 5.00 mm hook to attach your dark green yarn to the top corner of the shoe on the toe side. Begin to sc evenly around the outside of the shoe until you reach the other top corner of the shoe on the heel side. Slst to the 8th st over from heel-side of Row 47 (where heel meets bottom of shoe) and place 2 sc in corners of heel as you work.
Once you reach the other top corner of the shoe on the heel side, do not fasten off. Leave your yarn on your hook and continue following the directions below to create the cuff of the shoe.
Ad-Free, large-print PDF with detailed pattern instructions that includes pictures and additional tips now available on Etsy
Cuff of First Shoe
Ch 12 and join the end of the chain to the other corner at the top of the shoe (the toe-side corner) with a slst. Leave your yarn on your hook so you can now create the cuff on the opposite side of the shoe. Ch 12, turn the shoe over, and join the end of the chain to the top corner of the shoe on the heel-side with a slst. Fasten off, but leave a long tail for sewing the chains on each side down to the top of the shoe.
Sewing the Cuff Down on Each Side
Using your tapestry needle and the long tail you left, sew the chains that will form the cuff of the shoe to the stitches in Row 33 of the top of the shoe on one side. Insert your thread under the back ridge of each chain to sew to the corresponding stitch of Row 33 of the shoe. Once you have sewn each chain down, use your needle to bring the yarn through to the other side of the shoe and do the same thing to the chains on that side. Weave in the end of the yarn and tie off when finished.
Second Leg
We will be following the same pattern for the second leg as we did for the first leg. The second leg will be attached to the chain stitches of Row 1 of the dark green (pants) section of your scarf. You first need to figure out where/which side to attach your white yarn to begin the first stripe of the leg. Whichever side you attach your yarn to start the leg is the side the toe of your shoe will point.
Below are instructions on how to figure out where to attach your yarn so the second shoe ends up pointing the correct way when you wear it.
You should have left your dark green tail of yarn hang loose from your original slip knot at the very beginning of the scarf pattern for Row 1. Hold your work so the tail (or the 1st chain made in the pattern) is on your right. You will attach your white yarn to the 4th chain over from that side. You may have already marked this chain with a stitch marker to make it easier to identify. This is actually the 4th chain made in Row 1 of the scarf pattern.
Ad-Free, large-print PDF with detailed pattern instructions that includes pictures and additional tips now available on Etsy
After you have attached your white yarn to the 4th chain of Row 1 of the dark green pants section (your loose end from the beginning slip knot should be on the right), follow the pattern for the first leg to make the second leg. Row 1 of the second leg will be worked across the chain stitches of the dark green (pants) section of the scarf. Once you finish the last row of the second shoe and have fastened off your yarn, follow the directions below to finish/edge the shoe.
Shoe Finishing/Edging (Second Shoe)
You will sc evenly around the outside of the shoe in the opposite direction than you did from the first shoe. Start (attach your yarn) at the heel side top corner and sc evenly around to the toe-side top corner. Leave your yarn on your hook so you can create the cuff of the shoe as you did for the first shoe.
Cuff of Second Shoe
Ch 12 and join the end of the chain to the other corner at the top of the shoe (the heel-side corner) with a slst. Leave your yarn on your hook so you can now create the cuff on the opposite side of the shoe. Ch 12, turn the shoe over, and join the end of the chain to the top corner of the shoe on the toe-side with a slst. Fasten off, but leave a long tail for sewing the chains on each side down to the top of the shoe.
Sew the cuff down on both sides as you did for the first shoe.
*You should now have both legs and shoes completed on your scarf. The last thing left is to make and attach the two shoe buckles.
Gold Shoe Buckle (Make 2)
With your gold yarn, Ch 36, join to first ch with a slst to form ring.
Round 1: Ch 1, 2 sc in first ch, sc in next 9 chs, 2 sc in next ch, sc in next 7 chs, 2 sc in next ch, sc in next 9 chs, 2 sc in next ch, sc in last 7 chs, join to first sc with slst, fasten off, leaving a long tail for sewing onto the shoe.
Ad-Free, large-print PDF with detailed pattern instructions that includes pictures and additional tips now available on Etsy
Attaching the Buckle (Repeat for both shoes)
Fold the “buckle” in half and position it over the front of your shoe between Round 36 and Round 43 in the shape you desire. The corners of the buckle should be the 1st, 11th, 19th, and 29th chains of the starting chain (the chains in which you placed 2 sc stitches in Round 1). You may want to use pins to hold it in place before you sew it to the shoe. Use a tapestry needle to sew the buckle in place by sewing through both sides of the shoe and corresponding stitches on both sides of the buckle at once.
Once you have attached a buckle to each shoe, weave in/secure all remaining loose ends, and your scarf is finished and ready to wear!


The pattern and photos of this item are the property of TheCrafterLife. This pattern and design are subject to copyright, and are for personal, non-commercial use only. You may not distribute, sell this pattern, or claim it as your own under any circumstances.
You may not sell my patterns or claim them as your own. You may make items to sell (i.e. on Etsy) from my patterns but I ask that you link back to my site and provide credit for the pattern. You are welcome to share my patterns on social media as long as you link back directly to my site by providing the link. No copying and pasting of any patterns will be allowed under any circumstances.

Lucky Green Moss Stitch Scarf